 Email article
 Don’t have a smartphone or tablet? Want to see what all the buzz surrounding Android is? With this guide, you’ll learn how to install Android on your Windows, Mac, or Linux computer using Android-x86, an open source Android port for use on computers. Within no time you’ll be running one of the most popular mobile operating systems on your PC!
BEFORE WE BEGIN
To spare you the pain of losing any data, this guide will cover installation of Android-x86 on your computer via virtual machine (VirtualBox). If you feel brave enough to install Android on physical hardware (aka not on a physical machine), feel free to do so — Android-x86 allows you to do that.
Because this guide utilizes VirtualBox to virtually install Android, this guide works for any operating system that VirtualBox supports. That includes Windows XP, Vista, Windows 7, Windows 8, Mac OS X, and Linux. In other words, you can use the steps described in this guide to install Android on Windows XP, Vista, Windows 7, Windows 8, Mac OS X, and Linux.
That being said, Android-x86 comes with Google Play Store, so you can download, install, and use Android apps just like you would on an Android smartphone or tablet. However, take note that Android-x86, when installed, will have some app incompatibilities. It can run most Android apps with no problem, but because it is running on an x86 CPU and not on an ARM CPU (which is what most all Android smartphones and tablets use), you are bound to run into some apps that you simply cannot install from Play Store. You can, of course, manually sideload APKs if you want, but that is not recommended because of malware concerns. Plus, if you can’t install the app via Play Store it probably means it won’t be stable on Android-x86, so you shouldn’t install it anyway.
Also, some apps will change your screen orientation and if you do not have a touchscreen device with a sensor that tells Android what way to keep the screen, you will need to figure out how to change it back to landscape manually. Or turn your monitor.
Finally, there are several versions of Android-x86. This guide will be covering Android 4.2, but the steps to install Android on your Windows, Linux, or Mac computer will work with any version of Android-x86
HOW TO INSTALL ANDROID ON YOUR WINDOWS, MAC, OR LINUX COMPUTER USING VIRTUALBOX
To install Android on your Windows, Mac, or Linux computer, do the following:
- The first thing you need to do is download Android-x86 from this link (that is Android 4.2 version) and save it to your ‘Documents’ folder (or any other location that you want — it doesn’t really matter).
- Now you need to download VirtualBox and get it running on your computer with the Android virtual machine. VirtualBox runs on Windows, Linux, and Mac so this will work on any of these operating systems. You can grab VirtualBox for your particular operating system from this link. (Note to Linux users: VirtualBox is most likely in your software repositories.)
- Once VirtualBox is installed and opened, go to the top left corner and press ‘New‘. You will be prompted to type in the name of the operating system you are trying to virtualize. Type in ‘Android-x86’ in the name field. Under type select ‘Linux‘. Under version select ‘Other Linux‘.
- After entering the name, type and version, a screen will pop up prompting you to enter the amount of ram the virtual machine should be given. Enter 512 in the memory size box. The window will tell you 256 is the recommended memory size, disregard it.
- A window titled Hard Drive will appear after you finish allocating the ram that the virtual machine will use. Select the option that says ‘create a virtual hard drive now‘. After selecting ‘create a virtual hard drive now‘, a window will open and ask you which file type you want to select for your virtual hard drive. Make sure the option VDI (VirtualBox Disk Image) is selected, then press the next button on the bottom right of the window.
- After selecting the file type for the virtual hard drive, a window will open titled ‘Storage on physical hard drive‘. Select the option that says ‘Dynamically allocated‘. After selecting ‘Dynamically allocated‘, press the next button on the bottom right of the window. After selecting the options for ‘Storage on physical hard drive‘, a window will open that says ‘File location and size‘. This will determine how big your virtual hard drive will be. The default option is 8.0 Gigabytes. Make sure that it is set to 8.0 Gigabytes and press the ‘create‘ button on the bottom right of the window.
- After going through all of the setup options of the virtual machine, the setup wizard will finally finish, and you’ll be back to the same VirtualBox window that you had open when you first installed it. On the left side of the window, there should be a list of virtual machines. Select ‘Android-x86‘, right click on it, and select Start.
- Once the Android virtual machine is started up, the window will ask you to provide an installation disk. The default option is your physical drive. Select the folder icon on the right next to the drop-down box that says ‘Host Drive’, navigate to where you saved the Android-x86 file you downloaded earlier (e.g. your ‘Documents’ folder), select the ‘android-x86-4.2-20130228.iso‘ file and then select the Start button.
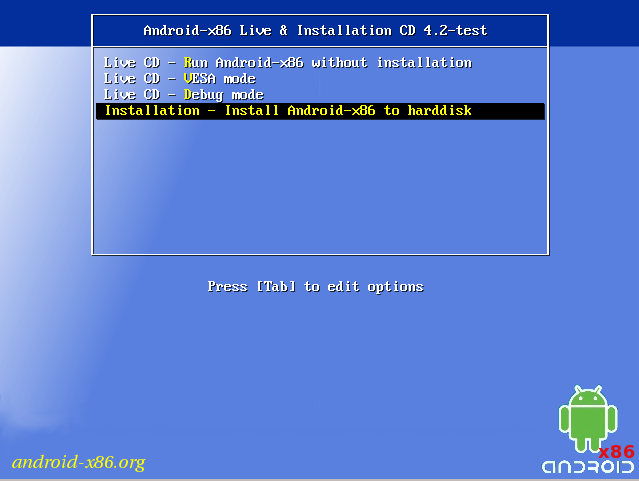
- After providing ‘android-x86-4.2-20130228.iso‘ file to the virtual machine, the installation of Android-x86 will begin. When this window appears, using the arrow keys, go all the way down to ‘Installation‘ and press the Enter key on your keyboard.
- After selecting the Installation option on the screen, you’ll be brought to a blue window with two options. Select the option ‘Create/Modify Partitions‘. After selecting ‘Create/Modify Partitions’ you’ll be brought to a window that looks like the image below.
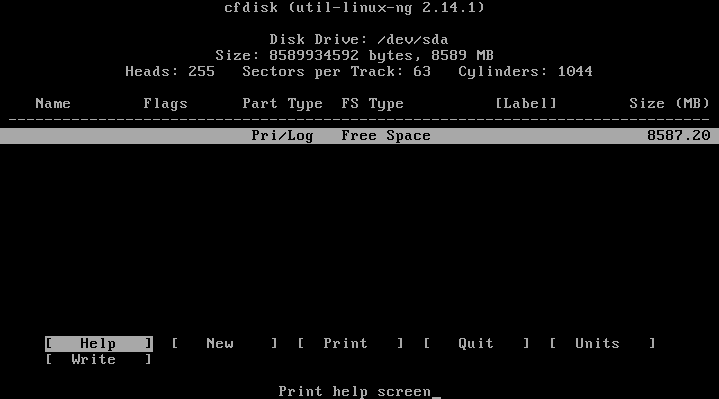
- When the Cfdisk window (shown above) comes up, using the arrow keys, select the ‘New‘ option and press enter. An option to select which partition you want to create will come up. Select Primary. Once you’ve selected Primary as the partition type, it will ask you how big you want to make the partition. The install works by detecting how big your drive is and then assumes you want to use the entire disk. Be sure that it says 8587.19 MB and press the enter key.
- Once you press enter, you’ll be taken directly back to the main Cfdisk menu. Highlight your partition and select the Bootable option that has just appeared.. Once you’ve done that, again using the arrow keys to navigate, go to the Write option and press enter. Cfdisk will prompt you to type yes and press enter to be sure you want to go through with the changes. This will write all the changes we’ve made to the disk. After writing all the changes to the disk, press Quit in Cfdisk.
- When you have exited Cfdisk, you should see something that looks exactly like the image below.

- Select ‘sda1 Linux ‘VBOX HARDDISK‘ and press Enter on your keyboard. Android x86 will start to install.
- After selecting ‘sda1 Linux ‘VBOX HARDDISK‘, a new window asking if you want to format will come up. Select ext3, then press Enter on your keyboard and your virtual hard disk will then be formatted to extended3.
- After you’ve formatted, the installer will ask you if you want to install the GRUB bootloader. It is very important that you press Yes and not skip it. Grub will give you access to a debug mode that can be very handy if Android acts up. Select yes to confirm that you want to install GRUB.
- After being prompted to install GRUB, the installer will also ask you if you want to install the /system directory as read-write. Doing this makes it easier to debug it. Select the Yes option.
- After selecting the options to install GRUB and allowing the /system directory to be set as read-write, Android-x86 will quickly install, and then finally ask you if you wish to run Android-x86. Before you do so, dismount the iso image from the virtual machine’s drive. You can do this by going to the bottom right-hand of the VirtualBox window, right-clicking on the cd icon and un-ticking the box that says ‘android-x86-4.2-20130228.iso‘. The .iso file for Android 4.2 will then be dismounted. If the Virtual Machine refuses to dismount the .iso, a window will pop up and ask you if you want to ‘Force Unmount’ the .iso. Select the option to force unmount the .iso file.
- After dismounting the .iso file, go to the top-left of the virtual machine window, select the Machine drop-down menu item, and then select the ‘Reset‘ option. This will manually reset the Android-x86 virtual machine. Once it is reset, Grub will appear for a brief moment, after which you will see the ANDROID logo/loading animation and you will be in Android.
- After the long and monotonous setup, the last thing we need to do is to set-up Android — but before we do that, you will need to disable mouse integration. Do this by going to the bottom right of the VirtualBox window, right clicking on the mouse icon and ticking the box that says ‘disable mouse integration‘. Because mouse integration is disabled, you will need to press right-ctrl on your keyboard to when you want to exit your mouse from the virtual machine and back into your regular computer.
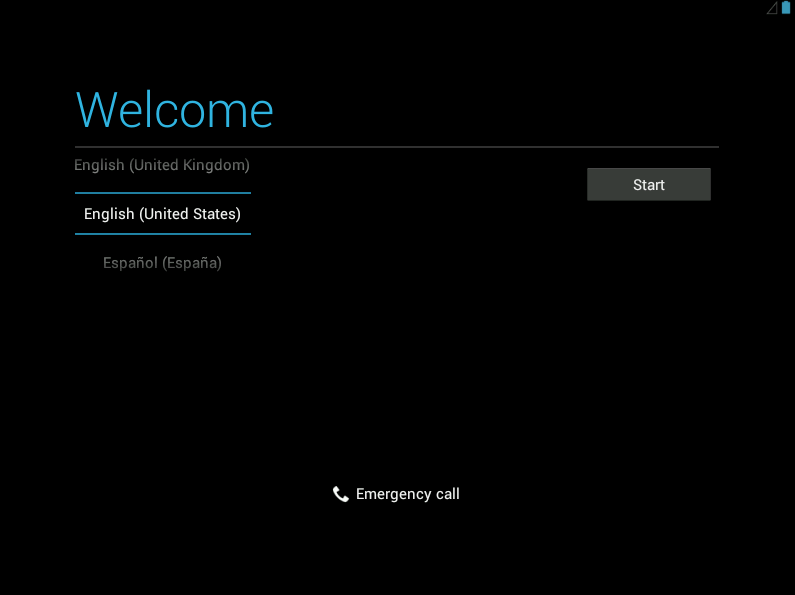
- Once in Android, you’ll see the ‘Welcome Screen’. This involves basic Android setup and logging into your Google account. Google makes it pretty easy to understand, so it’s not worth outlining it here — just follow on-screen instructions. Just make sure when Android asks you to connect to your Wifi press ‘skip‘ because the internet connection from your actual computer is being shared to the virtual machine via NAT so there’s no need to set up any sort of connection for it to work.
Done!
CONCLUSION
Android is an interesting and versatile operating system, sadly some people do not have the opportunity to try it out for themselves. With this guide, you’ve learned how you can install Android inside a virtual machine on Windows, Linux, and Mac OS X so that you can check it out firsthand, and if you’re brave enough, you can even take this knowledge and install it onto physical hardware. The possibilities are endless! Enjoy!


