 Email article
The Moto X by Motorola is one of the first non-Nexus devices to get upgraded to Android 4.4 KitKat, the latest iteration of Google’s Android OS. Users who may have rooted the device on an earlier version may have realized after accepting the 4.4 update that they have lost root access. If you happen to be one those unfortunate souls, here’s a detailed guide which will help you root your Moto X on Android 4.4 in no time. The guide works for all versions of the Moto X which come with an unlocked or user-unlockable bootloader, read – will not work for the standard Verizon Moto X, AT&T, Republic Wireless variants (but will work with the Developer Editions). Read on to know how.
Disclaimer: This guide is intended as a helpful how to. dotTech and its writers are not responsible for any gain or loss (including but not limited to bricked devices) incurred as a result of following this guide. Root your device at your own risk. Rooting may void your warranty. Unlock bootloader at your own risk. Unlocking the bootloader may void your warranty. Proceed further at your own risk.
Requirements
This root guide is for the Motorola Moto X Standard edition, or Developer Edition, running Android 4.4. It may or may not work with the Moto X running other versions of Android. The process involves unlocking your bootloader, hence will only work with Moto X variants which come with an unlocked bootloader or user-unlockable bootloader. Bootloader unlocking will wipe your phone clean. So please take a backup of all the important data and media on your device before you proceed.
Before We Begin
Download the Following files to your PC and save them to your desktop. Extract the Modified TWRP Recovery zip file. Leave the Superuser zip as it is.
- Motorola Device Drivers
- Moto X Modified TWRP Recovery (Includes Fastboot files)
- Superuser ZIP package
How To Root Motorola Moto X on Android 4.4 KitKat
Unlock the Bootloader
- Make sure you have installed the Motorola USB drivers on your PC, before you proceed further
- On your Moto X, go to Settings > Developer Options and enable USB Debugging. (If you do not see Developer Options, simply go to Settings > About Device and tap the Build Number field 7 times)
- To be able to flash a custom recovery like TWRP, you need to first unlock the device boot loader. Fortunately, most variants of the Moto X are supported by Motorola’s official boot loader unlock program. Click on the link below to pick your Moto X based on which version you are using.
Motorola Official Bootloader Unlock Page
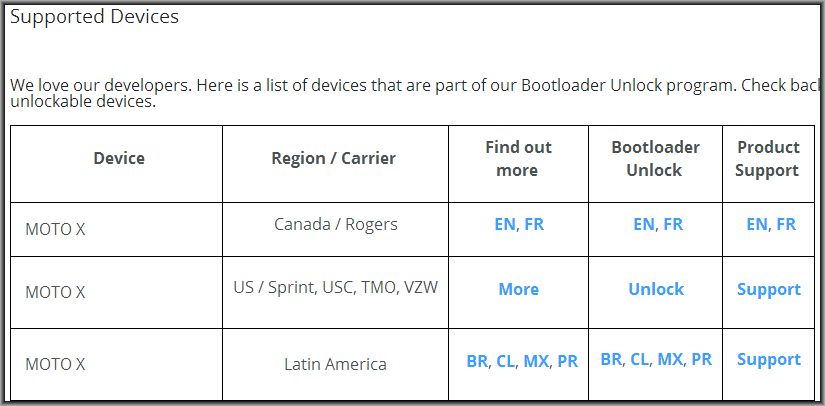
- You will now be routed to the official bootloader unlocking page for your specific variant of the Moto X. The process by itself is pretty self-explanatory and all you need to do is follow the steps mentioned there. Wherever you need to use a fastboot command, you can do it through the fastboot files that came included with the Modified Moto X TWRP recovery folder you downloaded earlier.
Once you have unlocked the bootloader, your device will reboot. Once it has rebooted fully, repeat Step 2 of this guide to make sure that USB debugging is enabled. Also, don’t bother setting up your Google account at this point, we can always do it later.
Install TWRP Recovery on the Moto X
- Reboot your Moto X into Fastboot mode. To do thisFirst Power down the phone completely. Then Press and hold down the Volume – and Power buttons together. Once the device begins to come on, release the power button but keep holding down the Volume – button until you see Fastboot Mode.
- Now connect your Moto X to the PC via USB cable
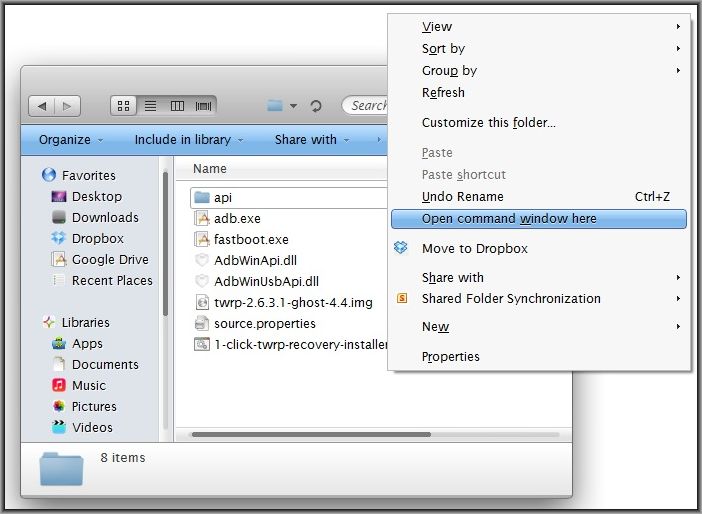
- Time to flash the TWRP custom recovery. Open the Moto X modified TWRP recovery v2.6.3.1 folder you extracted to your desktop earlier.
- Use Shift + Right Click on an empty white space in the folder, and select Open Command Window Here from the right-click menu
- At the prompt type in the following command to flash the TWRP recovery image on your Moto X, and hit Enter on the keyboard

- Once done, type in the following command to reboot your device

- That’s it. We now have the TWRP custom recovery installed on the Moto X. Time to root the device now.
Root The Motorola Moto X
- Connect the device to the PC via USB cable, and transfer the UPDATE-SuperSU-v1.93.zip file that you downloaded earlier, to the phone memory
- Power off the phone and reboot to TWRP recovery. To do that, First reboot to Fastboot mode using the steps mentioned in Part 2 of this guide. In Fastboot mode, use the Volume – key to highlight Recovery, and Volume + key to select it
- Your phone will now boot into TWRP recovery
- Tap the Install tile in TWRP. You should now see the a bunch of folders and files, which are the contents of your phone memory
- Locate the UPDATE-SuperSU-v1.93.zip file you copied over in Step 1 and select it by tapping on it.
- Confirm the flash on the next screen by sliding the blue circle
- Wait for TWRP to flash the file
- Once done, tap Reboot System to reboot your device and return to Android
That’s it. Your Moto X running Android 4.4 Kit Kat is now rooted along with a custom recovery installed, and you are all set to explore the world of root apps, or try out various custom ROMs on your device. Cheers!!


