 Email article
 Following up on the grand success of the original Galaxy Grand from early 2013, Samsung released the Galaxy Grand 2 which featured updated hardware specs for an affordable price. Specs include a 1.2 GHz quad core processor with 1.5 GB of RAM, 5.25 inch 720pHD display, 8 GB internal storage expandable to 64GB via misroSD card, and an 8 MP rear camera along with a 1.9 MP front facing camera, and Android 4.3 Jelly bean. If you happen to have gotten yourself a Galaxy Grand 2 and are looking to root it, here’s a step by step guide which will help you through the entire process.
Disclaimer: This guide is intended as a helpful how to. dotTech and its writers are not responsible for any gain or loss (including but not limited to bricked devices) incurred as a result of following this guide. Root your device at your own risk. Rooting may void your warranty.
Requirements
This guide is intended for the Samsung Galaxy Grand 2, model number SM-G7102, running Android 4.3 Jelly Bean. You can check your phone model number by going to Settings > About Device on your phone, or by checking the labels on the packaging box.
Before We Begin
A few things to download and be ready with before you go ahead and root your device:
- Samsung USB Drivers – Download and install on your computer
- ODIN 3.09 – Download and extract xip file to your desktop
- Android 4.3 XXUANA2 Pre-Rooted Firmware – Download and extract to your desktop
- Back up all your important data and media on the phone before you proceed
How To Root Samsung Galaxy Grand 2 SM-G7102
- Download and install the Samsung USB drivers on your PC
- Download and extract the Odin 3.09 zip to your desktop
- Download and extract the prerooted XXUANA2 firmware file to your desktop
- Switch off your phone and reboot to Download Mode. To do this, press and hold down Volume Down + Home + Power buttons simultaneously. When you see a warning screen, release all the buttons. Then Press Volume Up to enter Download mode
- Open the Odin folder on your desktop and launch Odin as administrator
- Connect the phone to the PC via USB cable. You should now see the message Added! in Odin
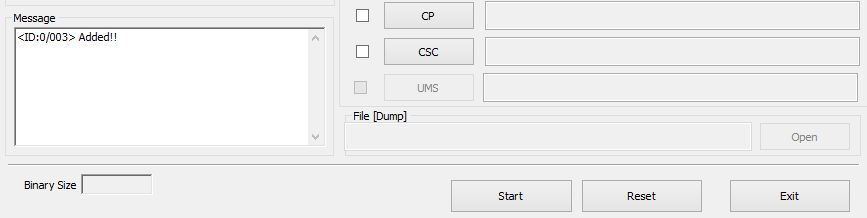
- Click the AP button in Odin and load the prerooted firmware .tar file from the folder you extracted earlier on your desktop
- Leave everything else in Odin as it is. Auto reboot and Reset Time boxes should be checked. Re-Partition box should be left unchecked
- Click the Start button in Odin to start flashing the pre-rooted firmware
- Once the flashing is done, your phone will reboot automatically and you will see a PASS message with green background at the top left in the Odin window. It is now safe to disconnect your phone
- Once the phone has rebooted fully, you should see the SuperSU app in the app drawer.
Congratulations!! Your Galaxy Grand 2 is now rooted! To verify root access, download and run the Root Checker app from the Play Store. Have fun.


