One of the core features of Google Docs is user collaboration. This simply means that multiple users can edit the same document at once. This option will really come in handy especially for group projects and team research. The thing is when the document consists of multiple chapters and pages (ex. research paper), there’s no built-in feature that would allow you to mark the page or paragraph where you left off. So when it’s time for you to re-open the document, you’ll need to scroll through its pages first.
Speaking of which, you can make your task easier by adding a custom mouse cursor point and here’s how.
How to set a custom cursor point in Google Docs
- Click here to open the download page for the “OpenHere” add-on for Google Docs. Once you’re on the said page, click the “+ Free” button to add the add-on to Google Docs. Make sure that you’re already logged in to your Google account.
- After which, an untitled Google Docs document will be opened in a new tab. Go to that document and then click “Continue” to allow OpenHere to access your Google Docs account.
- So what’s next? Just type whatever you want on your document.
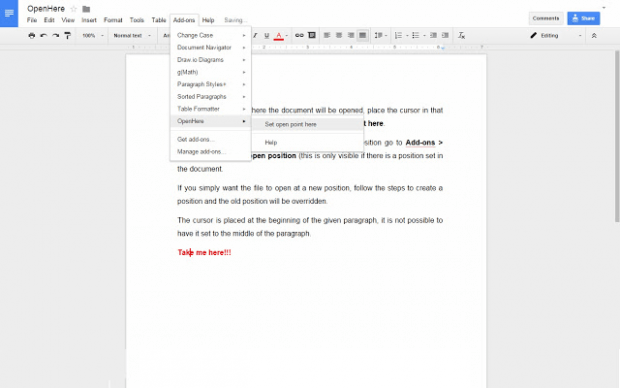
- Now, if you want to finish the document at a later time, you can set a custom cursor point so the next time that you open it, you can immediately resume from where you left off. To do so, simply place your cursor to where you want to appear and then go to the “Add-ons” tab, choose “OpenHere” > “Set open position at cursor”.
- That’s it. You may close your document and the next time that you open it, the cursor will be at its specified position.
Anyways, OpenHere is not only good for collaborative tasks, it is also ideal for writers and authors working on lengthy articles, novels and narratives.

 Email article


