 Email article
The Windows 10 Action Panel, otherwise known as the Quick Action Panel, does exactly that: lets you bring up a quick menu with various options available designed to make your most common tasks done with Windows more efficient. We’ve already seen similar technology become a big hit with smartphones. Apple first started the quick settings during iOS 7 with a swipe up from the bottom of the display to reveal option like Airplane Mode, the trusty torch, calculator and more. Apple named this new Quick Settings the Control Center for iOS. It’s no different with Windows, only the set of options change.
The best part about the new Windows 10 Action panel is you can change the apps to better suit what you would prefer having so it’s a win-win for everybody. Here’s what you need to do to configure Windows 10 Action Panel.
HOW TO CONFIGURE WINDOWS 10 ACTION PANEL
1. Navigate to the Settings bar found from the new Start menu.
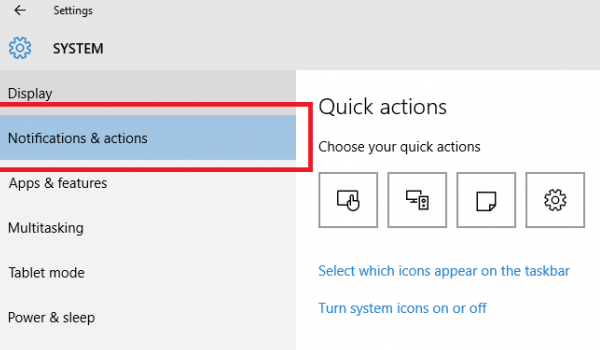
2. Click on the System icon found from the Settings, just like in the screenshot below.

3. Click or tap over the Notification & Actions option you can see from the left side panel.
4. Here’s the fun part where you get to set up your Quick Action buttons. The way you choose to lay them out from this page is the same way you can expect to eventually find them when you access them from the Windows 10 Action Panel.
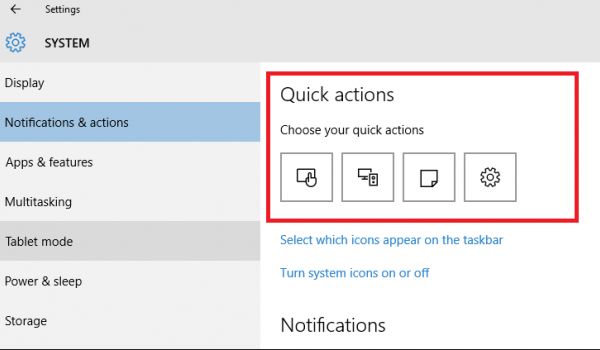
5. After selecting an option, you’ll get another drop down menu with additional options that are available for each button. For example, if you click the Settings button, you get extra options such as Connect, VPN, Note, Quiet Hours, Location and the tablet Mode.
Hopefully that taught you how to configure the Windows 10 Action panel! Now your personal preferences should be catered to your needs and not that of a default Microsoft Windows 10 preference.


