 Email article
![]() Need a screen capture program that can grab, manipulate, annotate, and share screenshots without costing you a penny? Screenshot Captor may be for you. There are several freeware and shareware screenshot programs to choose from, so what makes Screenshot Captor standout above the crowd? Let’s take a look.
Need a screen capture program that can grab, manipulate, annotate, and share screenshots without costing you a penny? Screenshot Captor may be for you. There are several freeware and shareware screenshot programs to choose from, so what makes Screenshot Captor standout above the crowd? Let’s take a look.
What is it and what does it do
Screenshot Captor is a tool for grabbing, manipulating, annotating, and sharing screenshots. It isn’t your average screenshot program — it has all the basics of screenshotography plus more. Because of its nature, the best way for me to properly explain Screenshot Captor is to let the developer themselves say it:
Screenshot Captor is different from other screenshot utilities in several notable ways:
- Optimized for taking lots of screenshots with minimal intervention; highly configurable to make it work the way you want it to but stays out of your way in the system tray.
- Excellent multi-monitor support.
- Full set of scanner acquisition tools and scanner image correction.
- Perfect capture of Windows 7 partial transparency effects.
- The most powerful scrolling capture tool in the field.
- Easy automatic or on-demand uploading of screenshots to a wide variety of image hosting services (imageshack, flickr, ftp, etc.).
- Great ragged edge splicing effects
- Smart autonaming of files, easy renaming and format conversion; automatic image file versioning.
- Ability to embed textual comments in files, watermarking, captioning.
- Lots of capture modes: Multimon (multiple monitors), Desktop, Active Window, Region, Windows Object, Scrolling Capture. Each mode has a customizable hotkey for quick access.
- Cool special effects, including automatic active window enhancement, ragged edge splicing, pixelation, and many more.
- Unsurpassed support for 3rd party user configurable tools, including file browsers and image editors; extend the program to do whatever you need by interfacing it with other programs.
- Sidebar thumbnail file browser provides full shell operations, drag and drop support, and right-click actions on screenshots.
- Deluxe thumbnail maker and watermarker.
- Optional quick “PostCapture PopUp Dialog”.
- Quick “Screenshot Emailer Menu”.
Getting Started with Screenshot Captor
Navigating the Interface
After playing around with Screenshot Captor for a fair amount of time, I can think of only two drawbacks to Screenshot Captor. One of these cons is, without a doubt, Screenshot Captor’s learning curve. Screenshot Captor has many features, but the user interface is not as user friendly – or aesthetically pleasing – as can be. However, after working with the program for a little while it is quite easy to master the art of Screenshot Captor.
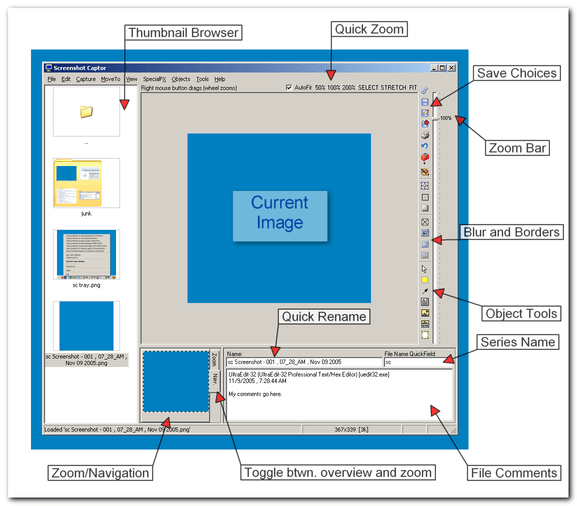
The main program window of Screenshot Captor can be broken down into seven parts:
- On the far left is the Thumbnail Browser. This is where screenshot thumbnails are shown after you have taken them. This panel also acts like a navigator for Windows, allowing you to explore files and folders other than the screenshots you have taken.
- On the far right is the Zoom Bar Slider which allows you to quickly adjust zoom magnification of the image you are currently working on (you can also use the mouse wheel or keyboard shortcuts to perform zoom, if you don’t like this slider).
- Next to Zoom Bar Slider is the Editing Toolbar. This Editing Toolbar contains all the buttons related to editing and saving screenshots.
- On the very bottom is the Status Bar Display. This bar shows basic information about the image you are working such as file name, date created, and resolution.
- On the bottom left is the Zoom/Navigation Panel. The Zoom Panel shows you the area around your mouse cursor but zoomed to the pixel level, making it easier to make small changes. The Navigation Panel shows you how your image looks in totality.
- On the bottom right is the File Name and Comments Panel. From this panel you can modify the name of the file and add any comments, if you wish.
- At the very top is the text menu from where you can access all Screenshot Captors features/options and Quick Zoom Links which allow you to quickly modify the zoom on the image in question.
Taking Screenshots
Screenshot Captor allows users to take multiple different types of screenshots:
- Grab entire Workspace – This method takes a screenshot of your entire workspace, including all monitors if you are using multiple monitors. Essentially it full-screen screenshots of all active monitors. (If you are using only one monitor it will take a full-screen screenshot of that one monitor.)
- Grab current Screen – This method takes a full-screen screenshot of the “current screen”. In a multi-monitor scenario, the “current screen” is the monitor with the active window. In a single-monitor scenario, the “current screen” is… your monitor.
- Grab Active window – Captures a screenshot of the active window (i.e. the window you are working in/have selected). If no window is active, a full-screen screenshot will be taken. This is extremely useful for quickly grabbing an image of a program.
- Grab selected Region – Allows you to select a region/area of the screen to capture using a freehand rectangle tool. If you prefer selecting an area using a resizable “red box”, you can enable RedBox mode for this type of capture via Preferences. By default this is performed in the new RedBox mode which lets you resize the region before capturing, but you can turn this off for a slightly faster and less flexible region capture more. A cool trick when using the freehand rectangle tool is you can hit Spacebar on your keyboard to cancel a region selection. For example, you have clicked the left mouse button once and are about to select an area but discover the selection is a bit off. Hitting Spacebar on your keyboard resets the tool, allowing you to make another selection quickly.
- Grab Fixed size region – Lets you to capture a region/area of your screen using a fixed-size rectangle. The size of this rectangle is specified HotKeys tab under Preferences. This is useful if you do a lot of repeat capturing of windows/objects of the same size.
- Grab windows Object or Scrolling Window – This is probably the most advanced screenshot method Screenshot Captor has. With this method you can capture “objects” which can be toolbars, panels, or whole windows; in addition, you can capture “scrolling windows”. “Scrolling windows” are exactly what they sound like — windows that have scroll bars (i.e. whole content doesn’t fit on your screen), such as websites. With this screenshot mode, Screenshot Captor allows you to capture all the content of a scrolling window into one screenshot. Be warned, however, capturing scrolling windows is not a perfected science — you may find Screenshot Captor not properly capturing some scrolling windows.
This particular screenshot mode works a bit differently than the others. With all the previously ones mentioned, you took the screenshot which was then passed onto the program (I will show what I mean by “passed onto the program” in a few paragraph. With Grab windows Object or Scrolling Window, there are a few intermediary steps. Firstly, you must select a window or object to capture. You do this by mousing over what you are trying to capture and Screenshot Captor shows you what it can capture by outlining it in a red box. When you have what you want, you hold Ctrl on your keyboard and left-click your mouse. You are then prompted with the following:

As you can see, you can either save the selected object as a screenshot, save the object as a screenshot and take another screenshot of the same type, conduct a scrolling window capture on the object selected, and capture multiple images for each child control (I’m not sure what this particular option does). Selecting the first two options is similar to what the other screenshot methods do — screenshot is taken and passed onto the program. The third option (scrolling window), however, is a bit different. When you select do capture a scrolling window, you are shown the following:

From this window you can customize how exactly you want to capture the scrolling window. As you can see, its kind of complicated and you maybe be confused as what to do. You can try leaving the default settings to see if that captures what you are looking for. If it doesn’t, you can come back and hit the Test Window and Guess Settings button which will try to guess the best settings to capture the scrolling window you selected. Whatever the case may be, hit the Ok, begin scrolling and capturing! button when you are ready and the scrolling window capture will begin; when its done you will see the following:

From here you can make some modifications to the image and save it if you are happy with it. If you aren’t happy, you can go back and try again.
- Grab Repeat Last Size+Pos – When this is selected it will take a screenshot of same region and size last used by you. Useful for repeat capturing of the same area.
- Capture Image of ScreenshotCaptor Window – When this is selected it will capture the Screenshot Captor window; useful if you want to show someone an image of your current Screenshot Captor.
All of the above screenshot methods except Capture Image of ScreenshotCaptor Window can be used via hotkeys (hotkeys are customizable via the HotKeys tab under Preferences), via the right-click menu of the system tray icon, and via the Capture drop-down menu from Screenshot Captor’s main program window. Capture Image of ScreenshotCaptor Window is accessibly only from the Capture drop-down menu I just mentioned. Additionally, when screenshotting, you can opt to use delay, capture cursor, or use and Auto Capture Timer.
Regardless of what screenshot method you use, all of them (eventually) “pass” the screenshot onto the program, showing a New Screenshot PopUp Dialog:
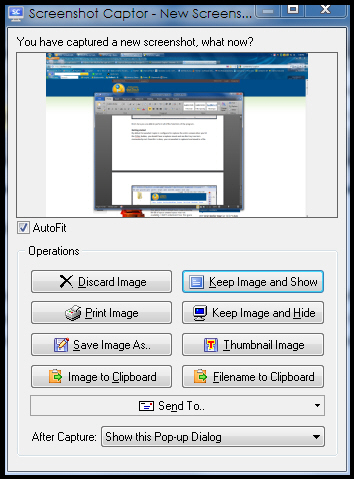
This re-sizable dialog lets you quickly preview screenshots and decide whether to save, discard, print, perform clipboard operations, and more without ever opening the screenshot in the main Screenshot Captor window. (Keep Image and Show opens the image in the main program window.) If you prefer not to see this popup, you can disable it by right-clicking on the system tray icon, going to After Capture Show… and selecting either Hide Main Form or Restore Main Form. Hide Main Form saves the screenshots you take without opening the popup dialog of the main program window. Restore Main Form shows screenshots in the main program window.
 After You Have Taken Screenshots
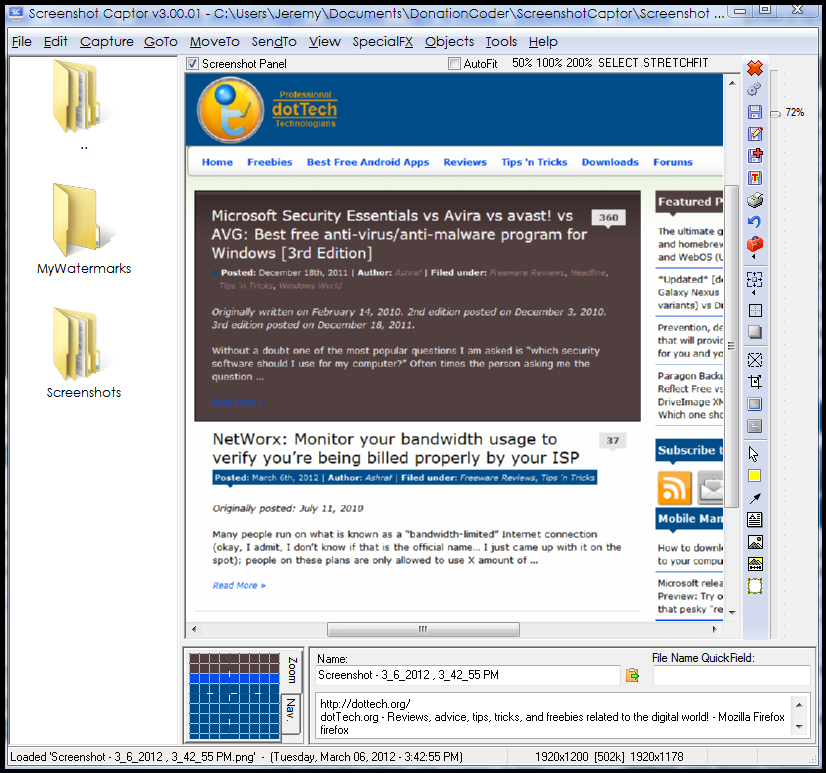
Once you have taken screenshots you can open the screenshots in the main program window to edit/manipulate/annotate to your hearts desire. (Double-clicking the system tray icon opens Screenshot Captor’s main program window, if you decided to not pass the screenshots to the main window already.) Your screenshots will be shown in the main program window as thumbnails on the left panel, with the last screenshot taken already selected and displayed first.
From the main program window you can do things such as add special effects, crop, add comments, and more — then save the images (you can also copy to clipboard, if you wish).
Donationware
Above I mentioned there are only two drawbacks I can think of for Screenshot Captor. This is the second one. (It is a minor drawback.)
You see Screenshot Captor comes from DonationCoder, a website that produces “donationware” products. Donationware are programs which developers provide for free and are compensated through donations. To keep their business model alive and kicking (and don’t take the word “business model” too literally — DonationCoder is not a business in the traditional sense), DonationCoder has implemented a unique method of registering their products.
Although Screenshot Captor is free, you are required to register it with a serial key. This serial key can be had for free by registering on DonationCoder’s website and then visiting the keys page:

The key is then used to register Screenshot Captor:


The catch is the first time you get the license key it is active for six months. After six months, you have to visit DonationCoder’s website to get another six month license key. After those second six months (i.e. one year after initial installation) you have to visit DonationCoder’s website to get another key but this time it is a permanent license key.
DonationCoder uses this method to encourage people to visit their website and make donations to support developers. If you donate to DonationCoder (even $1), you automatically get a permanent license key that can be used with all DonationCoder programs. Plus, if you donate, you get other goodies like access to a private section of DonationCoder where software discounts are posted, early access to new programs, ability to control who gets the donation you give, etc.
For what it is worth, it may be annoying to have to register Screenshot Captor multiple times but the DonationCoder model is one of the few, lessor harmful models of providing freeware software. The only other sustainable model that comes to mind is bundling crapware with installers and no one likes that.
Conclusion and Download Links
Screenshot Captor is a feature rich program that can do practically anything you need to do as far as taking screenshots and modifying them. In this review I haven’t even scratched the surface of what Screenshot Captor can do. It takes a while to fully understand the program and make it do what you need it do; but once you learn it, Screenshot Captor is awesome. That said, however, Screenshot Captor it is a great program for those who need an advanced screenshot utility; for those who want less advanced functionality or a screenshot capture program with little to no learning curve, Screenshot Captor is not ideal. (See FastStone Capture if this is the case for you.) Personally I found Screenshot Captor has more features than I need — I have had better experiences with other free screen capture software. Ultimately it depends on what you are after in a screenshot utility. If you want advanced, full-functioning capabilities then Screenshot Captor may be what you’re looking for. If you want something simple and do not need all the extra frills and features, you may want to look elsewhere.
You can grab Screenshot Captor from the links below:
Version reviewed: v3.00.01
Supported OS: Win9x/2k/XP/Vista/Win7
Download size: 7.9-8.7 MB, depending on the version you download
Malware scan: VirusTotal scan results (0/43)
[Screenshot Captor license key page]
[DonationCoder registration page]
[Some screenshots in this article were provided by DonationCoder.]


