{rw_text}Giveaway of the day for March 17, 2009:
Version reviewed:
2.1.0.0
Software description as per GOTD:
Screen Dash is the only software on the web that allows users to grab images right off their screen, edit them using paint and photo editing tools, and then instantly host them online. It saves the average user over 2 minutes and the hassle of having to print screen, paste into paint, and then go to a site to host.
The Premium Dash 2.1 has advanced photo editing tools, a huge transparent PNG library, the ability to host your own images with FTP, and the amazing ability to use your own Google Adsense and actually profit from the images you upload. Screen Dash is an amazingly smart utility tool which not only eliminates the need to use image hosts but also image editors; thus, saving you a considerable amount of time and effort.
————————-{/rw_text} –>
{rw_good}
- Allows you to upload screenshots directly onto ScreenDash.com.
- You don’t need to register to upload screenshots onto ScreenDash.com.
- You can upload screenshots directly to an FTP server.
- You can place your own Ads on ScreenDash.com page where your image is.
- Built in editor has basic editing features + ability to add effects.
- You can save your screenshots as PNG, JPG, GIF, BMP or TIF/TIFF.
- Has a nice simple tutorial that will guide you through how to use the software.
{/rw_good} –>
{rw_bad}
- Cumbersome interface.
- Only has a free form rectangle region screen capture tool.
- Uses more computer resources than some rival software.
- If you choose to upload directly onto ScreenDash.com, you have no control over image after upload.
- By default the program is set to display ScreenDash.com Ads on your image pages.
{/rw_bad} –>
{rw_score}
{for=”Features as Described” value=”10″}Everything is there and working.
{/for}
{for=”Ease of Use” value=”6″}I found the interface cumbersome;
{/for}
{for=”Performance” value=”7″}Uploads are quick, and the program is responsive. However I find it uses more computer resources than I would like.
{/for}
{for=”Usefulness” value=”5″}Only having a free form rectangle region selection tool really cuts down on how useful this software is.
{/for}
{for=”Arbitrary Equalizer” value=”6″}This category reflects an arbitrary number that does not specifically stand for anything. Rather this number is used to reflect my overall rating/verdict of the program in which I considered all the features and free alternatives.
{/for}
{/rw_score} –>
{rw_verdict}[tup]
{/rw_verdict} –>
Registration and installation for this software is tricky. When you run Setup.exe Screendash.msi will need to be first extracted. By default it will be put in C:/ but you can change that. After you extract it, run Screendash.msi. As for registration, I have been unable to find information on if it registered properly or not so I can only assume it worked.
Screen Dash is a screen capturing software that includes built in image editing features, to allow users to edit images without having to load it into an image editor, and allows you to quickly upload images to ScreenDash.com so you can show them to other people.
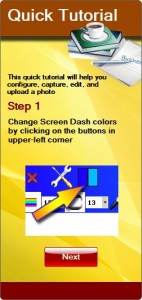
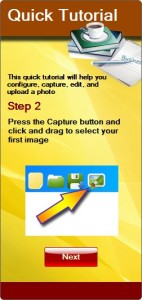
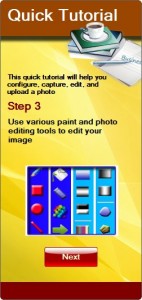
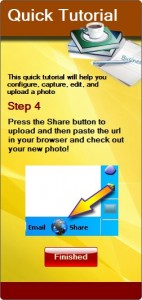
What you run Screen Dash for the first time, a simple tutorial will be displayed at the right of your screen. The tutorial leads you through the basics of how to use Screen Dash:
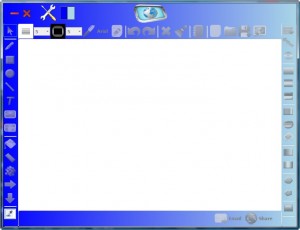
In addition to the tutorial, the main program window for Screen Dash will open:
It is not that obvious in the screenshot but the interface for Screen Dash is pretty cumbersome. It looks dated, and feels dated. Plus I think it is pretty ugly. Not to mention the menu bar is done pretty badly: if you scroll over the menu bar you will not even know they are buttons until you click on them. The menu bar is the following for anyone wondering:
The tutorial was pretty clear in teaching how to use this program. I would just like to point out a few things:
- Screen Dash only has a rectangle region screen capture tool. What I mean is when you click on the “Capture” button you are given the ability to click + select a rectangular region on your screen. Whatever you select will be taken as a screenshot. This feature is good and all, but since Screen Dash is a screen capture tool, it really needs other tools just as “Select Active Window”, “Select Window/Object”, “Select Scrolling Window”, “Select Freehand Region”, etc.
- In “Step 3” of the “Quick Tutorial” I showed you above, the developer talks about image editing tools. These tools enable you to do various things:
- Create a rectangle.
- Create a circle.
- Create a line.
- Insert text.
- Insert an image.
- Insert clipart.
- Invert colors.
- Apply grayscale.
- Add a blur.
- Change the hue.
- Change the saturation.
- Change brightness.
- Change contrast.
- …and more.
In addition, there is a pen tool, a paint bucket tool, an eraser too, a spray tool, and a selection tool (so you can apply any of the above in just a select part of the image).
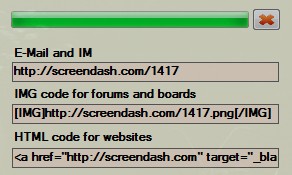
- When you click on “Share” (step 4 in the tutorial), your image is uploaded into ScreenDash.com. You will get a little window popup at the bottom right of your screen giving you the URL of the image:
After you have uploaded an image onto ScreenDash.com, you have absolute no control over it, i.e. you cannot delete or modify it. Just an FYI – be careful of what you upload.
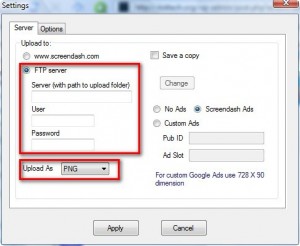
- You can also set Screen Dash to upload your image to an FTP server of your choice as opposed to ScreenDash.com. Click on
 and go to “Settings”. Click on “FTP Server” and fill in the appropiate information. Also, select what format you want your screenshot to be in (PNG, JPG, GIF, or BMP):
While you are at the “Server Settings”, notice that by default the program is set to display Screendash Ads when you upload an image. Change that to either “No Ads” or add your own custom Ads. Or if you want you can also leave it to Screendash Ads.
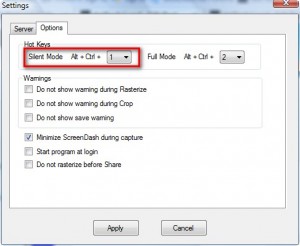
- Screen Dash has a “Silent Mode”. What “Silent Mode” does is that once you active it, the rectangle region capture tool appears for you. You select a region and that region is automatically uploaded onto ScreenDash.com or the FTP server you set. You can activate “Silent Mode” by pressing Alt + Ctrl + 1. If you want to change the hotkeys, go back to “Settings” and go to the “Options” tab:
- You do not have to upload your screenshot to ScreenDash.com or to an FTP server. You can also just save it locally on your computer. Look for the “Save As” button. It should be at the top toolbar:
However, if the Screen Dash window is small, you may need to click on a drop down menu to make it appear:
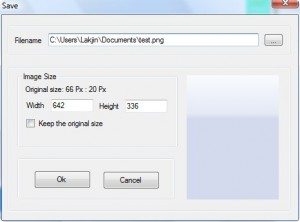
Once you click on the button, you will be able to change the screensize, the image format, the location and the name of the image before you save it:
To change the image format, just change the extenstion at the end of the name of the image. You can choose from .PNG, .JPG, .GIF, .BMP, .TIF/.TIFF. For example, in the above, I could change “test.png” to “test.jpg”.
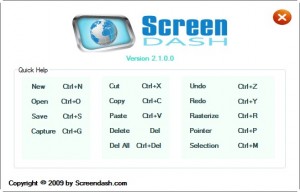
- Here are some hotkeys associated with Screen Dash:
There does not seem to be a way to change these hotkeys.
- While Screen Dash does not use that many resources in the whole scheme of things, when compared to other screen capturing alternatives, it uses up a fair bit. On start up, with nothing loaded into the program, Screen Dash was using ~12MB of RAM. Compare that to the 1.5MB of FastStone Capture (my favorite tool as I will explain later). The RAM usage just increases as you take screenshots (for both programs obviously).
Okay so now what do I give Screen Dash? I give Screen Dash a reluctant thumbs up. I was very tempted to give it a thumbs down but the “Silent Mode” feature convinced me that I should give it a thumbs up.; going along with that, the ability to quickly upload images onto ScreenDash.com is, in my opinion, the strength of this program. However that is also a problem because once you upload an image, you have little to no control over it. That being said, I almost gave Screen Dash a thumbs down because:
- The interface sucks.
- It uses too much computer resources for my liking.
- I feel that the developer of Screen Dash focused too much on including ‘bells and whistles’ such as many image editing features in Screen Dash and ignored basic screen capturing features. While the image editing features are nice, I don’t think they are practical. Honestly how many of us will sit there and edit a screenshot to the extent of the image editing features of Screen Dash? Not many I bet. When it comes to image editing, I am sure many of us would prefer a more powerful tool image editor such as Paint.NET or GIMP. The developer would have been better off including less lavish image editing tools and focusing more on actual screen capturing.
{rw_freea}
FastStone Capture, in my opinion, is the best free screen capture/screenshot tool out there. In fact FS C is the screen capture/screenshot tool that I use to take screenshots of programs for use on this blog. Yes it is the program I use to make those awesome arrows, write text, and outline areas with boxes.
FS C is feature filled, has a very small footprint computer resource wise, and is extremely easy to use. With FS C you can take a screenshot of the current active window, capture a window (does not have to be the active window – you get to chose), capture a specific region (via rectangle or free form tool), capture the full screen and capture a scrolling window (like in a web browser if you have to scroll up/down or left/right on a webpage, FS C will capture the whole webpage).
Additionally, after you capture an image you have quite a few features (but not as many ‘effects’ as Screen Dash has) to edit your screenshots with; I am notorious for using the text, arrow and rectangle editing tools.
Lastly as mentioned above, FS C uses a lot less computer resources than Screen Dash
Snipping Tool is an excellent tool that comes pre-installed on Vista Home Premium and above (you CANNOT download snipping tool). To access snipping tool, open start menu and type “snipping tool” into the search. Snipping tool basically does everything you might need for screenshot taking purposes:
- Free-form snip: Draw an irregular line, such as a circle or a triangle, around an object.
- Rectangular snip: Draw a precise line by dragging the cursor around an object to form a rectangle.
- Window snip: Select a window, such as a browser window or dialog box, that you want to capture.
- Full-screen snip: Capture the entire screen when you select this type of snip.
What happens is that when you open this program, a little window pops up and everything on your screen is frozen as it is. A light white layer comes over your screen to let you know snipping tool is active. By default, it is set to a rectangular snip and you can click and drag to take a screenshot of whatever you please. Or you can change the settings, by clicking the little arrow that is by the “New” button, to a different snip and then take a screenshot.
Once you take a snip, that certain area will appear in the snipping tool window. In that window you can use the ‘pen’ feature to write something on the screenshot, or you can use the highlighter feature to highlight something. There is also an eraser which you can erase any pen or highlighter marks you made. Once satisfied with the snip, you can save it to you desktop, copy it, or email it. There is almost no learning curve to this program.
I used to say that if you have Snipping Tool you need nothing else, but then I started using FS C and noticed the many features Snipping Tool is missing.
PicPick is an excellent tool. PicPick is very similar to FastStone capture. The ‘main’ difference between FS C and PicPick is that FS C has a floating window while PicPick works out of your system tray. Other then that, the differences between PicPick and FastStone Capture are really only in the ‘bells and whistles’ category.
With Jing not only can you take screenshots, but you can also capture video. Before I describe what this program does, let me tell you that the first time you open Jing you must enter an Email, Username, and Password to create an account with them. Otherwise you cannot use Jing. So if you are not willing to do that, just skip this program.
Back on topic, once you sign up with an account, Jing launches. It places a little circle at the top of your screen (you can drag this circle and dock it anywhere on the top/bottom/left/right). When you place your mouse over this circle, you can chose the options of “History” (screen capture history), “Options” or “Capture”. Once you click on capture, cross hairs appear on the screen and you click the area that you want to ‘capture’. Jing automatically detects active windows and their parts, so you can easily do one click capture of designated windows. Once you have captured an area, a small box comes up asking you if you want the designated area to be captured as an image or video (you also have the option of redo and cancel). At the same time, before you choose image or video, you can re-size the capture area in case you did not fully capture what you desired. Once you click image, for a screenshot, the area you captured shows in a window. In that window, you can add arrows to the picture, text, a frame, or even highlight an area. At the same time, at the bottom of the window there are options to send the screenshot directly to Screencast.com, Flickr.com, an FTP server, or just save it to your desktop.
You just have to try this program to truly understand it. The learning curve is fairly small. However note that is it the most heavy on computer resources out of all the programs mentioned here.
Screenshot Captor is a very powerful screen capturing tool. However it is very complicated (in my opinion) so I won’t elaborate much on it (actually not really at all).
{/rw_freea} –>
{rw_verdict2}In the end, I give Screen Dash a thumbs up, mainly because of the “Silent Mode” and ability to upload to ScreenDash.com with ease, but it is a reluctant thumbs up. As I said above, I feel the developer focused too much on ‘bells and whistles’ and ignored basic screen capturing tools. That being said, my recommendation for today is FastStone Capture. FastStone Capture is undoubtably one of the best screenshot capturing tools ever created. It is lightweight, featured filled and very easy to use. I know – I use it every day. Two thumbs up for FS C – get it =). Furthermore, PicPick is also an excellent screen capture tool; if you don’t enjoy FS C, try PicPick. Lastly, if you are interested in being able to share images over the internet in a quick fashion (similar to uploading images onto ScreenDash.com), I suggest Jing for that.
{/rw_verdict2} –>

 Email article
