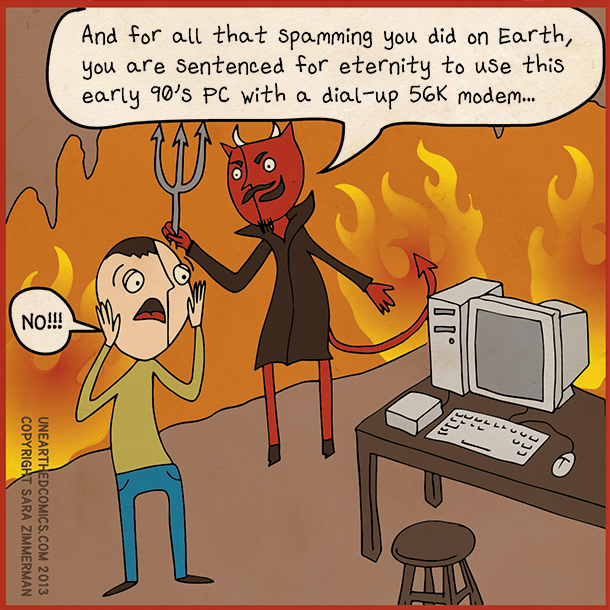
How to root Samsung Galaxy Camera [Guide]

galaxy cameraSo you own a brand new Samsung Galaxy Camera, one of the recent innovations by Samsung? Wait no more, to get your ‘camera’ rooted. Follow this guide to get the power of root now on your Galaxy Camera.

Disclaimer: This guide is intended as a helpful “how to”. dotTech and its writers are not responsible for any gain or loss (including but not limited to bricked devices) incurred as a result of following this guide. Root your device at your own risk. Rooting may void your warranty.

Requirements

This guide will help you to root your Samsung Galaxy Camera. This works perfect for Galaxy Camera on Jelly Bean (Android 4.1.1) build:GC100XXALK1. If you are having any problems with any other build, try using the GC100XXALK1 build.

Before We Begin

To get started with rooting your Galaxy Camera, make sure that you are ready with the following:

How To Root Samsung Galaxy Camera

Follow the steps below to get your Galaxy Camera rooted:

  • Turn off the device.
  • Remove the battery and insert it back after about a minute.
  • Boot into Download Mode by keeping the ‘Volume Down’, ‘Camera’ and ‘Power’ buttons pressed (Volume Down + Camera+ Power) until the screen responds.
  • Double-click odin3 v1.85.exe (from the location to where you had earlier extracted Odin3_v1.85.zip) to launch Odin.
  • Plug-in your device to the computer using USB cable.
  • After you plug-in the device, the first box at the top of Odin, i.e, ID:COM will turn yellow and the message ‘Added’ should appear in the message box in Odin (If this doesn’t happen make sure you have the drivers for your device installed on your computer).
  • On the Odin window, click on PDA button and select the file CF-Auto-Root-gd1-ekgc100.tar.md5 which you can find in the location where you had earlier extracted the file CF-Auto-Root-gd1-ekgc100.zip.
  • Make sure that Auto Reboot and F.Reset Time are selected in the Odin window.
  • Click on ‘Start’ to start the flashing.
  • Wait until Odin does its thing. The box at the top of Odin will show ‘PASS’ after the flashing procedure is complete.
  • Wait till the device automatically reboots.
  • Unplug the USB cable.
  • Congrats! Your Samsung Galaxy Camera is now rooted!

Video guide for rooting your Samsung Galaxy Camera:

Conclusion

Enjoy your brand new, rooted Galaxy Camera. Keep clicking with the power of root!

[via XDA]

Related Posts