 Email article
Viruses, malware, spyware, and all kinds of scumware always worry Windows users. Fortunately, Windows 8 comes with built-in Windows Defender, which is know as Microsoft Security Essentials (MSE) on other versions of Windows, that can keep you safe without installing any third-party security software. However, there is a big issue with Windows Defender in Windows 8 that is the lack of manually scanning selected files from the context menu. With MSE, you can right click/long tap on files then choose “Scan with MSE” to scan them; I don’t know why but Windows Defender in Windows 8 doesn’t have that basic function. Therefore, in this article, I will show you how to add “Scan with Windows Defender” option to the context menu in Windows 8.
Note: in Windows 8, we can’t open the graphic interface of Windows Defender from context menu, so that this trick will open the Command Prompt window to perform your scan.
UPDATE: The “Scan with Windows Defender” option only appears when you right-click a folder, not individual files.

HOW TO ADD “SCAN WITH WINDOWS DEFENDER” QUICKLY
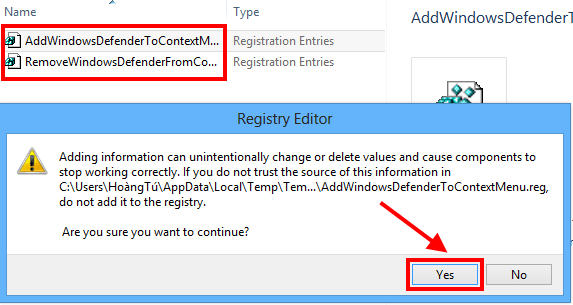
This trick deals with Registry so if you don’t want to do anything wrong with the Registry, you can use the link below to download the pre-written Registry file to add “Scan with Windows Defender” to context menu.
WindowsDefenderContextMenu download link
Once you have downloaded the file, you just need to open it. There will be two files, one is for adding the option “Scan with Windows Defender,” the other one is for removing it if you want. If you want to add the option, you have to run the file “AddWindowsDefenderToContextMenu.reg” and vice versa.
HOW TO MANUALLY ADD “SCAN WITH WINDOWS DEFENDER”
If you want to explore how this trick works, there is the way for you to manually edit Registry to add the option to context menu. Remember that you will deal with Registry, so that make sure you have your Registry or system backed up.
To do this, you should do following.
- Open Registry Editor by pressing Windows key then type “regedit” (without the quotes) and choose “regedit.exe” result on the left. If you are using a table, you should wipe from the right screen edge, select “Search” then type “regedit” and choose “regedit.exe” result.
- In Registry Editor window, you should navigate to: HKEY_CLASSES_ROOT\Folder\shell
- After that, you need to right click on the key “shell” then choose New –> Key. What you have to do next is naming it “WindowsDefender”

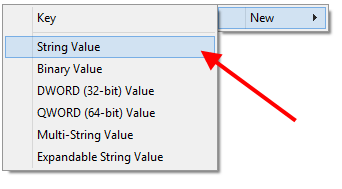
- Then right click/long tap at the empty space in the right side and choose New –> String value and name it “Icon”
- Next, you should double click “Icon” key then enter the following value into “Value data” field:
%ProgramFiles%\\Windows Defender\\EppManifest.dll
- After that, right click at the right side again, choose New –> String value and name it “MUIVerb.” Then double click it and enter the value: “Scan with Windows Defender.”

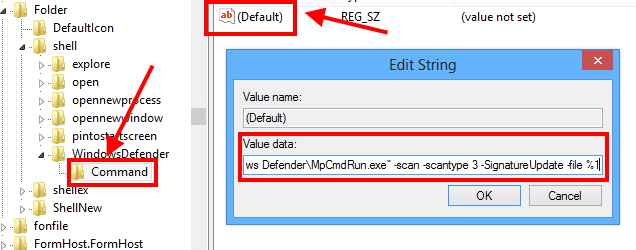
- What you need to do next is right click on the key “Windows Defender” on the left and choose New –> Key then name the new key as “Command”
- With the “Command” key selected, double click the value “(Default)” on the right side and enter the following value:
“C:\Program Files\Windows Defender\MpCmdRun.exe” -scan -scantype 3 -SignatureUpdate -file “%1”
- Now you’re done.
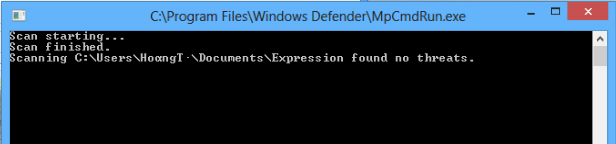
As I mentioned before, this method won’t open the graphic interface of Windows Defender but it will do the scan in Command Prompt window. The most important is that this window will appear and disappear very quickly if there is no problem with your files. Don’t worry, it won’t disappear when there is something wrong with your files.
CONCLUSION
Enjoy!
[via How-To Geek]


