 Email article
It’s almost six months after Microsoft first launched Windows 10 and the software giant just announced there are already 200 million devices with Windows 10. That is a huge number and such a fast pace of adoption in Microsoft’s history of operating system. To get to this number, the free upgrade from Windows 7 and 8.1 strategy is a big help. Microsoft knows that and it has pushed the upgrade very aggressive in recent months.
If you’re still on Windows 7 or 8.1, you pretty much have seen the upgrade utility pops up frequently to remind you to upgrade to Windows 10. It’s got more annoying now since Microsoft decided to push this utility as a required update, which allows it to be installed automatically via Windows Update. The utility called “Get Windows 10” (GWX) frequently annoys you with message to upgrade to Windows 10. If you hit the wrong button in its dialog, you can wake up next morning with your device now on Windows 10.
While Windows 10 definitely has many good stuff, it’s still not that stable or polished on some kinds of device as Windows 7 or 8.1. If you like to stick with your current Windows, here are somethings you can do to block the Windows 10 upgrade and stop that GWX utility.
How to block Windows 10 upgrade
The guide below requires involving the Registry. Make sure you backup the Registry before proceeding.
- Press Start and type “regedit” then run the regedit.exe result
- In Registry Editor window, navigate to this key:
HKEY_LOCAL_MACHINE\SOFTWARE\Microsoft\Windows\CurrentVersion\WindowsUpdate\OSUpgrade
- On the right pane, double click the value “AllowOSUpdate” and change it to 0. If you don’t it, you need to create it by right click and select New > DWORD Value. Name it “AllowOSUpdate” and set the value to 0.
- Then you’re done!

How to disable GWX
Next, you can disable GWX utility from annoying you by doing the followings.
- Open Registry Editor by press Start and type “regedit”
- Navigate to this key:
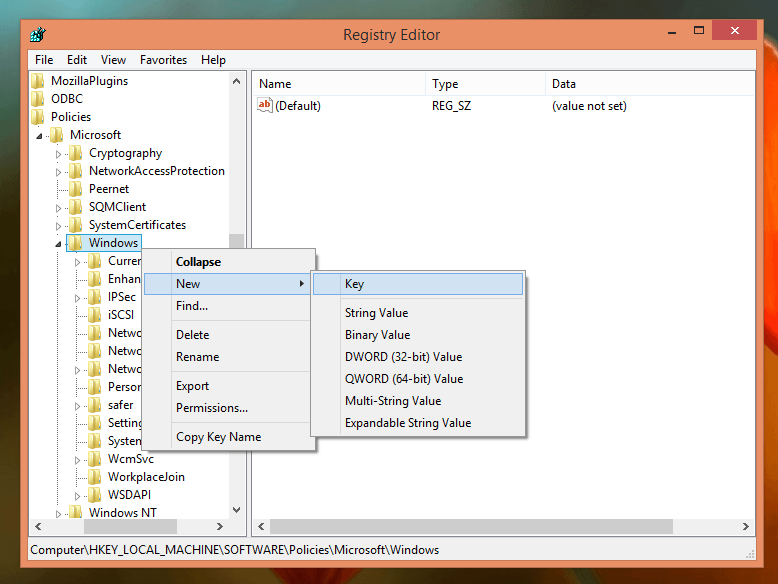
HKEY_LOCAL_MACHINE\SOFTWARE\Policies\Microsoft\Windows\
- Then you need to create a new key by right click on the Windows key and select New > Key. Name the new key “GWX”
- Select the newly created key GWX, right click on the right pane, select New > DWORD Value and name it “DisableGWX”
- Double click DisableGWX value and set it value to 1
Finally, restart your device for the changes to take effect.


