Email article
If animated GIFs (graphics interchange format) are unofficial language of the internet, PNG (portable network graphics) is the most widely used lossless image compression format on the web; and indeed PNG was created as an improved, non-patented replacement for GIF. The good news is that creating animated PNGs is also likely, and an uncluttered application like APNG Anime Maker or AAM does it in the twinkling of an eye.
If you are able to visualize the above animation, your browser supports APNG animations!
WHAT IS IT AND WHAT DOES IT DO
Main Functionality
AAM does exactly what it claims; it creates animated high-grade PNG images.
Pros
- Minimalist design
- Easy-to-use
- High-quality animated PNG output
- Portable
- Freeware
Cons
- No 64-bit version
- Development unclear
Discussion
The animated portable network graphics (APNG) file format is an extension to the PNG specification. It allows for animated PNG files that work similarly to animated GIF files, while supporting 24-bit images and 8-bit transparency not available for GIFs. It also retains backward compatibility with non-animated PNG files.
The first frame of an APNG file is stored as a normal PNG stream; so, most standard PNG decoders are able to display the first frame of an APNG file. The frame speed data and extra animation frames are stored in extra chunks (as provided for by the original PNG specification).
APNG competes with multiple-image network graphics (MNG), a comprehensive format for bitmapped animations created by the same team as PNG. APNG’s advantage is the smaller library size and compatibility with older PNG implementations.![]()
I have created the above animated text scrolling from right to left using AAM as described below:
# First of all, I needed to swiftly craft two PNGs using Windows built-in tool “Paint”; one having black background and the other having the white colored text ‘dotTech’ with transparent background, both being of same size (width x height).
# Loaded both images in AAM (clicked Open)
# Clicked to select the image having the text with transparent background; clicked to change ‘Dispose’ to Previous
# Clicked to select again the image having the text with transparent background; clicked Clone until I got desired number of rows (keep reading to see why)
# Clicked to select each cloned row (starting the original row); changed the ‘Offset’ (X) value one by one starting with 90 and ending with -90 with a decrement of 10 (you must click Offset to effect the change)
# Finally, I clicked Save to store the PNG output to a folder of my choice. I didn’t change any other parameters. You can Move Up, Move Down or Remove a row, too, but hitting Clear will delete all the rows.
I have tested AAM in Windows 7 Professional (and Home Premium) 64-bit. For your information, the stealth advantage of portability exists.
Glossary of terms
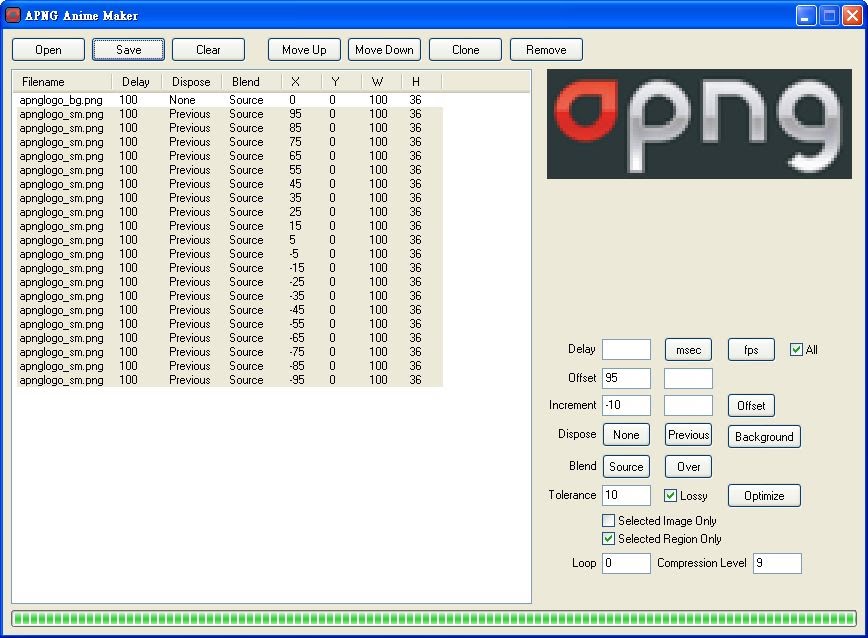
Delay: Enter a number in the ‘Delay’ box, and click msec or fps to set the delay time for the selected frames; you can check ‘All’ to apply to all the frames.
Offset and Increment: ‘Offset’ are X and Y positions at which to render the selected frames. ‘Increment’ X and Y auto increase the offset for the selected frames.
Dispose: None: No disposal is done on this frame before rendering the next; the contents of the output buffer are left as is. Previous: The frame’s region of the output buffer is to be reverted to the previous contents before rendering the next frame. Background: The frame’s region of the output buffer is to be cleared to fully transparent black before rendering the next frame.
Blend: Source: All color components of the frame, including alpha, overwrite the current contents of the frame’s output buffer region. Over: The frame should be composited onto the output buffer based on its alpha.
Optimize: It optimizes the file size of the animation. It is designed for movie clips with small scene changes.
Set ‘Lossy’ to have more compression, ‘Tolerance’ affects between file size and quality.
Set ‘Selected Region Only’; then drag a region in the image preview with scene change. Optimize will only search in the region selected. It can give more compression for a lossy movie.
‘Selected Image Only’ optimizes the image selected only.
Loop: Number of times to ‘Loop’ the animation; 0 indicates infinite looping.
Compression Level: Sets the ‘Compression Level’ of the PNG.
CONCLUSION AND DOWNLOAD LINK
APNG Anime Maker has induced a significant volte-face on my opinion about my beloved dynamic GIFs. We adapt to the technology of what’s possible, right? If you have been into animated GIFs, don’t you think it’s dead-on time to give the animated PNGs a try? I can’t wait to read your comments!
Price: Free
Version reviewed: 1
Supported OS: Windows (XP/Vista/7/8; 10 support unknown)
Download size: 439 KB
VirusTotal malware scan results: 0/60
Is it portable? Yes
APNG Anime Maker download page