We have all used DVDs before so we are all familiar with the “DVD menu” that appears at the beginning of every DVD and allows the user to navigate to specific parts of the DVD, change settings, or just play the DVD from the beginning. What if one would like to do something similar, i.e. create a menu, for a USB/flash drive, CD/DVD, or external hard drive? Well, the first step would be to start reading this post. The second step would be to grab Compact AutoRunner.
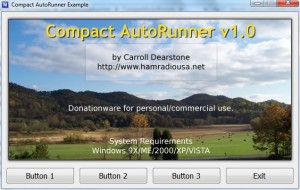
Compact AutoRunner is a free, portable application which allows you to easily create custom menus for external media, including but not limited to USB/flash drives, CD/DVDs, and external hard drives:
The technical term for these menus is “autorun menus” because, technically speaking, the menus are supposed to autorun whenever you insert your external media. However I decided to just call them “menus” and not “autorun menus” because of the mere facts 1) some people have autorun disabled because of security issues and 2) you can always manually run these menus so they are still useful if they don’t autorun.
Originally I was planning on writing about AutoPlayMM, a software by the developer of USB Image Tool; but I decided to go with Compact AutoRunner (CAR) because, while AutoPlayMM is useful, AutoPlayMM just is not as easy to use as CAR. CAR allows you to create menus in a very easy fashion with an easy-to-use GUI (Graphical User Interface) whereas the user would need to create XML files with AutoPlayMM.
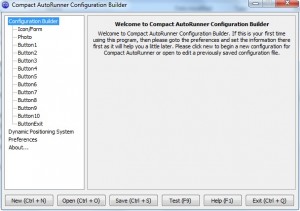
That being said, using CAR is [almost] as easy as eating pie. To get started, after you unzip CAR (you download it as a .ZIP), run “CompactAutoRunner_ConfigBuilder.exe” from the folder where you unzipped the contents of the .ZIP to. (There is also a “CompactAutoRunner.exe” file available for you to preview a menu created by the developer of CAR.):
After you are the same window as you see in the above screenshot, the first thing you want to do is hit the “New (Ctrl+N)” button; you will be asked to pick a location to save a .INI file (name the file whatever you want). To avoid possible pathing issues, be sure to place this .INI file in the same main directory as the contents which you want to create the menu for are. In other words, if you want to create a menu for the contents of a CD-R which you will burn later, gather all the contents of the CD-R, structure them like you want them to be on the CD-R, put them into one folder on your computer, and place the .INI file in the main directory of that same folder. The same thing applies for any other external media with the exception of the fact since other external media, such as USB/flash drive or external hard drive, are rewritable, you have a little more elbow room for error.
After you have created the .INI file, simply go down the options list you see on the left hand side of the program window configuring your menu as you please:
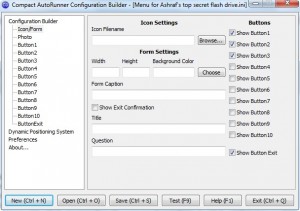
From the “Icon/Form” window you have the option to set a custom icon for the program (optional), define the size and color of the menu window (optional), and enable a “exit confirmation” window when exiting the menu (optional). You can also enable/disable buttons from here.
I say optional for all three of those before you don’t have to use them:
- If you decide to set a custom icon, your icon will be used…
![]()
…otherwise the default icon will be used:
Now I am going to go out on a limb and say the purpose of the developer to add this custom icon feature in was
- To allow the user to set a custom icon for the external media (you know the icon that appears when you open My Computer/Computer);
- To allow the user to set a custom icon for the actual .EXE file which you store on your external media.
The only problem is setting a custom icon does not change the icon for the external media and the .EXE file. I assume this is a bug. If changing the icon for the external media is that important to you, simply edit the autorun.inf file which will be (optionally) created after you save your file:
If you decide not to create an autorun.inf file (I will explain more about this later), do not worry about this icon issue.
Note: the icon file you use must be on the external media you plan on having the menu for.
- The reason you don’t have to edit the “form settings” (the size and color of the menu window) is because if you plan on adding an image as the background to your menu (adding image is in the next step) any form settings you set are pretty much useless. However I do suggest you set the “Form Caption”. The “Form Caption” is the title of the menu. If you don’t set one, the default “Compact AutoRunner version 1.01 Build 100” will be used and that is just ugly.
- If you decide not to enable an exit confirmation window, whenever a user hits the “exit” button, the menu will close. If you do enable an exit confirmation window the user will be asked to confirm they want to exit the menu.
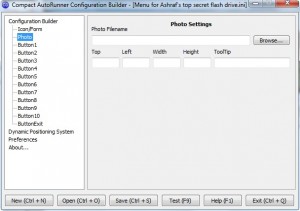
For the “Photo” window you can add a .JPG, .JPEG, .PNG, and .BMP image as the background of your image (no supported for .GIF unfortunately). Be sure to also add something under “ToolTip” if you want a tooltip to show up when the mouse is idle over the background image. Note: the image file you use must be on the external media you plan on having the menu for.
Although there are “Top”, “Left”, “Width”, and “Height” fields here, I suggest you just ignore them for now because we will deal with the background image positioning and size in the “Dynamic Positioning System”.
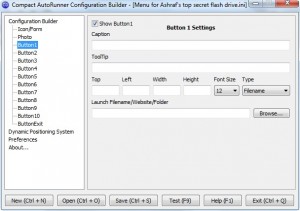
For each button you can set a “caption” (the text that appears on the button), a “tooltip” (the text that appears in the tooltip when you float your mouse over the button) and what the button does when clicked on.
In terms of what the buttons can do, you can set them to open a file, a folder, or a website:
- Select either “Filename”, “Folder” or “Website” from the “Type” menu.
- Then, if you want to open a website just type in the website URL in the “Launch Filename/Website/Folder” box. Or, if you want to open a file or folder, click on the “browse” button and select that file and folder. Note that be default when browsing for files you will be looking for HTML files only. However you can set a button to open any type of file so just select “All files” from “File of type” when browsing for the file:
![]()
Like with the background image, although there are “Top”, “Left” fields here , I suggest you just ignore them for now because we will deal with the background image positioning and size in the “Dynamic Positioning System”. However, to keep all buttons looking uniform, I do suggest you decide what “Width”, and “Height” you want your button to be. When deciding what width and height, be sure to either change the font size so the caption will properly fit on the button, or change the width and height to accommodate the font size.
You must do the same thing for all buttons you want to have on your menu. You can have up to 10 buttons. Although 10 buttons are quite a lot, I do wish the developer added in the option to have unlimited buttons seeing as some users may desire that.
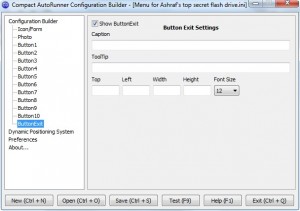
The “ButtonExit” is basically the same thing as the other 10 buttons with one difference: you cannot set what the “ButtonExit” will do; it is always set to exit the menu.
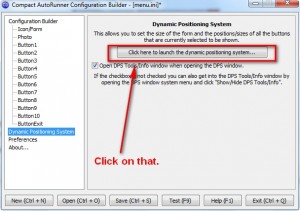
Once you have set everything mentioned above, you need to go to “Dynamic Position System”:
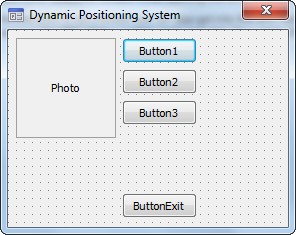
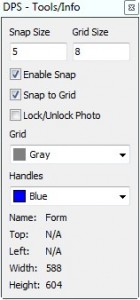
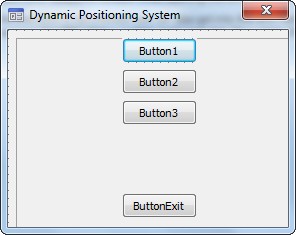
The “Dynamic Position System” (DPS) is a really nice feature of CAR which allows you to click + drag to move around and resize the background image (if applicable) and buttons. Using the “Dynamic Position System” is fairly self explanatory with one exception: the size of the whole DPS window represents the actual size of your menu. So as you click + drag and resize the DPS window, you are literally resizing the window size of your menu. I mention this because if you have an image that is bigger than the default menu size, you will want to resize the DPS window so the menu window size fits the background image. For example, I started with
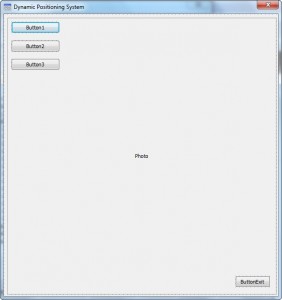
and ended with
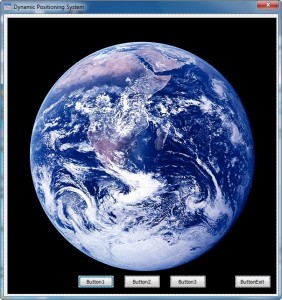
Clicking on “Lock/Unlock Photo” from the DPS toolbar allows you to preview the actual photo (when checked you see the photo, when unchecked you just see the gray box in the above screenshot):
Keep in mind even if you decide you don’t want to configure the positioning and size of your image, menu window, and buttons, you must at least visit the DPS window once to initialize the default settings for your menu (you need not make any changes at that point; just exit the window). Otherwise when you try to run the menu you will get an error.
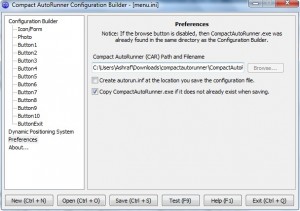
Last but not least, you want to go to the “Preferences” window:
You do not need to change anything at this “Preferences” window except one thing. Note the “Create autorun.inf…” is unchecked by default. For those that don’t know, autorun.inf is a file that is placed in your external media and it allows the user to define a program or run automatically when the external media is inserted into a computer. Now, as I already mentioned earlier, because of potential security issues with autorun.inf, many users have disabled it on their computers. So, just because you create an autorun.inf file does not mean your menu will in fact autorun on every computer. However I do suggest you create an autorun.inf file because it will become handy on those computers that do not have autorun disabled. Note that the functionality of your menu will be the except same with or without autorun.inf. The difference is with autorun.inf your menu will autorun (if applicable) when the external media is inserted into your computer and without autorun.inf you will have to manually run the .EXE file associated with your menu.
After all is set and done, and you are happy with everything as it is, hit the “Save (Ctrl +S)” button to save your menu. Then, hit the “Test (F9)” button to preview your menu (see how it looks and if it works properly). If you are happy with your menu, just hit “Exit (Ctrl + Q)” or if you want to still make changes, go back and make the changes, save the menu again, and test it again.
After you have successfully created your menu, if you had initially created the menu in the same directory as the contents of your external media like I suggested earlier (remember the .INI file), you do not need to do anything further except burn the CD/DVD or transfer the files to the USB/flash drive or external hard drive. If, however, you did not do what I suggested, you will need to take the files which are created (look in the directory where you saved the .INI file – there should be 3 or 4 files depending on if you opted in for autorun.inf or not) and place them in the proper place (the proper place is the top level directory in your CD/DVD, USB/flash drive, or external hard drive).
Here are a couple of tips concerning CAR:
- When using a custom icon, custom background image, or launching a file or folder, make sure the path is always relative and not absolute. In other words, make sure it looks similar to…
<APP_PATH>\Stuff\Cool_list.txt
…and not
G:\Stuff\Cool_list.txt
- I am not sure if this works with CD/DVDs also, but to make your USB/flash drive or external hard drive look “clean” and “organized”, I suggest you
- Keep the files related to the menu in the top most directory and all of the actual contents of your external media in a seperate sub-folder. Then, make all the files except the .EXE (the .INI and the .INI.BAK [also the autorun.inf, icon, and background images if applicable]) “hidden” so you don’t have to see them every time you open your external media (right click on them, go to properties, and check “hidden”).
- Although you are limited to 10 buttons per menu, you can easily create multiple menus for the same external media and link the menus together. In other words, use one button on each menu to launch the other menu (launch the menu’s .EXE file). This way not only can you better categorize your menu, but you are not limited to only 10 buttons per external media.
- The purpose of Compact AutoRunner menus is for use on external media. However if someone wants, they can always use the menus for files and folders stored locally on their computer.
All in all, Compact AutoRunner makes creating menus for external media dead simple. So what are you waiting for? Grab Compact AutoRunner from the following links and start creating your own menus today:
Version Reviewed: v1.0.1 Build 100
Supported OS
Officially: Windows 98/ME/2000/XP/VISTA
Unofficially: Win7
Compact AutoRunner homepage [direct download]

 Email article
