 If you’ve already rooted your Samsung Galaxy Note 10.1 2014 Editon using our handy guide, and are now looking at installing a custom recovery on your phone, here’s a step-by step guide which will walk you through the process of installing TWRP Recovery on your rooted tablet.
Disclaimer: This guide is intended as a helpful how to. dotTech and its writers are not responsible for any gain or loss (including but not limited to bricked devices) incurred as a result of following this guide. Rooting and flashing a custom recovery may void your warranty. Proceed further at your own risk.
REQUIREMENTS
This Custom Recovery Installation guide is for the Samsung Galaxy Note 10.1 2014 Edition, model numbers . You can confirm the model number by going to Settings > About Device on your phone or by checking the packaging box.
BEFORE WE BEGIN
Download the following files
- Samsung USB Drivers – Download and install on PC
- ODIN – Download and extract the zip to your desktop
- TWRP Recovery Tar File – Download to your PC TWRP Recovery for Galaxy Note 10.1 Exynos ( Wifi | Wifi + 3G)
TWRP Recovery for Galaxy Note 10.1 Snapdragon (LTE)
How To Install TWRP Recovery on Samsung Galaxy Note 10.1 2014 Edition
- First of all, download and install the Samsung USB drivers on your PC
- Next download the TWRP Recovery file for your device from above, and save it on your desktop
- Download Odin and extract the zip to your desktop too
- Power off your tablet
- On your PC, launch ODIN as administrator
- Now power on your tablet while pressing the Volume Down + Home + Power buttons at the same time. At the warning screen, press Vol Up to enter Download Mode
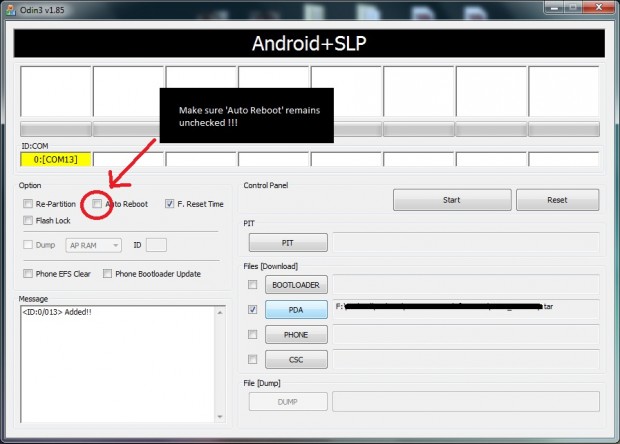
- Now plug in your device to the PC. You should see an Added! message in the Odin window

- Click the PDA or AP button in ODIN and load the TWRP Recovery tar.md5 file that you downloaded to your desktop
- In ODIN, uncheck the Auto Reboot box. This is because the OS will re-flash the stock recovery upon reboot. Leave everything else as it is

- Click the Start button in Odin to start flashing the recovery
- Once done, you should see a PASS message at the top-left in Odin.
- Disconnect the tablet and reboot to TWRP. You can do this by pressing and holding Volume Up + Home + Power buttons together
That’s it. You now have TWRP Recovery installed on your rooted Galaxy Note 10.1 2014, and are all set to explore custom ROMs and mods for your device.

 Email article


