Assuming you have the hardware to support it, you are able to switch from 32-bit version of Windows 10 to the 64-bit version of Windows 10. Naturally when you are upgrading from Windows 7 or Windows 8 to Windows 10, Microsoft will automatically give you the same version. For example, if I was running 32-bit version of Windows 8, I will be upgraded to the 32-bit version of Windows 10 without any choice. That is unless you follow this guide. Here you will learn how to switch from 32-bit to 64-bit version of Windows 10.
REQUIREMENTS
- First, you must check if your Windows PC does support a 64-bit processor. To do that, navigate to the Start menu > Settings app > System > About. Now look at the right side of the system type.
- The important part to note is the ‘x-based processor’. That’s the part that’s telling you what your computer is capable of running. The information on the display before that in the system type is telling you what you are currently running. For example, if you can see 32-bit operating system, x64-based processor, that means you are currently running the 32-bit CPU of Windows and are capable of running the 64-bit version.
- Those of you who see the computer only supports 32-bit processors cannot run a 64-bit version of Windows 10. With that being said, because past versions of Windows were bought on disk by many, there are heaps of people out there running the 32-bit version that could be running the 64-bit version if they knew better.
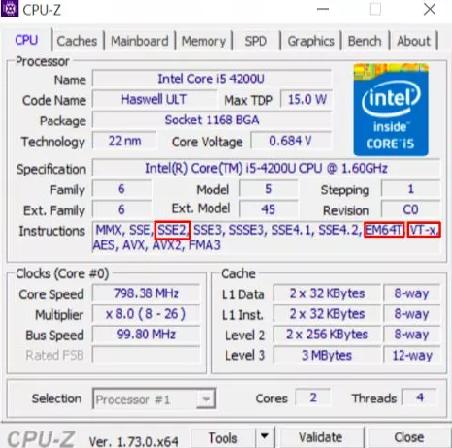
- Download the CPU-Z software from this page. There are some other requirements Windows 10 needs that I’ll run through in a minute and the CPU-Z software will help you easily identify those facts about your PC.
- In regards to the CPU-Z software, Windows 10 also needs PAE, SSE2, and NX. You can read up on that from Microsoft here. The 64-bit version of Windows 10 will not install without these features. The screenshot below will help you identify them:

- You should be able to see the areas of interest under the “instructions” section. The “EM64T” or “AMD64” tells us PAE is supported. The “VT-x” or “VT-d” tells us the NX is supported. Additionally, the SSE2 should come up as the exact match to let us know that it is supported.
HOW TO SWITCH FROM THE 32-BIT VERSION OF WINDOWS 10 TO THE 64-BIT VERSION OF WINDOWS 10
- Make sure you backup all of your files before starting. You will wipe all the installed programs and files. You will rely on restoring those programs and files later. Without a backup, you will lose them.
- You must clean install Windows 10 to switch to the 64-bit CPU version. You cannot follow an upgrade path from the existing 32-bit installation.
- Upgrade to Windows 10 if you haven’t upgraded already. Use the upgrade tool to upgrade your machine. Microsoft will automatically give you the 32-bit architecture if you are running the 32-bit version now. That’s fine. We will solve that problem soon. First you must install the Windows 10 so it is activated on your computer.
- Download the media creation tool from Microsoft. Those with 32-bit architecture must still download the 32-bit version of the media creation tool.
- Select the “Create installation media for another PC” option. You can now install that media on a USB drive or a disk.
- Once the wizard starts, you’ll be asked whether you want to create the 32-bit or 64-bit media. Here is where you need to choose the 64-bit installation.
- Reboot the computer from the installation media.
- Choose the “Custom install” when installing Windows 10.
- You will be asked to enter a product key. Skip this step and continue. After skipping several of these commands you’ll get to the desktop where Windows 10 will automatically check with Microsoft for the activation.
- Job done! You should now be running the 64-bit version of Windows 10.

 Email article


