For an unknown reason, Microsoft hasn’t included the option to turn off the automatic updates in Windows 10 like it did with past operating systems. If we were to try to guess why, I’d say they feel they have made Windows 10 well enough for the automatic updates to not hinder your experience in any way like it once did it past build. I turned off the automatic updates with my Windows XP because it was so slow when booting up, there was no other solution. Since most people are using PCs that were made in the last five or so years, we know the PC itself can handle greater memory challenges. Couple that with Microsoft’s improvements with the latest Windows 10 release and they feel everything is going to work out well enough that you shouldn’t ever need to sacrifice your security and other potential issues by not having the automatic updates enabled.
With all that being said, there are still going to be people out there who would prefer knowing how to disable automatic updates in Windows 10. Moreover, I wouldn’t bet against Windows 10 automatic updates creating an issue on the odd and rare occasion for some. Here is the guide that teaches you how to disable automatic updates in Windows 10.
Notes:
- Those of you who want to learn how to disable Windows 10 automatic download from Windows 7 and Windows 8 computers will need to follow a different guide that the one we are offering below. Likewise, learning how to disable automatic app updates in Windows 10 is different too.
- We recommend turning the Windows 10 automatic updates back on every so often so you don’t miss out on important security updates, new driver updates and other bug fixes to help keep your operating system running at optimum levels. That’s particularly a good idea at the time of publishing this post because Windows 10 is still new and will likely see a few updates worth noting still to come in the months ahead.
HOW TO DISABLE AUTOMATIC UPDATES IN WINDOWS 10
- Right-click the Start bar and choose the ‘run’ option. Alternatively, use the Hotkey combination of Windows Key + R to open the Run box.
- Type services.msc and hit Enter.
- Glance in the services Windows and find the Windows Update service.
- Right-click the mouse over the Windows Update option.
- Choose properties from the new menu.
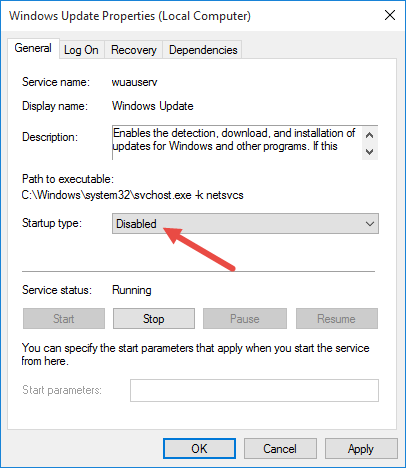
- There are two things you must do from the Windows Update Properties:
- i. Click the Stop button to stop the service.
ii. Change the Startup type to disabled.
- Click the ‘OK’ button and you are done!
Now the Windows Update won’t run when you start the computer. That will mean all of you who didn’t want the Windows Update running because of a slow boot up process, will find that problem solved.
Allowing the automatic updates in Windows 10 again is easy: follow the same steps during the guide until you get to the properties box. Now change the ‘disabled’ option from the drop down menu to ‘manual’. Click the ‘OK’ button and navigate to the Windows Update available from the PC Settings. Now manually check for updates.

 Email article


