HandBrake is an extremely popular open source cross-platform (Windows, Mac and Linux) freeware for converting (aka transcoding) videos from virtually any format to the most modern, widely supported, user-friendly formats. VidCoder uses HandBrake as its encoding engine. Why VidCoder when Handbrake itself helps convert videos for your devices, and does the other customizations? Well, to some of us, the user interface (UI) of HandBrake is a bit daunting to the novices, at least on Windows platform. The UI of VidCoder seems to be a little more pleasing to the eye than that of HandBrake. VidCoder also adds pared-down menus and options.
WHAT IS IT AND WHAT DOES IT DO
Main Functionality
Vidcoder helps convert videos (aka re-encoding or transcoding) for your iPod, iPhone, iPad, PSP, Android/Windows phone/tablet or even laptop, and implement subtitles, chapter break-ups, and the other customizations.
Pros
- Multi-threaded
- H.264 encoding with x264 video codec
- H.265, MPEG-4, MPEG-2 video options
- AAC, HE-AAC, AC3, MP3 audio codec options and ‘Passthrough if possible’
- MP4, MKV containers (aka formats)
- Completely integrated encoding pipeline: no large intermediate temporary files
- ‘Keep Aspect Ratio’, ‘Cropping’ options for picture
- Detelecine, decomb, deinterlace, denoise, deblock, rotation, reflect filters
- Target size, bitrate or quality choice for video
- ‘2-pass Encoding’ opportunity
- ‘Framerate (FPS)’ ‘Same as source’ selection for video
- ‘Same as source’ option for the audio sample rate, ‘Auto’ option for the bitrate
- ‘Include chapter markers’ option
- Batch encoding possibility
- Instant source previews
- Small encoded preview clips can be created
- Pause or resume encoding is allowed
- Freeware
- Portable version is available
- 32/64 bit versions are available
- Support of multiple languages
Cons
- Windows only
- .NET 4 is required
- No option to keep the original untouched audio
- No option to keep the original resolution
- No 10 bit x265 encoding
- Doesn’t work on protected DVDs, BDs
The client profile of .NET 4 is required only. If you don’t have it installed in Windows 7, VidCoder will prompt you to download and install it. If your operating system is Windows 8 or above, you won’t need to install anything (.NET 4 pre-installed).
Discussion
Video encoding: Some facts
In the world of video encoding/transcoding, there are a plethora of applications, including the free ones. The primary challenge is that one needs to maintain the transparency, i.e., how close the picture quality (PQ) of the encoded frame is to that of the original frame, at the smallest possible size. Lower quality pictures might be blurry, or have blocky video artifacts. A tradeoff exists between the PQ and the data size. The PQ increases as you go on increasing the file size. At an optimum point, you get possibly the best looking picture, i.e., even if you add bits and bytes to it, it may not give the impression of being any better. The additional problem is that all videos are not crafted one and the same. Compressing videos with motions or complex details is more difficult.
And, there are the 1-pass and the 2-pass encoding alternatives. In 1-pass encoding, which is the oldest and the most commonly used mode, the size of the data for the video compression per second is fixed; higher the value, better is the quality. The bad news is that the encoder is not aware of what the rest of the video is like while working on a particular segment of the video; therefore, it distributes the data evenly across the video as a result of which the simple parts of the video are getting surplus data. The complex parts would perhaps look bad if you lowered the bitrate to make these parts efficient. If you use 2-pass encoding, an initial scanning pass is done over the entire video (to get an idea of what it turns outs to be), and this is how this mode can understand how to swing the data around from plain scenes to the more intricate scenes while still preserving the overall average video bitrate. The result is a much better video output than what 1-pass encoding could offer.
The ‘Target Size’ mode calculates based on the selected audio track(s) and the video runtime to find out the right video bitrate that will give rise to the defined size. However, there is still a caveat in this method. You may not get good results all the time if you are transcoding multiple videos with the same settings; for example, relatively simple videos like animes (mostly) will be flooded with data, while complex videos will not get enough data to keep bad PQs away. One may simply increase the data rate so high that even the most complex videos will look just fine, but by raising the data rate, one is adding even more unnecessary information on the simple videos.
In the ‘Constant Quality’ mode, which requires only 1-pass (faster than 2-pass), a definite PQ number (CRF or constant rate factor) is given. In the x264 world, lower values signify higher qualities, and higher values translate to lower quality. The quality targets between 18 and 25 are quite practical. The ‘Constant Quality’ mode may the best one to go for when one doesn’t need to strictly control the output size.
Video encoding: Steps & Tips, especially for the beginners
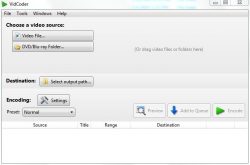
- ‘Choose a video source’: You may have either ‘Video File’ or ‘DVD/Blu-ray Folder’. Click the appropriate button to load it (or File > Open Video File or Ctrl+O; or File > Open DVD/Blu-ray Folder or Ctrl+F). You may also drag video files or folders on to the interface.
Once the source video is loaded, you will be able to ‘Preview’ (play the whole video, or encode & play a small clip), ‘Add to Queue’ (batch encoding), or ‘Encode’ it. The file details will be visible, too; for instance, the ‘Source’ filename/location, ‘Time Range/Chapters/Frames’ of ‘Video’, the ‘Audio’ details (the ‘Add Track’ button will also appear), and the ‘Edit’ button of ‘Subtitles’. You may pick up ‘Subtitles from source’, or add ‘External subtitles’ (the ‘Import .srt File’ button).
You can also enque multiple files (File > Enque Multiple Files or Ctrl+Shift+O), or enque multiple titles (File > Enque Multiple Titles or Ctrl+T).
- ‘Select output path’ or ‘Destination’ of your choice (your favorite folder or directory)
- ‘Encoding Settings’ (Windows > Encoding Settings or Ctrl+N):
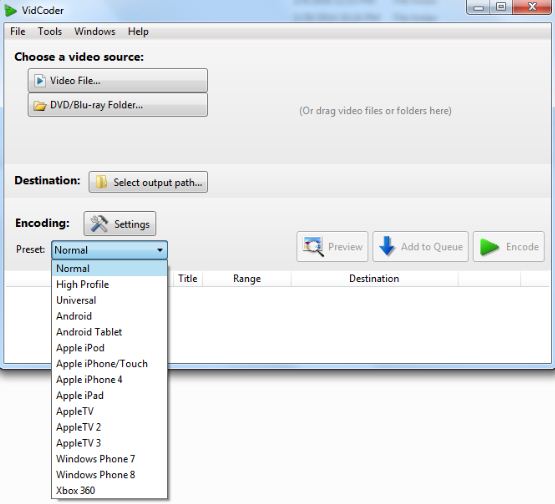
If you want to ensure your output compatibility to your device like Android, Apple, Windows Phone or Xbox 360, then select the desired ‘Preset’ from the drop-down menu as shown in the following picture:

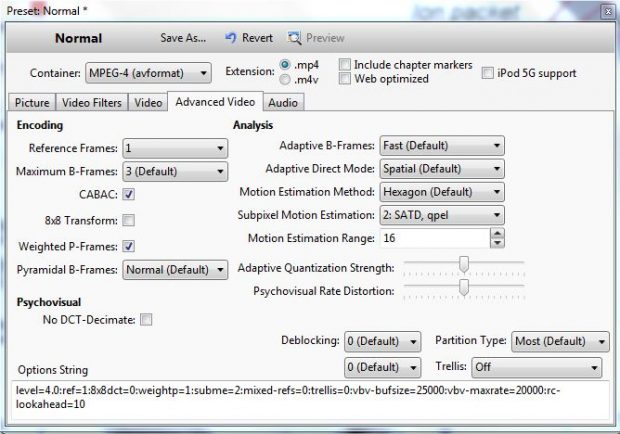
If you are not too concerned about compatibility (e.g., the modern Android devices with a media player like VLC or BSPlayer virtually plays anything that you throw in), go to ‘Settings’ that opens a new window ‘Preset: Normal’ that has 4 tabs:
A. ‘Picture’: Checking ‘Keep Aspect Ratio’ is desirable; else, your final video may look crazy. ‘Cropping’ should be ‘Automatic’ if you would like to avoid the black bars. For the neophytes, I don’t recommend any other parameters in this tab to mess around with.
B. ‘Video Filters’: A good number of filters for the advanced users, namely, ‘Detelecine’, ‘Decomb’, ‘Deinterlace’, ‘Denoise’, ‘Deblock’, ‘Rotation’, reflect. There is even an option for ‘Grayscale encoding’. The beginners are suggested not to touch these filters.
C. ‘Video’: Most folks would go with H.264 encoding with x264 video codec (the default one in Vidcoder) although some people may like H.265, MPEG-4 or MPEG-2. ‘H.265 (x.265)’ is the latest encoding option; so, choose only if your device supports it. ‘Target Size’, ‘Avg Bitrate’ or ‘Constant Quality’ may be selected, ‘2-pass Encoding’ being available with ‘Target Size’ or ‘Avg Bitrate’. As per the above discussion, you should opt for ‘Constant Quality’ if you are a greenhorn. Keep ‘Framerate (FPS)’ ‘Same as source’. Keep ‘Profile’ as ‘Main’, and ‘Level’ as ‘4.0’ (this may be important especially for the Sony PlayStation 3 users). The learners should not lay a hand on the other selections.

You will notice that ‘Encoder Settings’ is kept as ‘Basic’ by default. For the advanced consumers, ‘Advanced Tab’ exists; if you select it, the ‘Advanced Video’ tab will be added where you have a number of possibilities including a manual script.
D. ‘Audio’: You can choose the audio codec to be AAC [‘AAC (avcodec)’ recommended], HE-AAC, AC3 or MP3. Select ‘5.1 Channels’ for ‘Mixdown’ (pseudo Dolby, but space saving; the default being ‘Dolby Pro Logic II’), ‘Same as source’ for ‘Sample Rate‘, Auto’ for ‘Bitrate’. You may leave ‘Passthrough if possible’ or the other variables alone. Do note that you can add multiple audios by selecting ‘Add audio encoding’.
Either of the containers (aka formats) MP4 [‘MPEG-4 (avformat)’] or MKV [‘Matroska (avformat)’] may be had, the default being MP4. MKV is admired by the small size lovers as well as the quality enthusiasts, but MP4 is compatible with more hardware/software. For the MP4 option, you can have ‘Extension’ as either ‘.mp4’ or ‘.m4v’, and there are the ‘Web optimized’ and the ‘iPod 5G support’ choices. ‘Include chapter markers’ is present both for MP4 and MKV. It allows renaming the chapters. In the main window, one can customize them.
You can save a preset by clicking the ‘Save As’ button. You can export/import presets by going to Tools > Export Preset and Tools > Import Preset respectively.
- If you click the ‘Play Source’ button, it will open the system default player for the media playback. Click the ‘Encode Preview Clip’ button on the ‘Preview’ window (or Windows > Preview or Ctrl+P) if you want to play with the quality. This uses the existing settings, and allows you to try out different quality levels pretty fast. The default duration of the clip will be 10 s, the minimum and the maximum being 5 s and 120 s respectively.
Pausing or resuming encodes is allowed as well.
You can export/import queues by going to Tools > Export Queue and Tools > Import Queue respectively.
CONCLUSION AND DOWNLOAD LINK
I don’t have practically any reasons not to give it two thumbs up. Yes, it doesn’t have options to keep the original resolution/audio, or to do 10 bit encoding, or to work on encrypted discs, but there are no freeware that do have all of these options. Please note that the operation of VidCoder doesn’t need HandBrake.
Price: Free
Version reviewed: 1.5.34.0 (x86) (32 bit) portable
Supported OS: Windows 7/8 (Windows 10 support unknown)
Download size: 9.41 MB
VirusTotal malware scan results: 1/55
Is it portable? Yes

 Email article


