 Email article
Most things that you view on the internet have some type of cache supporting them. On the web, that can help with what you are viewing being delivered quicker among other things. The Windows Store has a cache also that can be cleared. If you are browsing the Windows Store and are having issues with installing or updating applications, then it can often be the cache that is the culprit.
To fix cache-related problems, you need to clear the cache and then try doing what you were doing again. Windows gives users a couple of ways to go about doing this, and the way that will work best for your computer will depend on the problem. Windows makes it possible to reset the entire Windows Store cache (both for an individual account or all accounts on the computer), as well as an individual application’s cache.
How to clear and Reset Windows Store Cache in Windows 10
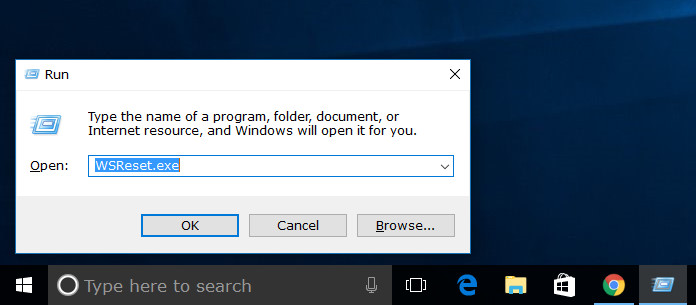
Open the Run box by typing the Windows logo + R keys on the keyboard. When the box opens, type “WSRESET.exe” into the available field and then press the “OK” key.
You’ll see a command line window open on the computer’s display. Wait for it to disappear again. When it does, it means the Windows Store is now reset.

How to Clear Windows Store Cache for 3rd Party Apps
Open a Command Prompt window. When you have the command line open, you get the choice between two codes. You can choose the one you think is best for your situation. To clear the Windows Store cache associated with the current user SID only, type “whoami /user” and then hit Enter on the keyboard. On the other hand, if you want to clear the Windows Store cache for all accounts’ SID, type “wmic useraccount get name,sid” and the hit the Enter key on your keyboards instead.

You’ll be given a string of code that’s associated with the account you are using now. If there are quite a few user accounts on the computer, for example, then you will get a string code for each, and it’s only the one next to your username that you want.
Next, press the Windows logo key + R on your keyboards to open up the Run dialog box again. This time type “Regedit” and hit the “OK” button. It’s possible to open up the Registry Editor on any version of Windows 10, including the Home version that most people use—although, you’ll probably need to click “Yes” when you get the User Account Control (UAC) screen.
Reset any current paths that you might have open in the Registry Editor from last time so you can easily navigate it this time. To do that, just click on the open keys from the left side pane. When you have the five keys in the left pane and nothing else, navigate to this path: HKEY_LOCAL_MACHINE\SOFTWARE\Microsoft\Windows\CurrentVersion\Appx\AppxAllUserStore.

Expand the left side pane if you need to make it larger so you can see the full line of numbers available beneath the final key from the path above. It’s in here that you’ll find one of these strings of numbers matching up with the line of code that you were given in the Command Prompt window that makes up your SID key. Now all you need to do is delete the same digits that are associated with your user account. To delete the SID key, you just need to right-click on it or press and hold on it and then choose the “Delete” option.

The Windows Store still doesn’t have as many applications available for it as many would have hoped by now, but the usability of the Store is typically pretty good. One of the few problems people have is related to the cache–and that’s nothing new when it comes to websites either, so it’s OK to not hate Microsoft for that.


