Windows 8 not only brings many new features, but it also level-up some great features from Windows 7. One of them is the ability to take screenshot. In Windows 7, you can use the new Snipping Tool to take and edit screenshot. And this tool still there in Windows 8, but there is another very cool new way to directly take a screenshot then it will be automatically saved to the default location. By default, all screenshots that shot by this way is saved in C:\Users\[username]\Pictures\Screenshots; if you may want to save screenshots to other location, this is an article you should read. Additionally, I also will show you how to restore the screenshot location to default.
HOW TO TAKE AND SAVE A SCREENSHOT
Before Windows 8, the basic way to take a screenshot is pressing the Print Screen (Prt Sc) key then copy to Paint and save it. In Windows 8, you just need a hotkey to take and automatically save your screenshot to default location. The hotkey is Windows + Print Screen. If the Print Screen key on your keyboard need to be fired by Fn key (mostly happens in laptop keyboard), you can press Windows + Fn + the key that contains Print Screen (Prt Sc) key. After that, you can go to C:\Users\[username]\Pictures\Screenshots to see your screenshots.
HOW TO CHANGE THE DEFAULT SAVED SCREENSHOTS LOCATION
To change the default saved screenshots location, you need to follow these steps.
- Open default location by this path: %userprofile%\pictures\screenshots
- Right click/long tap on the empty space then choose Properties.
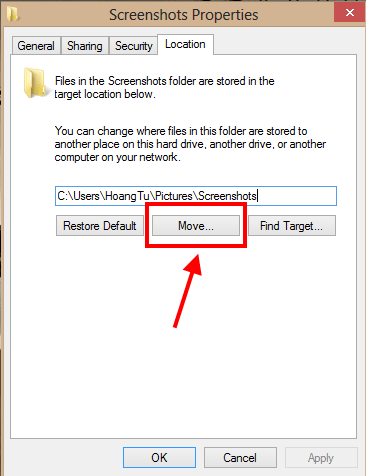
- In the Properties window, you should switch to Location tab then click the button “Move…”
- After that, you have to choose the folder you want to change to and click Select Folder.
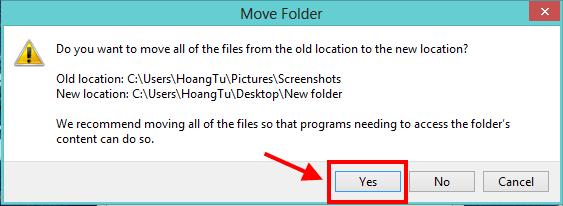
- When you press OK button, you will be asked to confirm the action, so that just click Yes.
- Once the process completed, you may notice the new folder’s name has changed to Screenshots. From now on, all of your screenshots will be saved to that folder.
HOW TO RESTORE THE DEFAULT SAVED SCREENSHOTS LOCATION
If you have changed the screenshots location then you want to restore it to the default location. You just need to do these simple steps.
- Navigate to your screenshots location.
- Right click/long tap on the empty space then choose Properties.
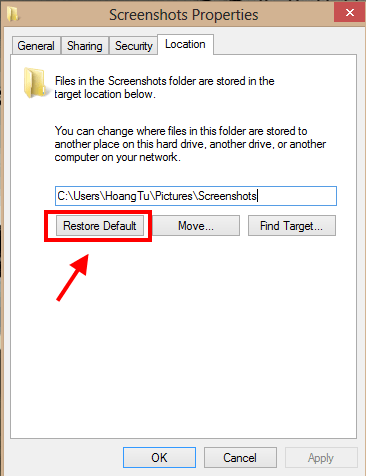
- In the Properties window, you should switch to Location tab then click the button “Restore Default.”
- You should click Yes button in the Create Folder and Move Folder dialog, which will be appeared when you choose OK button.
CONCLUSION
This is my favorite tool in Windows 8 because it helps me to create a screenshot much faster and easier. I have changed the default location to a SkyDrive folder so that I can access my screenshots then write an article everywhere. Hope this article is helpful to you.
[via WindowsEightForums]

 Email article


