 Email article
Despite having tons of new things, Windows 8 also eliminates many traditional features such as Start menu. One more thing that Windows 8 lacks the ability to create Ad-hoc networks. Ad-hoc network is a very powerful Windows feature for sharing your Internet connection with other devices (phone, tablet, other computers, etc.). In the general, with Ad-hoc network, you make your computer a Wi-Fi hotspot and other Wi-Fi enabled devices can use your Internet connection.
Unfortunately, Windows 8 can not longer make Ad-hoc networks. It can, however, still share an Internet connection with other devices (phone, tablet, other computers, etc.) using a hosted network (which is similar to Ad-hoc network). In this article, I will show you how to set up a hosted network in Windows 8.
(Using a hosted network can also be thought of as tethering your Internet connection.)
Step 1: CHECK FOR COMPATIBILITY TO CREATE HOSTED NETWORK
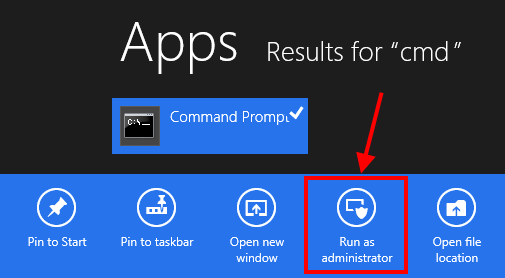
First of all, you have to check whether your wireless card supports hosted network. To do this, you should open Command Prompt by pressing Windows button (on tablet, swipe from the right edge then choose Search button) then type “cmd” (without the quotes). You may see the “Command Prompt” result on the left side and you have to right click/long tap on it then choose “Run as administrator” in the app bar below.
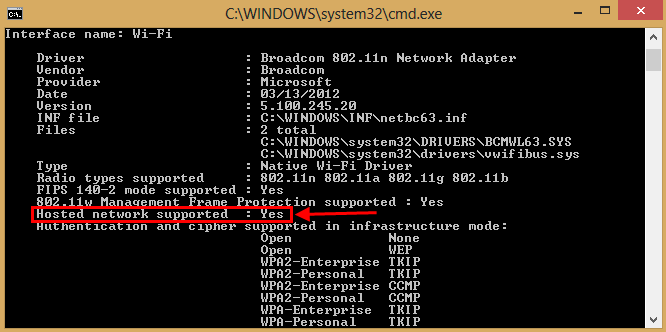
In Command Prompt window, you should run this command to check your wireless card: ‘netsh wlan show drivers‘ (without the quotes).
After the process has finished, you need you focus on the line “Hosted network supported.” If it shows “Yes,” that means you can create a hosted network, and the “No” answer means you can’t.
STEP 2: CREATE A HOSTED NETWORK
If you still in Command Prompt window, you are ready to go. If you don’t, just simple open it again. To create a hosted network, you should do these steps.
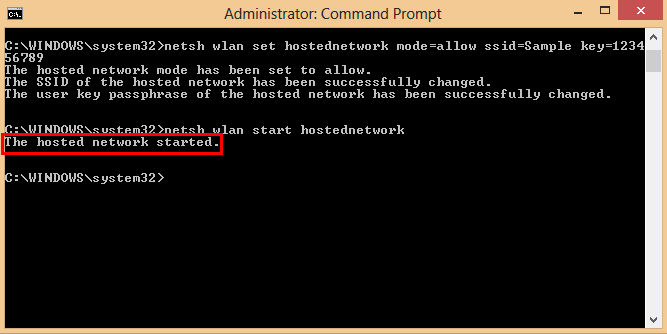
- Enter this command in Command Prompt window then press enter.
netsh wlan set hostednetwork mode=allow ssid=networkname key=password
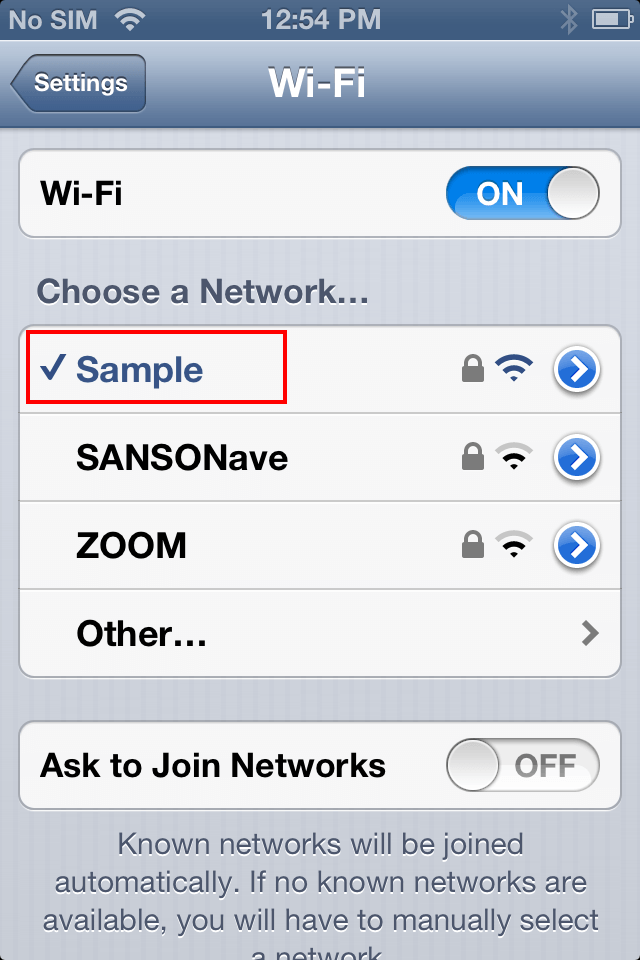
- In the command, networkname and password is the name and password you want to set for your network. For example, I can create a network named “sample” with password “123456789” by this command
netsh wlan set hostednetwork mode=allow ssid=Sample key=123456789
- After that, you network now has been created. What you have to do next is turn it on by enter this command.
netsh wlan start hostednetwork
- Once you see the line “The hosted network started,” that mean you successfully create a hosted network.
STEP 3: SETUP THE NETWORK
After creating the hosted network, you just have to do some simple things to make it available to other devices.
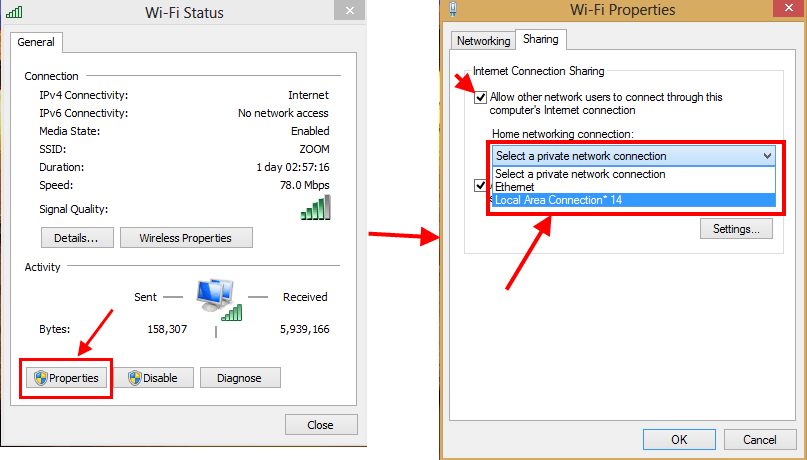
- Open “Network and Sharing Center” by right click/long tap on the network icon in system tray then choose “Open Network and Sharing Center.”
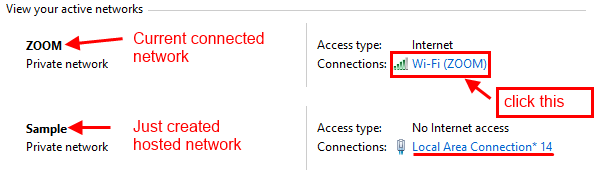
- In Network and Sharing Center window, you can see your current connected network. In my example, the current one is named “ZOOM” which is a Wi-Fi connection; I have to click on the blue line “Wi-Fi (ZOOM)” that places on the right side. Additionally, I notice that my hosted network’s connection name is “Local Area Network *14.”
- Then I should click “Properties” button in the new opened window.
- In Properties window, I will choose “Sharing” tab then check the box “Allow other network users to connect through this computer’s Internet connection.”
- Below that is a drop down list, I will choose it and select “Local Area Network *14,” which is my new hosted network.
- Finally, I just click OK button and wait for it to be finished.
- In the photo below, I use an iPhone to connect to my hosted network. And it just works perfectly.
CONCLUSION
In my opinion, this is a very interesting thing in Windows 8. Before I had a Wi-Fi router in my house, I had used this feature to share my desktop computer’s Internet to my phone. Hope you can find this article helpful.


