 With the recent rapid releases of Firefox, there may be a desire to test the latest release of FF before upgrading to ensure add-on compatibility, etc. There are many ways to go about testing the latest release of Firefox including using portable versions of FF or installing on a virtual machine. This article provides a how to guide on another method of testing Firefox releases – installing multiple (non-portable) versions of Firefox on your computer.
Note: This guide is written for Windows users. However, the same concept can be applied to Linux and Mac OS X; the process is mostly the same with only a few minor variations.
Before We Begin
Before you delve into installing multiple versions of Firefox, there are a couple things you need to do.
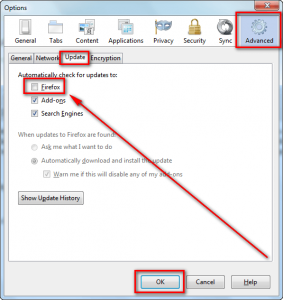
Firstly, ensure auto-updates for Firefox have been disabled. The reason you want to disable auto-updates is if you don’t disable auto-updates then Firefox will automatically update you to the latest version of Firefox – overwriting the current version you have – which then nullifies the whole point of testing a new release separate from your main, day-to-day browser.
To disable auto-update in Firefox, go to Firefox Options -> Advanced -> Updates, uncheck Firefox, and click OK:
Secondly, you have to make a decision. Do you want the test versions of Firefox (the latest releases you will test before upgrading your main FF install) to access your add-ons, bookmarks, etc.? If yes, then you don’t have to do anything else — proceed to the next section in this guide. However, if no (i.e. you want to keep your main FF data separate from your FF test installs), you need to create a new profile for each of the versions of Firefox you will install.
To create a new profile you need to launch Firefox’s Profile Manager. First ensure Firefox is closed. Then, to launch the profile manager, press Win + R on your keyboard, type firefox.exe -p in the Run window that pops open, and press OK:
(Note: You may have to type the full path to Firefox if it cannot be found simply by typing firefox.exe, e.g. you may need to type C:\Program Files\Mozilla Firefox\firefox.exe -p)
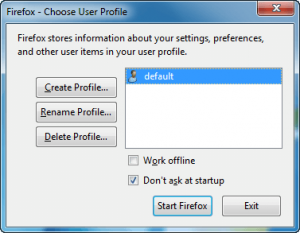
Once you press OK, Profile Manager will open:
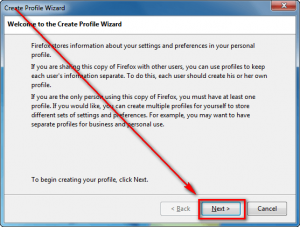
From the Profile Manager click the Create Profile… button and create a new profile:
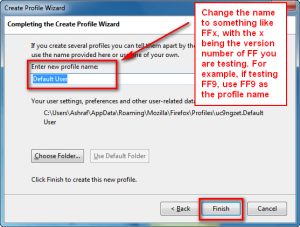
Make sure to change the name of the new profile to something that is relevant to the version of Firefox you are installing, e.g. if installing Firefox 9 name the profile FF9.
Once you hit the the Finish button, you will be taken back to the Profile Manager. Repeat this new profile process for each version of Firefox you plan on installing. Close Profile Manager after you are done.
Now that you have a new profile created for each Firefox version you plan on installing, you have another decision to make. By creating a new profile you have ensured the new Firefox installs won’t mess with your current Firefox data. However, part of the process of testing a new Firefox release is making sure your add-ons work, right? Therefore you may still want new Firefox installs to have access to your data but at the same time ensure any changes made with new Firefox installs don’t affect your current/main Firefox install. This can be accomplished by copying the data from your current Firefox’s profile into the new profile(s) you just created.
To copy profile data, press Win + R on your keyboard, type %APPDATA%\Mozilla\Firefox\Profiles\ at the Run window that pops open, and click OK:
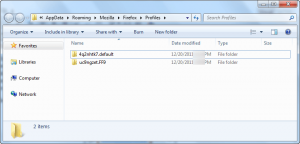
Once you click OK the folder where Firefox profiles are stored will open:
Double-click on the folder named xxxxxxxx.default (with the xxxxxxxx being random numbers and letters — it is different for everyone). Once inside the xxxxxxxx.default folder, select and copy everything (easiest way is to press Ctrl + A and then Ctrl + C on your keyboard). Now go back to the main Firefox profiles folder and double-click on the folder of the new profile you just created. In my example, the new profile folder is named uc9ngzet.FF9 because I named the profile FF9. Once inside the new profile’s folder, paste everything you just copied (easiest way is pressing Ctrl + V on your keyboard). You may be asked for administrator access to paste some files — give it.
Repeat this process for all the new profiles you created. Close the Firefox profiles folder when you are done.
Once you have done all that is mentioned above, you are ready to begin installing multiple versions of Firefox.
Installing Multiple Versions of FireFox
To install multiple versions of Firefox, do the following:
- Download the version of you Firefox you want to install.
- After the download has finished, run the installer.
- Install like you normally would install any program expect for a few things:
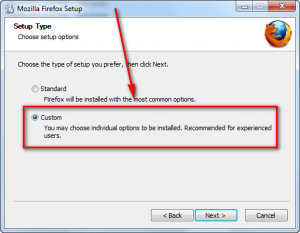
- First, make sure to select Custom when asked for Install Type:
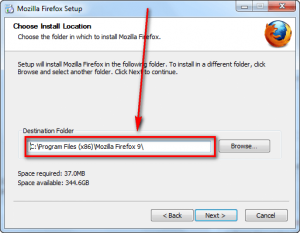
- Second, when prompted to select Install Location, change the Destination Folder to anything except the default C:\Program Files\Mozilla Firefox. I suggest placing it in a folder named after the version of Firefox you are installing, e.g. if installing Firefox 9 place it in C:\Program Files\Mozilla Firefox 9:
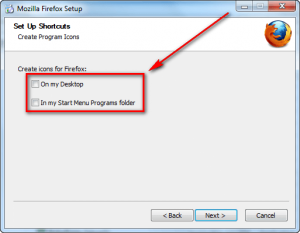
- Third, make sure to not create a shortcut on your desktop or Start Menu because it will override your existing Firefox shortcuts:
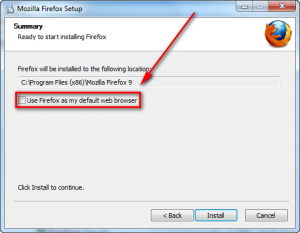
- Fourth, make sure to not make this new install your default browser:
Repeat this process for all versions of Firefox you want to install.
After installing all versions of Firefox you desire following the method described above, you are almost ready to begin testing them — there is just one more thing you need to do.
Last Step — Adding Command Line Arguments
By default Firefox is set to do two things: A) Use the default profile in the profiles folder B) Not allow users to run more than one instance of Firefox at a time. To remedy both issues (i.e. to force each new install of Firefox to use the profile specifically created for it and to be able to run multiple versions of Firefox at the same time, to make for easy comparisons) we need to launch new installs of Firefox with command line arguments.
Note: If you opted to not create a new profile for new installs of Firefox you need not worry about the first issue. The second issue is still of concern, however, so don’t stop reading this guide!
Command line arguments not as scary as they sound. In context of what we are talking about, they are simply text commands that modify how a program launches. They require no special expertise or knowledge to use and are extremely easy to implement. If you are confused (or scared) don’t be — the famous dotTech screenshot method of instruction will hold your hand every step of the way. (Yes, I made up that name on the spot.)
To launch new Firefox installs with the relevant command line arguments, do the following:
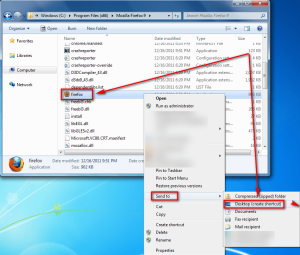
- Open the folder where you installed the new version of Firefox. In my example, that is C:\Program Files\Mozilla Firefox 9.
- Right-click on firefox.exe, go to Send To, and click on Desktop (create shortcut):
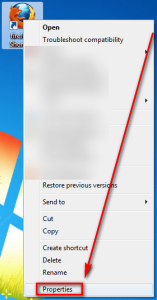
- Go to your desktop and look for the shortcut you just created — it should be named firefox – Shortcut:
- Right-click this shortcut and go to Properties:
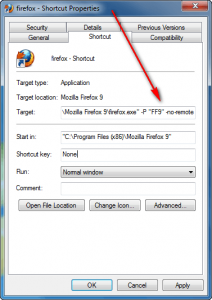
- At the Properties window look in the Shortcut tab where it says Target. In the Target box at the very end type -P “Profile Name” -no-remote with Profile Name being the name of the new profile you created earlier for this specific version of Firefox. For example, I would type -P “FF9” -no-remote. If you opted to not create a new profile, just type -no-remote. Make sure to put a space between the existing content and the new commands you are typing in. This is how it should look when you are finished:
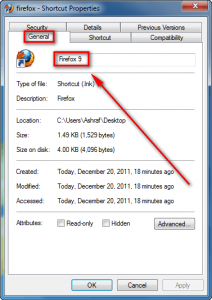
- Next go to the General tab and rename the shortcut to Firefox X, with X being the version of Firefox the shortcut is for, e.g. Firefox 9:
- Click OK to close the Properties window and apply both changes you have made.
Repeat this process for all versions of Firefox you opted to install.
After you have added the command line arguments, you are good to go. You can now start testing the new versions of Firefox you installed. Take note, however, to always launch the Firefox installs via the desktop shortcut. If you launch them from anywhere else then they may not launch with the proper command line arguments and you will have problems.
When Uninstalling…
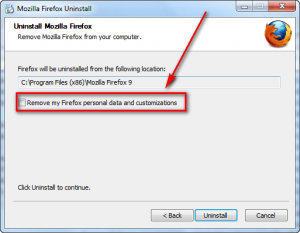
Eventually you will (hopefully) reach a point where you decide you no longer need the extra versions of Firefox; so you will uninstall them. You can uninstall the extra Firefox installs like you normally would but make sure to not remove Firefox personal data and customizations:
Also if you use a third-party uninstaller, like RevoUninstaller, be sure to not delete any leftover registry entries and leftover files.
If you do any of the above two – i.e if you remove FF personal data and customizations and delete leftover registry entries/files – you will be in a world of digital hurt.
Conclusion
There is no need to update Firefox just because Mozilla says so. You are more than within your rights to update when you feel comfortable with the new release of Firefox. This guide provides a method to safely test new releases of Firefox before upgrading your main Firefox browser. Enjoy!
Feel free to post any comments, feedback, tips, criticism, etc. in the comments section below.
[Thanks hatman for the inspiration behind this article.]

 Email article
