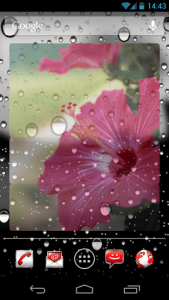
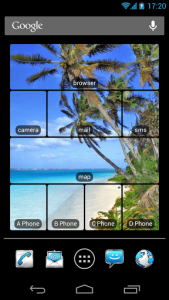
 I’ve always been a firm believer in that I know there’s a better way to setup homescreen icons and shortcuts in Android. While some launchers do allow you to use custom themes to swap out the way icons look a bit, they generally don’t change much. You can use MinimalisticText to create simple text based shortcuts, and similar apps to customize even further. What if you want to link a shortcut to a custom image? For example, what if I just want an image of my favorite headphones to link to Google Play music or something like that? Desktop Visualizer is an Android application –despite the fact that ‘desktop’ is a Windows term- that allows you to place shortcuts, or links on the homescreen which are represented by a custom image.
What is it and what does it do
Main Functionality
Desktop Visualizer is an Android customization tool that allows you to add customized homescreen widgets, which essentially act as quick shortcuts or links. The difference between this app and similar offerings is that you can use completely custom images as the base for your icons. This pretty much affords you endless possibilities when it comes to homescreen customization. You can spice up the images which a photo editor beforehand to offer kind of a matching theme, or you can just use original images for variety.
- Setup shortcuts with custom images or icons
- You add the shortcuts like you’re adding a widget
- There is quite the selection of downloadable themes and add-ons available in Google Play
Cons
- For additional functionality some of the add-ons are required (there are both free and paid add-ons available)
- Can potentially use quite a bit of system resources depending on the image quality you choose
- There are advertisements in the app settings
Discussion
By default, Desktop Visualizer only works like a standard launcher in that you can add shortcuts or links to installed applications, browser bookmarks, or several related functions. If you’d like to add shortcuts to the homescreen that directly dial a contact you will also need to download and install the DVRDirectCall add-on. There are also similar tools like DVRSizeConfigTool, which helps you set up correctly proportioned widgets for your screen resolution, and DVRImageCrop or DVRImageSlicer. The two latter add-ons essentially allow you to further customize any images you plan to use with the app.
 It should be noted that the add-ons are optional, and with exception to a couple of them they are mostly free. Here’s a complete list of add-ons that are available:
- DVRImageCrop- $2.94
- DVRImageSlicer- $2.94
- DVRSizeConfigTool- Free
- DVRAppListCache- Free
- DVRDirectCall- Free
- DVRAdRemover- $2.94
In addition to the function add-ons, there are a ton of theme packs, which I’m not even going to bother to list. They just add custom themed icons and images for use.
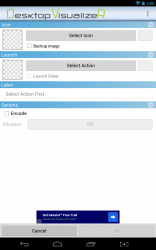 When you load up the application, you’ll see the UI which definitely looks a bit complicated at first glance. It’s really not that difficult to navigate or use though.
There are advertisements in the app settings, so keep that in mind. They can be removed by purchasing the optional add-on. That being said, the ads only show up in the app settings screen, they never appear in the homescreen widgets
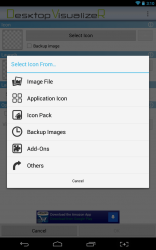
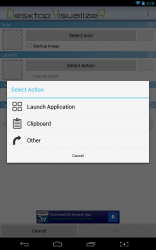
At the very top of the window you can choose the custom icon or image you would like to use, then below that you choose the action you would like the shortcut to perform. That’s pretty much it for setting up the various widgets. There’s quite a bit more going on in the application settings menu, which happens to be quite extensive.
To add a widget or shortcut to your homescreen you just choose a custom image and then a related action before tapping the “ok” button down at the bottom of the window. When choosing an icon (image), you can select an image file, existing application icon, one from an icon pack, add-ons or other image apps.
Of course, you have to add the actual widget to your homescreen, but this is done in the standard Android fashion. To reiterate, you just navigate to the Android widget menu and place your widget on the homescreen where you want it to appear. There are 17 different sizes to choose from when placing a widget, ranging from a 1×1 square to a 4×4 rectangle.
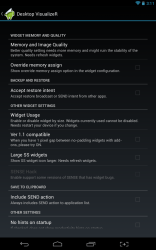
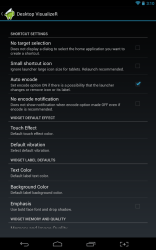
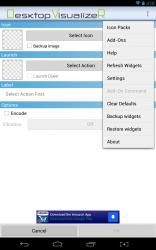
In the application settings menu you can customize the interaction effect which is a fancy way of saying you can change the displayed color when tapping on an icon. You can also configure text color, background color, and font type (bold with drop shadow or not).
A lot of the settings have to do with add-ons and how they work with Desktop Visualizer. Another setting of worth is the option to customize memory usage and image quality. You can select a maximum bitmap memory cell size, and a memory usage rating (from low to high) which essentially determines how much the widgets will use for system resources. The better the image quality, the more system resources the related widgets will take up. I would say this is really only a setting of note when using a tablet or smartphone with a high operating resolution and ppi display rating.
For reference, Desktop Visualizer uses about 22MB of RAM without any widgets setup. That number increases quite a bit depending on how many widgets you have running and the quality of the custom images you have set.
Conclusion and download link
 Desktop Visualizer is a powerful customization tool for Android that allows you to assign personalized images to icons and shortcuts (widgets). Essentially, users can add a widget to their homescreen that lets them perform various actions or operations and then tie said functions to a custom image. With a decent amount of time invested, it can be used to create a fresh yet personal homescreen. Since that’s what Android is all about, it means this app is ideal for anyone looking to spice up their device a bit. Check it out if you want this functionality.
Price: Free
Version reviewed: 1.4.1
Requires: Android 1.5 and up
Download size: 904KB
Desktop Visualizer on Play Store

 Email article
