Those who add software to their PC or Mac willy-nilly might lose track of some of the software they have installed. Would it not be great to have a database which you can open to find the location of all your installed software? The database could also include other details such as the size of the software packages.
You can set up a software database with the freeware OpenOffice suite. The software suite includes the Base application which has all the options required to set up databases. It is also a multiplatform software package compatible with Windows XP, Vista, 7, 8, 8.1, Mac OS X and Linux platforms. Check out the OpenOffice website to add it to your software library.
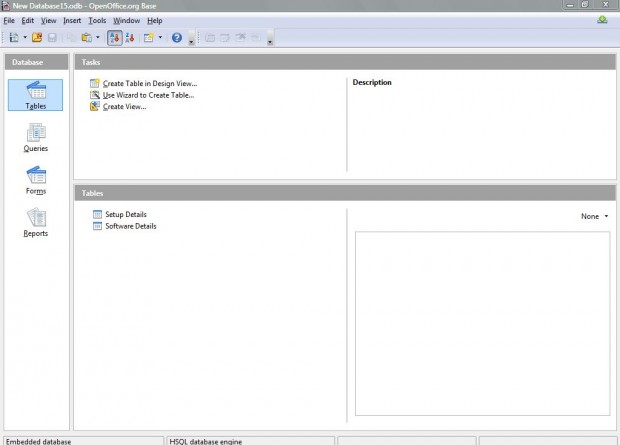
When you open Base, select the Create a new database option from the Database Wizard window. Then click Next and the No, do not register the database check-box option. Select the Open the database for editing option, and then Finish to save a new database. Type in the title of the database file, and click Save to open the Base software window.
Now you should input the software database fields, or table columns, in a couple of tables. Databases with multiple tables are relational databases which reduce the amount of duplicated data you might find in a single table (flat-file) alternative. The first table will include the following database fields:
- Software Title – The title of the software package, and primary key for the database.
- Publisher – The software publisher.
- Type – The type of software such as office, photo editing, games etc.
- Freeware – Whether the software is freeware or otherwise.
- Software Suite – Is the software a suite of packages?
The most essential field in this table is the software title. So long as you input the full software title including the specific version number, such as Opera 12.6, the software title is a unique identifier (otherwise the primary key) for the database records. To set up the first table with these fields, select Create Table in Design View to open the window below.
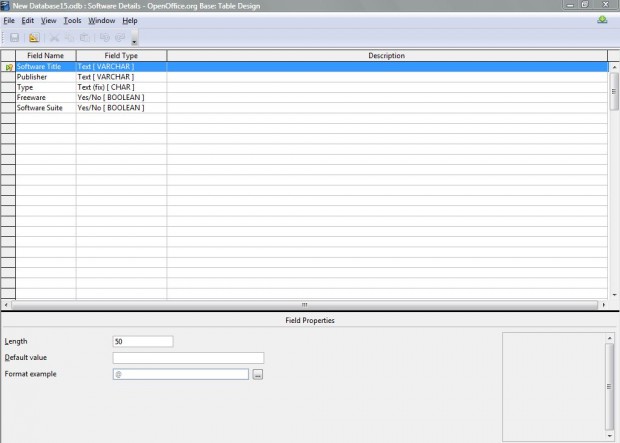
There you input the above database fields in the Field Name column. Next to that, there is a Field Type column where you should select a suitable type of field from the drop-down lists. Select the following field types for the table:
- Software Title – Text [VARCHAR]
- Publisher – Text [VARCHAR]
- Type – Text (fix) [CHAR]
- Freeware – Yes/No [BOOLEAN]
- Software Suite – Yes/No [BOOLEAN]
You add a primary key for the database table by right-clicking the far left of the software title row. Click on the Primary Key option to make that field a unique identifier for the database. You can also adjust the length of the fields in the Length text box near the bottom of the table window.
Once finished, click File > Save All and type in Software Details as the table name. Your table should match the one in the shot below. Then click File > Close, and open the Software Details table.
The second table in the database is one that includes setup details for the software. As such, the table title is Setup Details; and it has the following fields:
- Software Title – A duplicated field that will be the foreign key field linking the two tables.
- Default Software – Is the package default software?
- Software Location – This field includes the full location of the software, and is the primary key in the second database table.
- Size – The storage size of the software.
- Startup Software – A field to select if the package runs as startup software.
The software location is the most essential field in this database table. So long as you input the full location of the software including its exe, such as C:\Program Files\Opera\opera.exe, it is a unique primary key field. Right-click the far left of the location field’s row, and select Primary Key. You should select the field types as follows:
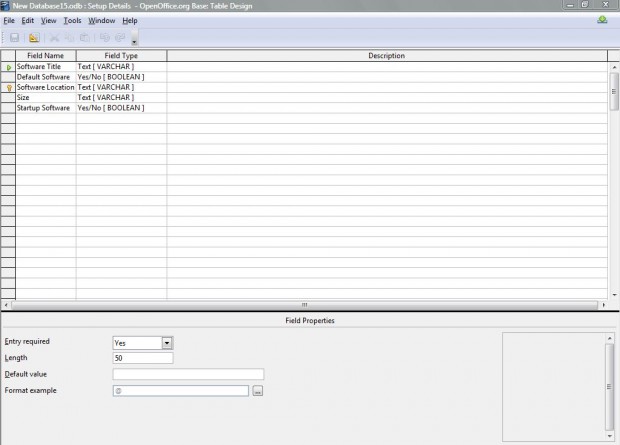
- Software Title – Text [VARCHAR]
- Default Software – Yes/No [BOOLEAN]
- Software Location – Text [VARCHAR]
- Size – Text [VARCHAR]
- Startup Software – Yes/No [BOOLEAN]
When you have done so, the table should match the one in the shot directly below. You should set the software location field length value to at least 500. Click File > Save As and input Setup Details in the text box. Then select File > Close, and click on the Setup Details table to open it.
Having set up two database tables, you should link them together. Database design relationships such as one-to-many, many-to-many, etc link the database tables together. This software database has a one-to-many relationship between the two tables. There are, after all, many ways to install one software package.
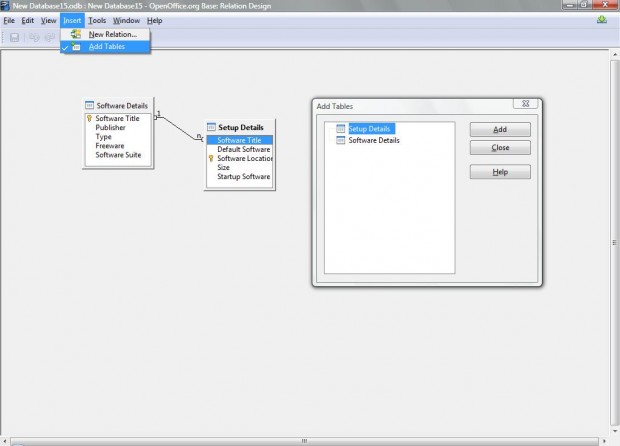
To link the tables together, select Tools > Relationships which opens the window below. There you should click Insert > New Tables to open the Add Table window. Click on the software tables and the Add option, and then Close to close the window.
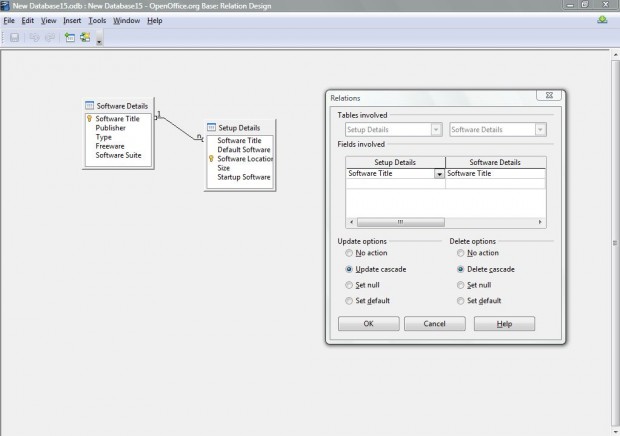
Now drag the Software Title field from one of the tables over the matching field on the other table. That should add a relationship line connecting the two tables as below. Right-click on the line, and select Edit to open the Relations window. Select both the Delete Cascade and Update Cascade options on that window, and then click OK to close it. Click File > Save, and the Close option to return to the primary Base window.
That’s the end of the first part of this guide. Now you have established a basic software database, with a couple of tables. You can update the database by inputting records directly in the database tables. However, it would be better to have a single data input form where you can enter, and remove, the software records. The second installment in this guide covers setting up an input form for the software database.

 Email article
