In Microsoft Office Word 2007, you can compare two documents while having a side by side view of the original, revised and compared versions of your files. If you wish to utilize such feature yet, you do not know how, all you need to do is to follow the steps listed below.
How to compare documents side by side in MS Word 2007
- Open the said program from your PC or laptop. To open MS Word 2007, click “Start” then go to “All Programs”. Find the “Microsoft Office” folder. Click on it then select “Microsoft Office Word 2007”.
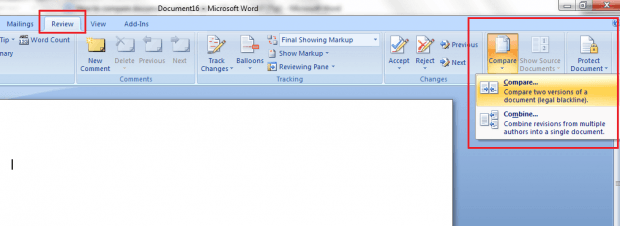
- Once you’ve opened MS Word, click the “Review” tab.
- Under the “Review” tab, find the “Compare” tool then click on it.
- Under the “Compare” menu, select the option for “Compare – compare two versions of a document”.
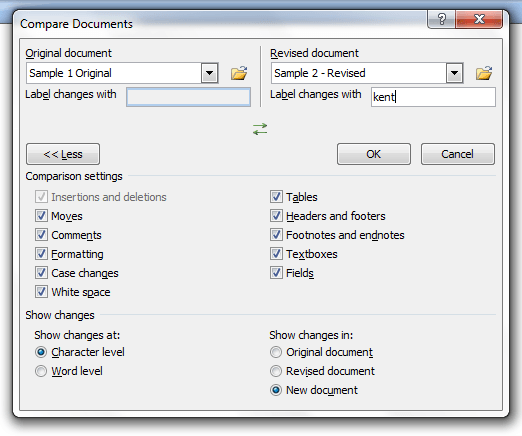
- A dialog box will appear. In the dialog box, you will be asked to select your original document as well as your revised document. Just click the small folder icon next to each section to browse and select your original and revised files.
- Now, if you want to add more specifications, just click the “More” tool at the bottom section of the dialog box then check the comparison settings and changes that you wish to apply.
- Click “OK” as soon as you’re done.
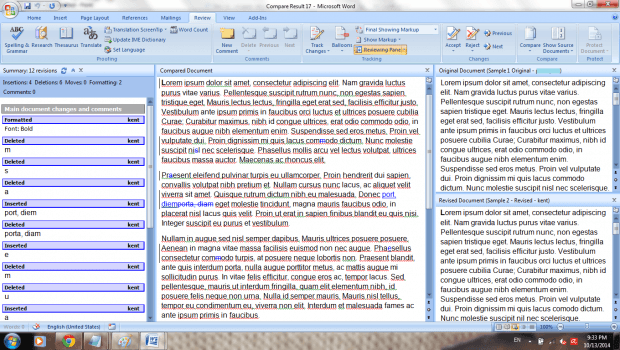
So that’s it. MS Word will immediately show you three versions of your documents in a side-by-side layout. These document versions are as follows – compared document, original document and revised document. The “Compared document” is where you can view all of the changes or revisions made to your original document. The changes will be highlighted. For a more detailed list of the revisions that you made to your main document, you can open the “Reviewing Pane”.
If you want to make further changes to your MS Word document, just edit the text in the “Compared document” pane then click “Save”. The changes will be saved to your revised document but if you want, you can also opt to save your latest revisions in a new document. To do so, simply click “Save as”.

 Email article


