Do you often highlight words when reading posts? If yes, then you already know that it’s such a hassle to highlight the same words over and over again. For every page or post that you read, you need to manually highlight each word or phrase. If you want a more efficient solution to your constant highlighting needs, then better read on.
This post will teach you the steps on how to always highlight specific words on web pages in Chrome.
How to always highlight specific words on web pages in Chrome
- Open your Chrome web browser.
- Go to Web Store then download the “Pearls Extension”. Install it on your web browser.
- Once installed, the extension will add its shortcut icon to your browser’s omnibar. The icon looks like a pearl (or white rounded object) so it’s very easy to recognize.
- Go to any web page or blog post. For example, you can open any published posts here in dotTech.
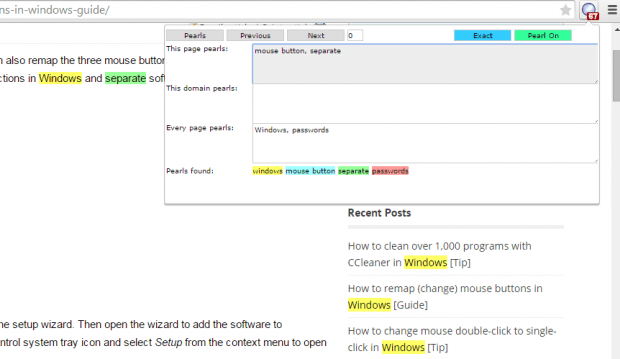
- To highlight words and phrases, just click the extension’s icon then type the words or phrases that you want to highlight in the fields provided. Do not forget to separate each word or phrase with a comma.
- Now, if you want to only highlight words on the page that you’re currently viewing, type the words on the field for “This page pearls”. If you want to always highlight specific words every time you visit a certain website or domain, fill in the text field for “This domain pearls”. As for the “Every page pearls” field, it is where you can type the words that you wish to highlight in every page.
- So that’s it. The words and phrases will be automatically highlighted as you type. In addition, this extension will always show your highlights so even if you close the page, your highlights for that particular page or domain won’t disappear. They will still show up the next time that you get to open or view that page.
- If you want to temporary disable your highlights, just click the “Pearl On/Off” button from the extension’s popup menu then switch it off.

 Email article


