By blurring out some parts of a photo, you can keep some information private without fully distorting the photo. It is quite useful especially if the photo that you want to share online contains some elements that you do not want to reveal to the public. For example, you can blur out an important location landmark that could possibly reveal your actual address.
Speaking of which, you can use any basic image editing software to censor your photos. Just make sure that your image editing software has a blur and select tool. If you don’t have any software for image editing, you can look for free alternatives online.
How to blur any part of a photo online
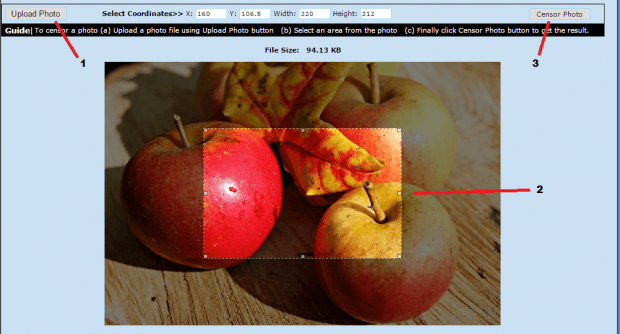
- Open this link on your web browser (ex. Chrome, Firefox, etc.). It will take you to the censor photo tool of “PhotoFuntoos”.
- After loading the tool, just click the “Upload Photo” button to upload the photo that you wish to censor.
- Once the photo has been fully uploaded, use the highlighted box to select the area that you wish to blur out. Just click and drag the selection points to resize the box.
- After making your selection, just click “Censor Photo” to confirm.
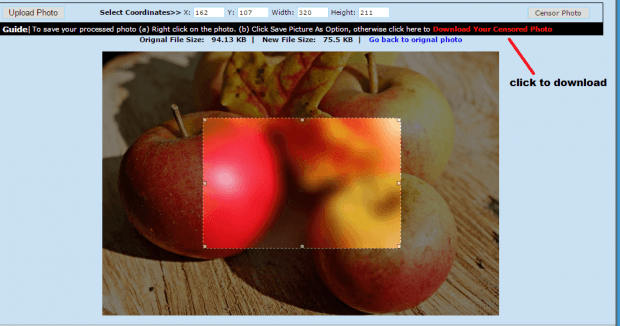
- Wait while the online tool processes your request. Once done, you can see that your selected area has already been blurred out. If you want to censor more areas, just repeat the steps listed above.
- To download your photo, just right-click on it then select “Save picture as”. If it doesn’t work, click the “Download Your Censored Photo” link right above the censored photo. Your photo will be saved in JPG format.
That’s it. You’re done.

 Email article


