Now that I’ve taught you how to exclude files from a Time Machine backup, I’ll take things one step further and teach you about how to encrypt a Time machine backup. Encryption is a word associated with our computer security. It goes hand-in-hand with settings a password, and is one way of creating a stronger password which is harder to hack.
While most people don’t associate back up passwords with computers and laptops, they do come in handy if you Mac is stolen or the drive is stolen. Without encryption, people can connect your driver to a different computer and easily view what you had backup up on the drive. To keep your files safe and out of harms way, you should follow the guide on how to encrypt Time Machine backups.
HOW TO ENCRYPT TIME MACHINE BACKUPS (MAC OS X)
1. Enable the Time Machine backup first.
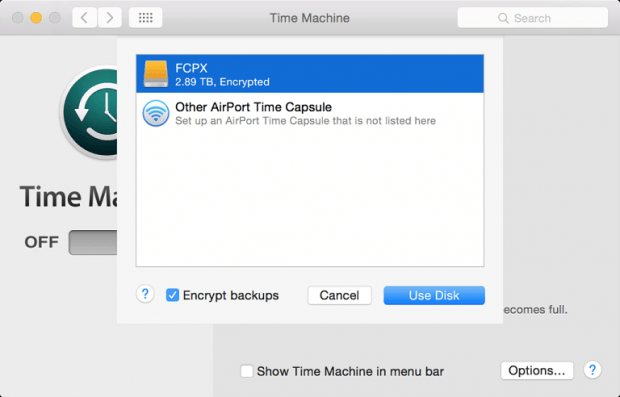
2. During the initial setup of Time machine, you’ll see a screenshot similar to this:

3. Click the bottom left option that says ‘Encrypt backups’ by checking the box and leaving it with a tick mark.
4. After ticking the box, you’ll have to enter a password. Choose a password that you remember. It doesn’t have to be as advanced as may other passwords you should enter online. It’s unlikely you’ll get sophisticated bots attached to your derive unless you are working for the FBI — or being hunted by the FBI. An 8 digit password with letters, capital letters, numbers and symbols should suffice.
5. After the backup password is created, you’ll need to verify that password so that it matches — this eliminates you making spelling mistakes and making it impossible to access your files.
6. The last option lets you put in a password hint. For example, if you password is F0re$t Tr33s I might put a hint of ‘nature’.
7. Now your backup will begin and complete as fully encrypted. Enjoy!

 Email article


