 Email article
 Setting up and managing a local SQL server connection in their computers is the option most programmers choose in order to build their websites and test their projects. Using the free Microsoft SQL Server Management Studio and creating a local database, users can link to a local SQL server connection.
Which Version Of SQL Should Be Used to Create a Local SQL Server Connection in Your Windows PC?
Users can use any version of the Microsoft SQL Server Management Studio that is compatible with their PC. Any version such as the 2008, 2012, 2014, or Microsoft SQL Server 2016 can be used to create a local SQL Server connection.
Installation of SQL Server for Setting Up local SQL Server connection.
The first step in setting up a local SQL server connection in the computer is to install the SQL Server itself. Since it is the first install, the user has to select “New SQL Server stand-alone installation…” from the SQL Server Installation Center. SQL Server Management Studio Express will then validate that all support rules have been applied and after that, the license agreement screen will be shown to the user. Once the user accepts the agreement, installation will begin. After completing the setup, SQL server Management Studio will ask the user to choose features that he needs to enable. It is advisable to choose all the options and click on “Next.” “Error Report” option will appear. This is an optional feature that the user can neglect or select to send error reports to Microsoft. After that, the user can click on the “Next” button to proceed with the installation. After installation is completed successfully, all the options will display the status as “Succeeded.” If not, then the user will have to correct the errors to complete the installation.
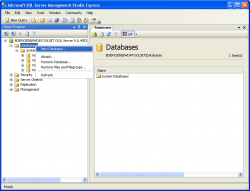
Finding the SQL Server Management Studio Server Name
You will need the instance name for setting up a local SQL Server connection, and there are a number of ways to find it.
Go to SQL Server Management Studio and connect to the Server window. Now, hit the down arrow besides “Server name”, and then the “<Browse for more …>” option. After clicking it, a dialog box opens up. Here, the user can browse for network servers and local servers.
By default, the “Local Servers” tab is opened, but switching to “Network Servers” is done with just a click. In the “Local Servers” tab, he can find local database engines and servers. To connect to a server, simply click on the server name and click OK to connect.
How to Set Up Local SQL Server Connection in a Windows PC
Downloading Microsoft SQL Server Express does not download a database, just the tools needed for managing one. Setting up of a local SQL server connection in a PC requires the following steps:
- Run SQL Server Management Studio in a PC.
- A prompt window to connect to a SQL server will appear on the screen.
- Choose “Database Engine” as the server type.
- In the “Server name” text box, enter your local server instance name.
- Choose “Windows Authentication” as the authentication type.
- Click the “Connect” button that is displayed at the bottom to connect to the server desired.
Benefits of Local SQL Server Connection
Having a local database helps developers in unit testing where he can manipulate data and test various scenarios. Using a local SQL Server connection, a developer can do most of the development activities before publishing to the production server.


