 Most gamers are crazy about gaming and they will start fighting if you every try to take their game pad away. But for many games, game pads are the worth using like racing, fighting and emulated retro games.
If you find that your controller isn’t working properly, in windows 10 you can calibrate it by making sure that every movement is translated to the game accurately.
Why would I need to do this?
Many of the gamepads, like Xbox One or Xbox 360 controllers are mostly calibrated out of the way for the PC gaming. However, other gamepads may require to calibrate them with the system for the recognition of their accurate movements. For example if you are using Nintendo 64 controller along with USB adapter, certainly it needs to be calibrated before using it, with the system.
There are some cases in which you are just having old controller and they need some aid. For example, there may be a button on your gamepad that get stick when pressed and you are not sure how much the computer is able to read from this on each press. Or probably the thumb stick of your gamepad does not seems to be tilting as much as it could. The working of the calibration tool is to help you dial in your controller, so it must be as much accurate as it can be.
For this guide we are using Xbox 360 controller, as it is the only thing which we have, but it must behave pretty much same for any gamepad which you are plugging in.
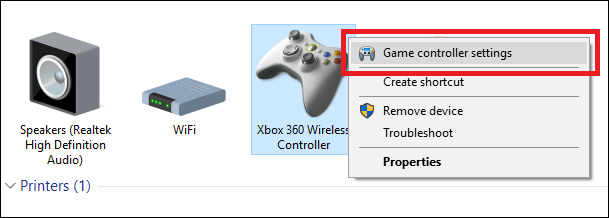
To begin, select on the start button and choose settings. From the other options choose devices. Choose Devices and Printers by scrolling to the end and selecting the link, inside the Printer and Scanner tab, click on it.
You can also reach here by going into control panel and selecting devices and printers.
If the controller is already connected, it should pop up. If not then check either you have installed all the latest drivers or not.
Right click on the controller and select Game controller settings from the drop down menu. After clicking this A new window will be popup. Click on the properties. The window will display two options settings and test. From the settings tabs, select calibrate.
Calibrate wizard will start from here
Click on the next to start calibration. Leave the thumb stick to find the center point automatically and click next. Again click on the next.
Now swing the thumb stick all around in its full range of motion a few times. You must see the small cross hitting all the four corners of the box and click next.
For horizontal movements, the X-axis calibrate the Xbox’s right thumb stick for that you just need to pull the thumb stick all the way to check if all the range is registered. Click next.
The same is for the Y-axis. If your calibration is complete, click on finish.

 Email article


