{rw_text}Giveaway of the day for January 15, 2009 is History Explorer v 1.1.0
[rssless]————————-{/rw_text} –>
{rw_good}
- Ability to designate/undesignate specific files/folders for backup.
- Ability to add specific file types to be backed up.
- Nice time line user friendly interface.
- Ability to receive warning of database size.
- Ability to limit file size of backed up files.
- Ability to clean database on demand.
{/rw_good} –>
{rw_bad}
- Lacking a superior hierarchical tree like interface for file list.
- Cannot minimize to system tray natively/run program in background.
- Cannot start up on Windows boot natively.
- Will not record file backups correctly if program is closed.
- Shows temporary files.
- Every time I open up History Explorer, it displays My Documents by default – can’t seem to change that.
- Vista users must run as Administrator every time.
- You may have to manually refresh the file list at times.
{/rw_bad} –>
{rw_score}
{for=”Features as Described” value=”9″}Only give this a 9 because of one small…bug?… I ran into with the database limit.
{/for}
{for=”Ease of Use” value=”8″}I give an 8 low score because it has an inferior method of navigating your computer.
{/for}
{for=”Usefulness” value=”8″}Contrary to popular belief, I think with the ability to designate specific files/folders, this program can be useful to many people – who doesn’t have at least one important file they work on?
{/for}
{/rw_score} –>
I really hate developer who just decide not to make their software Vista compatible. I really hope they dont keep up the same trend when Windows 7 comes out. That being said, officially this program does not support Vista. So for any bugs/functionality errors, you may want to double check them on a non-Vista machine seeing as I am running on Vista 32-bit. While we are on the topic, Vista users will have to run History.exe as Administartor otherwise the license will not be recognized. Yes, you will have to run as Administrator every time. Some people may suggest that running in compatibility mode will fix this issue. Yes it will. However, if you run in compatibility mode, the program will stop working properly, i.e. it won’t pick up your back ups anymore.
So as for the installation and registration, they went okay except for that Vista-license-not-recognized issue I described above.
Today I was a little late in grabbing the giveaway so I had a chance to read some comments on GOTD before checking out this program. The comments made, along with the description given on GOTD, mislead me into thinking that History Explorer would back up every single file that I save/edit on my computer. This could not be more false. Can History Explorer back up every single file on your computer? From the looks of it, yes it can. Will it? Only if you tell it to. And that seems to be a key feature that people are missing. This program will only backup files that you want, not every single file on your computer. And with that ability, the useful of this program increases ten fold because everyone has at least some kind of file that they would like to be backed up while being allowed to make changes…first thing to come to my mind is resumes. Also, the program does not just put backed up files everywhere on the computer – it stores it in a database. There is also a built in ability to warn you if that database gets bigger then X MB. Then you have the ability to cleanup that database. So yes while there is a possibility of this program eating up your hard drive space, if you are intelligent about it, that probably will not happen.
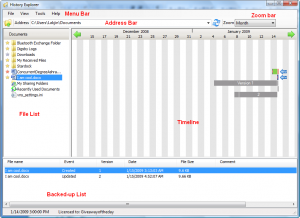
Okay enough of my rant. When you first run the program you will be prompted to include My Documents in your back up. I forgot to take a screenshot of this so I can’t show you, but you will have to option of adding it or skipping it. If you decide to skip, you can always add it later on. This is what the program looks like:
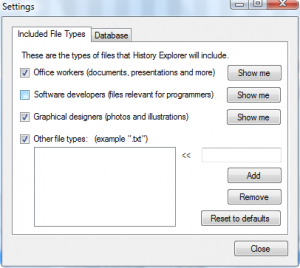
Before we go on, the first thing you want to do is go to Tools -> Settings:
The file types that you have checked above will be the file types that are backed up in folders that you designate. Like for example if you set your Downloads folder to be backed up (I will explain how you can do that a bit later on), all the .doc files will be backed up in there, but the .exe files will not if you only have “Office workers” checked. Click on “Show me” to see exactly what file types will be backed up. If the file type that you would like backed up is not include in the list, you can add it manually where it says “Other file types”. You will also be able to manually designate individual files to be backed up – more on that later. While we are on the topic of settings, click on the “Database” tab:
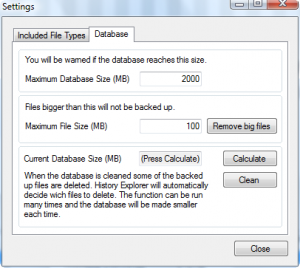
The database size is a big issue and concern for many people. And rightly so. The database can get very big very quickly depending on how many backups you have and how big they are. Now I cannot say for sure, because the documentation does not go into detail about it, but I do not think the program compressess files when they are being backed up. Anyway, it really doesn’t matter how the files are backed up – rather only the database size is important.
As you can see, you can set a ‘limit’ to your database, so to speak. The program claims that you will be warned if the database reaches X MB. However, in my testing, and keep in mind I am on the not-officially-supported Vista, I was not given a warning when my database exceeded X MB but rather the program just stopped recording backups. Take from that what you will.
Also, you can limit how big files you want backed up (“Maximum File Size”). While are you are at it, if you hit “Calculate” you will be able to see how big your database is. Lastly, you have the ability to clean your database – hit “Clean”. The program will automatically clean out your database. What files are deleted depends on the age of the file, the size of the file, and how many backups exist.
Now that we are done with settings, lets get onto the good stuff. There are three parts of the program window we are mainly concerned about:
- The file list – this is where you will be able to see your files/folders. The address bar up top will indicate what directory/folder you are in. You can navigate from, for example, My Documents to Desktop by changing the address in the address bar. You can also hit the
 which will take you up one folder, like from C:/Users/Lakjin/Documents to C:/Users/Lakjin.
Before we go on, let me express my viewpoint that the developer really missed a trick when he/she decided to create the file list this way (“FTP” style is how I would describe it) instead of the hierarchical tree format where each subdirectories and folders were listed beneath with the ability to view/unview them easily. This current method of file list is inferior in my opinion – makes it much harder to navigate your computer. Holla if you get what I mean.
That being said, you may notice that by some files above there is a yellow star, by others there is a gray star, by others there is a red star, while others have no start at all. If a file has a yellow star by it, it indicates that the file is being backed up. Any changes to that file will be recorded. If a folder has a yellow star by it, it means all the contents of that folder are being backed up according to your settings (the file types we discussed earlier). If a file has a red star by it, it means that the file was being backed up and it has been deleted (History Explorer counts cut + pasting a file in another directory as being ‘deleted’). You have the ability to access the file before it was deleted. The gray star, which is by a folder, indicates that the folder it self is not being fully backed up but there are files inside that folder that are being backed up.
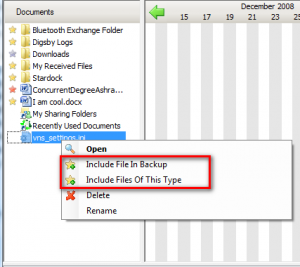
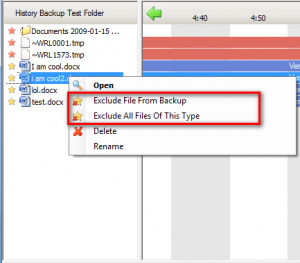
Recall that earlier I mentioned that you can add individual files to be backed up. To do this, right click on a file in the file list:
Just select “Include File in Backup” and that file will start being backed up (a yellow star should be placed by it). You can also, as you see, makes files of that type, in general, to be backed up. If you do use that option of “Include files of this type”, the file type will be added to “Others” in settings that we discussed earlier.
While we are on the same note, you can also remove specific files from the backup and remove specific file types from being backed up. Just right click on a backed up file/file type that you want removed:
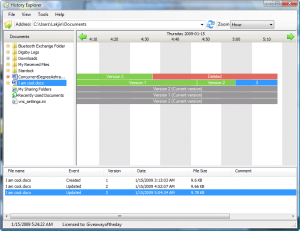
- The timeline – the timeline is a visual representation of the ‘revisions’ of each file that you have recorded. By default the timeline is at “Month” zoom so it will be difficult to see. I changed it to “Hour” zoom via the zoom bar (located top right) for demonstartion purposes:
Besides month and hour, you can set the zoom to 6 hours, day, week, 3 months, year, 4 years, 10 years. Ok so now you see the timeline bars are a lot bigger because the scale has changed from month to hour. Each ‘row’ in the timeline corresponds to a specific file on the left in the file list. Each ‘segment’ of that ‘row’ corresponds to a specific revision or backup of the file (as you click on a segment, different entries in the ‘backed-up list’ are being highlighted). Counter intuitively (for me at least), the latest version/revision of the file is on the right hand end of the each ‘row’ as opposed to the left. If you double click on a segment, History Explorer will open up the revision/backup associated with that segment.
If a segment/row is gray, that means the file is not being backed up. If a segment is green, that means the file is being backed up but the green segment is associated with an older version of the file. If the segment is blue that means the file is being backed up and the blue segment is associated with the newest version of the file. If a segment is red that means the file was being backed up but it was deleted. As you can see, if you click on the green before the red, you will be able to access the file in the state it was in before it was deleted.
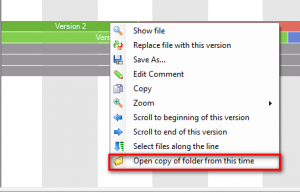
One last interesting thing I found by fluke that I would like to mention before we move on. If you right click on a segment, there is an option that allows you to view the state of the folder that file was in at the time of the segment:
The folder will display the state of all the backed up file as they were at that specific time.
- The ‘backed-up list’ – I already referred to this a few times, but officially I am now discussing it =P. This is where you get a detailed view of the version of each backed up file you have. Each entry in this list corresponds to a version of the file. Every time you save a file, or delete it, or make any other recordable change, a new entry will be entered in this list. Double clicking on an entry will display the respective file in the state of how it was at that time. If you right click on a file, you have a few more options:
As you can see, if the file you have right clicked on is an old version, you can have it replace the current version of have by clicking on “Replace the file with this version”. Other then that, you can save as old version as its own file by clicking “Save As”. You can add a comment to that specific entry by clicking “Edit Comment” (to remind yourself of what is in it maybe). You can also copy that old version (“Copy”).
Also as I mentioned earlier, each entry in this ‘backed-up list’ corresponds to a segment on the timeline.
Besides all that I mentioned above, there is just one more ‘option’ worth mentioning. If you go under “View”, you have the ability to choose if you want to see all the files in the specific folder you are in in the file list, or just the files that are being backed up by History Explorer:
Overall, I think the concept of History Explorer is nice, and it does its designated job pretty freaking well. However, I believe there are still a few kinks the developer has to work out:
- Improve method of browsing your computer (the file list). As I mentioned earlier, the current “FTP” method is very cumbersome and annoying. The developer should really consider the tree method. Or at the least, add an option to allow the user to choose what method they want.
- History Explorer only records versions of files that are designated to be backed up when History Explorer is running. That is not surprising nor is it a con that I am discussing. However, with this functionality, that means that the program would need to be on when you are doing your work. That being said, the developer should really had an option to start History Explorer on Windows boot (which you can do via Windows Scheduler if you are really interested) so a person does not have to worry about turning it on before they start their work (some may even forget) and allow History Explorer to be minimized to the system tray so it will not waste space in the task bar.
- The program records temporary files, such as the ones that are created when you create/edit word documents. Maybe someone more knowledge can inform me of this issue, but what is the need to record temporary files? Or rather yet what I am trying to say is, what is the need to show them on the file list? For all intends and purposes, I don’t see my self ever needing to restore a temp file. Now I know I could turn off “Show Delete Files” from the View menu and the temporary files would not appear since they are marked as deleted.
- Every time I open History Explorer the default directory I am in is My Documents. I wish there was a way to change this.
- Sometimes History Explorer does not pick up on the changes made on my computer by itself. I have to hit the refresh button:

Free Alternatives:
FileHamster (thx Bill)
FileHamster provides real-time backup and archiving of your files while you work. It enables you to monitor specific files on your hard drive and automatically create incremental backups whenever those files are modified. It also enables you to store notes about the changes that have been made, allowing you to quickly locate a specific revision or provide a detailed account of the work you’ve done on a project.
It has many features, but is very easy to use and does not require any technical expertise – just point it to the directory or file you want to monitor/backup and it will do the rest.
- Designed for Artists
- Real-time Backup
- Plugin Support
- Simple Interface
- IT’S FREE!!!
-Developer
—-
I found FileHamster to be really nice. It basically does the same thing as History Explorer with a new changes here and there. It is a bit more complex also then History Explorer – it gives you a little bit more options. However, FileHamster has the ability to start up on windows boot and to run in the background (minimize to system tray) which are two key features I give it over History Explorer.
PMnet Verdict: History Explorer is a pretty nice program. It does exactly what it is designed to do, and gives you full control over what is/is not backed up. The simplicity of History Explorer and the control it gives the user are its key features. However, as I mentioned above, there are a few extra features the developer has to add, mainly the feature to start up on Windows boot and the ability to be minimized in system tray/run in the background. Now yes you can make History Explorer do both these tasks via external programs, but it really should be supported natively. While I really liked History Explorer, especially the timeline feature, until the developer adds these two key features, I suggest sticking with FileHamster. FileHamster is a little bit more complex then History Explorer but it more or less does the same thing – plus it is always free.
[/rssless]

 Email article
