NOTE: This article is mainly focused on how to remove Windows 7. However, the methods here still apply even if you are trying to remove a different OS such as Vista or XP.
At this point, there are bound to be many people who the Windows 7 fetish has worn off of. So now they want to remove Windows 7 but are not sure how (obviously I am not talking to the tech gurus here). I am one of these people… the ones that want to remove Windows 7 that is, not the ones that don’t know how =).
Going on and off from Linux a lot, I have quite a bit of experience when it comes to installing/’uninstalling’ an OS besides your primary Windows. So I figured I should make a post about how to remove Windows 7 in case there are people out there who are not sure how. Maybe I will even make a few bucks on the way. :P
Okay how to remove Windows 7 depends on your situation. If you may recall, in my Windows 7 post I mentioned three main ways of how to install Windows 7:
1) Make Windows 7 your primary OS (i.e. upgrading or installing Windows 7 in/over your current Window partition/installation).
2) Installing Windows 7 virtually.
3) Dual booting Windows 7 w/ your current Windows.
I will explain how to remove/’uninstall’ Windows 7 for each of these methods. All these methods have been tested by me and they work. However, use them at your own risk. Me, PMnet, anyone/anything associated/not associated with us are not responsible for any gain/loss coming out of using the methods mentioned in this HOW TO or the comments that follow. Also note that all of the following methods are cross platform so it does not matter if you have/want to have XP or Vista.
1) You upgraded to Windows 7 or you installed Windows 7 over your last Windows installation. Bottom line: Windows 7 is the only Windows on your computer at this moment.
Okay with a situation like this, I am sorry to inform you, but you cannot revert back to your earlier Windows – it just can’t be done. The only way to remove Windows 7 would be to install another Windows over it effectively losing all your data, i.e. do a clean install. Thus you are recommended to backup any data you consider important.
In order for this to work, you need a Windows CD or a recovery CD. Either one of these should have come with your computer. If you have lost them or, for whatever reason, they did not come with your computer, try contacting customer service for your respective computer company to see if they will send you a new one. If that does not work, you can also borrow a Windows CD from a friend just for installation purposes. Or if push comes to shove, you can torrent a copy of the Windows that you need (but you must already have a valid Windows key!). Torrenting is not legal, nor is it recommended because you don’t know what malicious content someone might have inserted into the ISO.
Okay first thing you want to do is look around your computer for a Windows label. If you are on a laptop it will probably be at the bottom of your laptop. If you are on a desktop, it can be anywhere. The label should list a product key for Windows. Copy this product key onto a piece of paper – you may or may not need it depending on your installation methods.
If you have a recovery CD, follow the directions provided by your computer manufacturer on how to restore your computer back to factory settings.
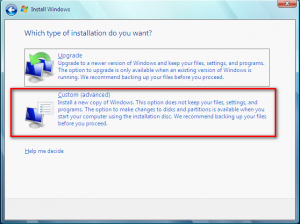
If you have a Windows CD, you will install it the same way you installed Windows 7. Pop the CD into the CD drive. Reboot your computer and follow on screen instructions. You should come to a page that asks you “What type of installation you want?”. Choose “Custom(advanced)”:
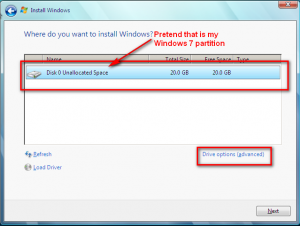
This will bring you to a page that will list all the partitions on your computer. Single left click on the partition that has Windows 7 installed. Then click on “Drive options (Advanced)”:
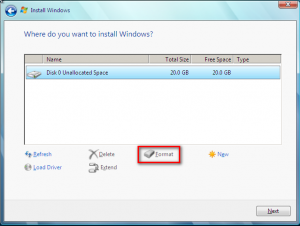
Now you technically do not *have* to do the following, but for safe measures you should. Click on ‘format’:
After the partition is done being formatted, make sure you have the partition selected, and hit “Next”. Just follow on screen instructions and you will have your Windows up in no time.
2) You virtually installed Windows 7
I mentioned three differnet programs you can use to virtually install Windows 7. However I recommeneded VirtualBox and that is the one I will use to explain on how to remove Windows 7. The method should, however, be similar for all three programs.
Removing OS installations that have been virtualized is really, really easy – literally a click of a button. This is when people start patting themselves on the back for going virtual…very easy to undo it all!
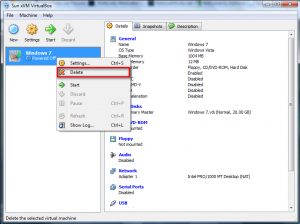
Okay load up VirtualBox. Right click on the Windows 7 installation and hit “Delete”:
You will get a message box asking you if you are sure/asking you to confirm that you want to delete it. Click yes. NOTE: Once you delete it, you will not be able to get it back again. If you want it back you will have to reinstall it.
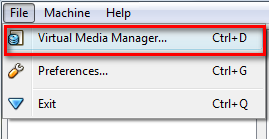
After that, go to File -> Virtual Media Manager:
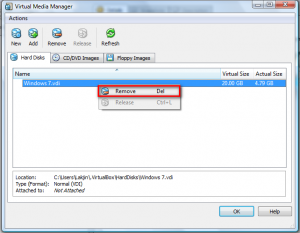
A window will pop up that will list the ‘virtual hard drive’ that you had Windows 7 installed. In order to get your hard drive space back that this ‘virtual hard drive’ is taking, you will have to delete it. Right click on the hard disk and click on “Remove”:
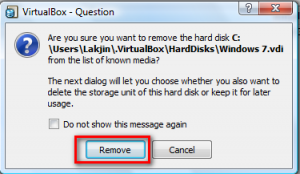
A message box will pop up asking you to confirm that you want to remove the hard disk. Hit “Remove”:
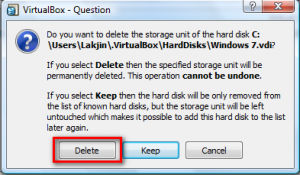
Another message box will pop up asking you if you want to delete the virtual hard drive or to keep it. Hit “Delete”:
And that is it. Windows 7 is no longer virtually installed on your computer. If you do not think you will be installing an OS virtually again, feel free to uninstall VirtualBox also. Be sure to use RevoUninstaller.
3) You dual booted Windows 7 with another Windows on your computer.
I know that there are multiple ways on how to remove Windows 7 if you dual booted. However, I chose to use the following way because I find it to be very easy and it is cross platform so you do not have to worry about if you are on Vista or XP.
First thing you have to do is download and install Paragon Partition Manager on your primary OS (the OS you want to keep – double check system requirements to make sure PPM will work on your system), not Windows 7 (the OS you want to remove).
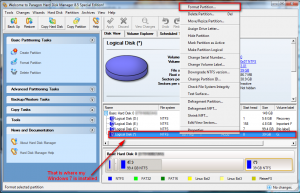
After that, run Paragon Partition Manager. At the bottom you will see all your partitions listed. Right click on the partition that has Windows 7 installed and click on “Format”:
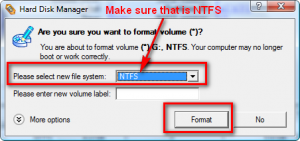
Make sure you are formatting the partition with Windows 7 and not the one with your primary OS installed! A window will popup asking you if you are sure you want to format the partition. It will give you the option to select a new file system and name it. Name it whatever you want, the name will be short lived anyway, but be sure to select “NTFS” for the file system. Hit “Format”:
After that, go up to the top of the program window where the buttons are and hit “Apply”:
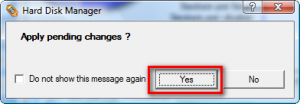
You will be prompted with a message asking you are you sure you want to make the changes. Hit “Yes”:
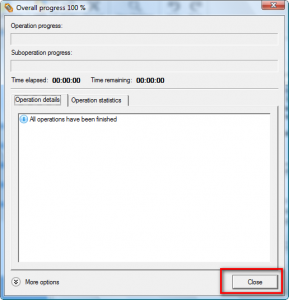
That will start the process of formatting your partition. A window will pop up that will allow you to monitor the progress. After the formatting is done hit “Close”:
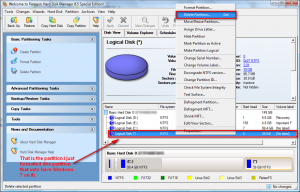
Now right click again on that partition that you just formatted, from the main program window, and hit “Delete”:
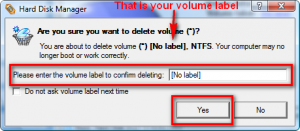
A window will popup asking you to type the label of the volume in order to confirm that you want to delete it. Type the name of the volume and hit “Yes”. The label of the volume in my screenshot is “[No label]” (without the quotes) so I typed in “[No label]” (without the quotes):
After you hit “Yes”, you will again have to hit the “Apply” button from the top:
You will be prompted with a message asking you are you sure you want to make the changes. Hit “Yes”:
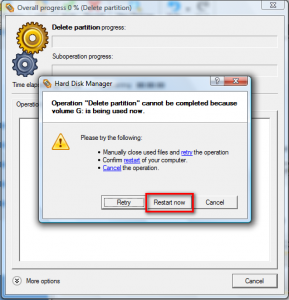
Again a window where you can monitor the progress of your partition deletion will popup. Just sit back and watch. After a few seconds, a window will popup telling you that your partition is in use and that you must reboot your computer to delete it. Hit “Restart Now”:
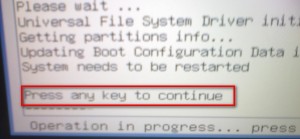
Your computer will then restart. Instead of your booting into Windows, you will be brought to a Paragon Hard Disk Manager screen (sorry for bad quality screenshot – had to use my camera phone):
Allow the program to do its thing until the bottom left hand of the screen displays the following:
Hit any key you desire and allow your computer to restart. When restarting you should not be prompted with any screen that asks you to choose what OS to load – you should load directly into your primary OS, whether that is XP, Vista, Win98, whatever.
Now at this point you are done removing Windows 7. However, since you had designated X GB on your hard drive for Windows 7 and you no longer have Windows 7, you have X GB just sitting there and being useless on your hard drive. The following is optional but I highly recommend you do it so you can put those X GB back to good use.
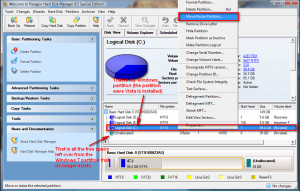
After your computer boots into your primary OS, run Paragon Hard Disk Manager again. You should at the bottom where it lists your partitions there should be an entry that says “(Unallocated)”. That is all the space that usto be your Windows 7 partition now just sitting there. Lets change that. Right click on your current Windows partition and click on “Move/Resize Partition”:
***If the ‘unallocated’ is not right next to your Windows partition (above or below) in the partition list, you have a special case. If you can’t figure out how to make it work, take a screenshot and post it in the comments below – I will try to help.
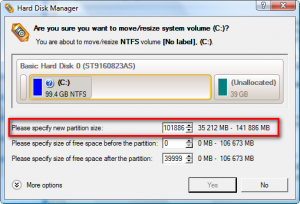
You should now see a window that will ask you to specify the new partition size:
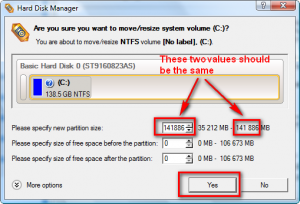
Make it as big as possible and hit “Yes”:
Again hit the “Apply” button from the top menu on the main program window:
You will be prompted with a message asking you are you sure you want to make the changes. Hit “Yes”:
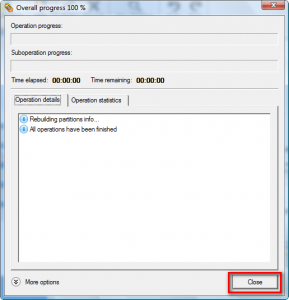
After that a window will popup where you can monitor the progress of making your partition bigger. After it is done, hit “Close”:
You are done. Go enjoy what is left of your day. :)
That is it. If anyone has any questions, feel free to ask – I will try to help to the best of my ability.

 Email article
