System Restore was introduced in Windows XP to help people undo changes to their system. Windows 8 comes with two great new restore features to help you deal with serious problems which cause your computer to be unstable. They’re called “Refresh” and “Reset” feature, and, in this article, I will not only tell you what they are but also tell you how to use them.
What is “Refresh”?
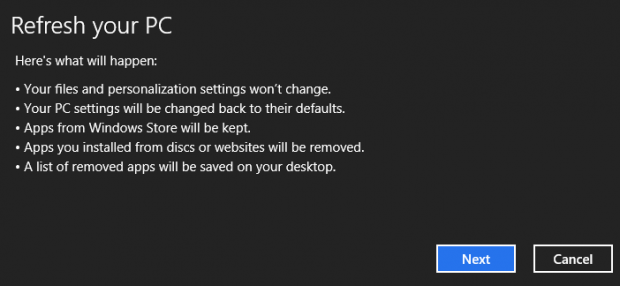
When your computer or tablet doesn’t work well, you may want to use “Refresh” feature. As the name may indicate, “Refresh” refreshes your computer — this feature will clean up your computer or tablet by restoring your Windows 8 settings to default (i.e. factory settings) but will not delete your personal files and will not delete Windows Store apps that you have installed. Apps you install outside of Windows Store, however, are deleted and you are provided with a list of deleted programs on your desktop.
As I have used Refresh feature several times, I can attest it is a very good way to make a system stable again. After about 15 minutes (the time it took to Refresh), my Windows 8 worked as smooth as before the errors.
What is “Reset”?
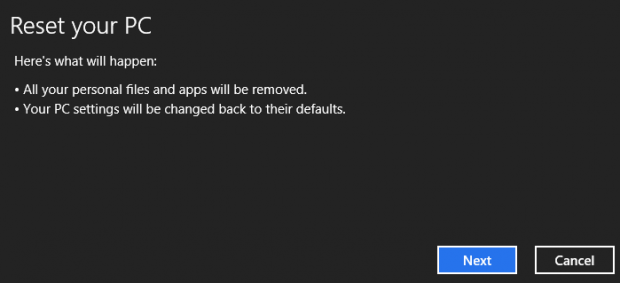
You know how some electronics — like your router or modem — have a hidden reset button which, when pressed, reset your electronic device back to factory settings? “Reset” on Windows 8 is similar; Reset on Windows 8 deletes all your files, data, and apps (Windows Store apps and programs you downloaded outside of Windows Store) plus resets your Windows 8 settings back to factory/default settings.
Essentially, when you Reset, everything will return to the state that it was in when you purchased your Windows 8 machine (or when you first installed Windows 8); your personal files, apps (both desktop and Windows Store), and settings will be gone. Think of it like reinstalling Windows 8 on your computer or tablet.
HOW TO USE REFRESH AND RESET IN WINDOWS 8
Before you can use Windows 8’s Refresh or Reset, you need to have a Windows 8 install CD/DVD or a Windows 8 bootable USB. If you bought the retail copy of Windows 8, it should have come with an install DVD — that will work for this. If you purchased Windows 8 online and you downloaded an ISO, you will need to put that ISO on a CD/DVD or on a USB drive. Burning the ISO to CD/DVD is very easy — you can use any image burning program (Windows 8 will even do it natively), such as ImgBurn. To make a bootable Windows 8 USB drive, you can use Microsoft’s official Windows 7 USB/DVD download tool to turn your ISO into a bootable Windows 8 USB drive; don’t worry, despite having “Windows 7” in the name, the tool works for Windows 8 too.
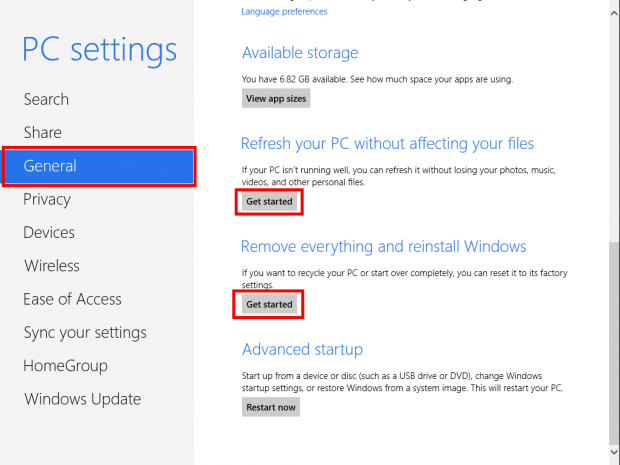
Once you have the Windows 8 CD/DVD or bootable USB, insert it into your computer or tablet. After that, open Settings by bringing up Charms bar (Windows + C or click/swipe the right-side of your screen) and click “Settings”. Then you have to click “Change PC Settings” and choose “General” section. From there, on the right side, you will see “Refresh your PC without affecting your files” (aka Refresh) and “Remove everything and reinstall Windows” (aka Reset). Clicking the “Get started” button for either of the features gets you started. From there all you have to do is follow on-screen instructions (Microsoft provides excellent step-by-step procedures when using Refresh or Reset, holding your hand the whole way) and your tablet or PC will (hopefully) be fixed in no time.
CONCLUSION
These features are what you need when your Windows 8 doesn’t work correctly. It may be a painful experience to Refresh or Reset but, after all, you cannot use your PC or tablet if you have continual errors, right?

 Email article


