{rw_text}Giveaway of the day for December 17, 2008 is DDWidget Pro 1.4.
[rssless]————————-{/rw_text} –>
{rw_good}
- Easy to use.
- You can transfer files to a location on your LAN, on your own computer, on an FTP server, or to an e-mail.
- You can set one widget to send files to multiple different locations.
- You can add filters to prevent accidental transfer of an unwanted file.
- You have have multiple widgets, each set to different locations.
- Can be used as a ‘backup files’ program of sorts.
- You can customize the look of your widget.
{/rw_good} –>
{rw_bad}
- You cannot ‘lock’ the widget in place that is displayed on your screen.
- E-mail and FTP passwords are visible (not replaced with ***)
- Does not include pre-defined settings for e-mail profiles.
- There is no way to make the name of the widget show on the actual widget.
- “Customize Layout” (how the widget looks) is kind of buggy.
- If you add filters, your file transfer will not work.
- There are a few bugs.
{/rw_bad} –>
{rw_score}
{for=”Features as Described” value=”7″}This program does everything the developer claims. It only gets a 7 because of a few bugs.
{/for}
{for=”Ease of Use” value=”9″}It is fairly easy to use. I do not give it a 10 because I found some labels to be rather confusing.
{/for}
{for=”Usefulness” value=”5″}Although I find this program to be amazingly useful, most people probably will not have the need to send files to network/ftp/e-mails on a frequent basis to justify keeping this program.
{/for}
{/rw_score} –>
Installation was easy enough. Registration was kind of unorthodox (be sure to read readme.txt) and caused me a problem at first, but in the end it all worked out. The first time around I just ran Setup.exe, put license.license in the correct location, and ran Activate.exe. It did not register properly. I closed the program and tried running Activate.exe as Administrator. Still didn’t work (I was expecting it to work after running Activate.exe as Admin). So I uninstalled it all with revouninstaller, and did the whole process over but I ran Setup.exe and Activate.exe as Administrator this time around (running Setup.exe as Admin was properly over kill, but what the heck). Registered fine.
Before I say anything else, I must say this: This. Program. Is. Amazing. True, many people will find not this very useful, but for people like me, who constantly have to transfer files via FTP to their websites, this program kicks ***; its almost like a wet dream.
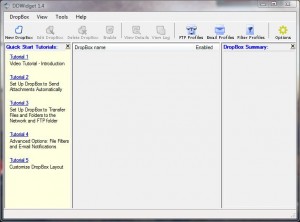
That being said, if you are on Vista, be sure to run this program as Administrator the first time around or else the program will not open properly. This is what the program window looks like:
As you can see, the developer was nice enough to spoon-feed us with tutorials. The tutorials the developer provides for this program are pretty useful, especially the introduction video. Usually at this point I would tell you to just look at the introduction video on how to use this program, but I feel the introduction video is missing some key features of this program, and it will become really awkward referencing back to the video. What I am trying to say is that you should watch the video, but I am going to go over the steps in this review anyway.
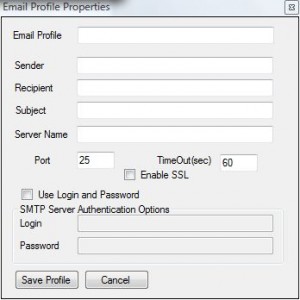
Once you have the program running, there are a few things we can do. We can either go straight to creating a widget, or we can first create FTP, E-mail and Filter profiles. Just for the heck of it, lets go the create a widget path first. There is just one thing: since there is a bug in E-mail profiles (more on this later), first you should create an e-mail profile if you plan on using E-mail transfers. Hit “E-mail Profiles” button. Hit “Add Profile”. This is the window that you should see:
Fill out all the fields. “Email Profile” is just the name you want for this e-mail profile. “Sender” is what you want to be displayed in the “Sender” field when your e-mail is sent (usually your e-mail address). “Recipient” is a field that is used for E-mail notifications – the e-mail you want e-mail notifications to go to (more on this later). “Subject” is just what you want to appear in the subject area of your e-mail when it is sent. “Server Name” is your webhost’ smtp address. SMTP address is a protocol used for outgoing email. If you use gmail, for example, your smtp address will be smtp.gmail.com. Google your e-mail service provider’s smtp address if you do not know it, or try to find it in their help section. “Enable SSL” will enable a secure connection when connecting to your e-mail service provider. This may not be support by your e-mail provider. Lastly fill out Login and Password and hit “Save Profile”. If you do not want to add any more profiles, just hit “Close”.
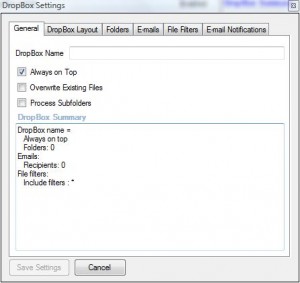
Now we can get to creating the actual widget. Please click on “New DropBox”. You should see this window:
- Think of “DropBox Name” as “Profile Name” or “Widget Name”. It is the name of the widget you are about to create. This name will not appear on the actually widget that you will see on your screen after you finish creating a widget; it is just a profile name.
- “Always on Top” means the widget that you create will always be the top ‘window’ on your screen, i.e. if you have Firefox open and you checked “Always on Top”, your widget will be ‘above’ your firefox window, meaning you will be able to see the widget even if you maximize firefox to full screen.
- “Overwrite Existing Files” is exactly what it sounds like. If your destination location is a folder (on your LAN, local computer or FTP server) and you have this option checked, if the file you are transfering has the same name as a file already located in that folder, that file already located in the folder will be overwritten with your new file.
- “Process Subfolders” means that if you drag a folder into the widget to transfer, all the files from any subfolders in that folder will also be transferred.
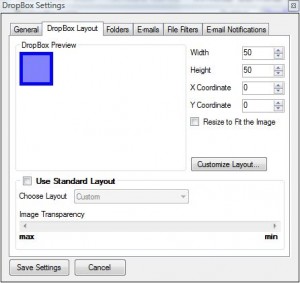
Once you are satisfied with the settings, click on “DropBox Layout” tab. You will see this window:
Under this tab you get to change how your widget will look.
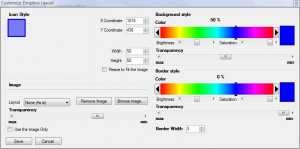
The width and height will obviously change the width and height of your widget. The width and height are in pixels. X and Y Coordinate are not really important. By default they are set to 0,0 meaning that when you first enable your widget, it will be placed in the top left corner of your screen. But after that you can click + drag and place it wherever you want, so these two options really do not matter. To change the look of your widget, check “Use Standard Layout”. Choose the look of your widget via the drop down menu labeled “Choose Layout”. There are 4 different pre-defined looks that come with the program: Network, E-mail, FTP and Universal. All four come in two sizes. If you do not like any of those looks, leave “Choose Layout” to custom and hit “Customize Layout”. You will see this window:
From here you can change the widget background color and border color (the two different shades of blue you see). You can also add your own custom image to the widget (hit “Browse Image”). To make the widget only look like your image and without all the background/border color, just check “Use the Image Only”. Checking “Resize to fit the Image” will resize the widget to your image size not resizing your image to fit widget size. If you click on the “Layout” drop down menu, you will get four options: None (As Is), Tile, Flip, Center. These “Layout” options seem to be a bit buggy. None (As Is), Tile and Center all do the same thing – show the top left corner of your image. Flip centers your image and resizes your image to fit to widget size. You can change the transparency of your image, the background and the border from here also. After you are done, just hit “Save”. The window will close and you will be back to the “DropBox Layout” tab. If you are happy with your settings, move on.
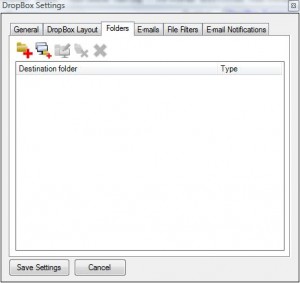
Next up you will have choices. If you want your widget to transfer files to a folder located on your LAN, your local computer or an FTP server, go to the “Folders” tab. If you want your widget to transfer your file as an e-mail attachment and send it to specified e-mails, go to the E-mail tab. You are not limited to picking only one type of file transfer (i.e. folder or e-mail); you can do both folders and e-mail.
This is what the folders tab looks like:
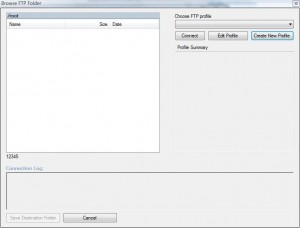
The first button from the left allows you to choose a folder that is located on your LAN or your local computer The next button allows you to choose a folder that is located on an FTP server. You can add as many folder locations (folders on network, your computer or FTP) as you want. If you choose a folder on an FTP server, you will get this window:
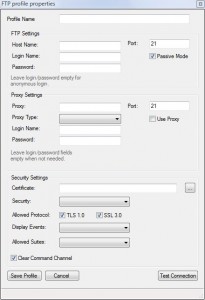
If this is your first time creating a widget, you will have to create an FTP profile. If it is not, you can chose your profile from the drop down menu. Hit “Create New Profile”. This window will come up:
Fill out the window as you find appropriate. The only fields that are *required* are Profile Name and Host Name, everything else is optional and varies from FTP to FTP. If you are not sure of your FTP settings, ask an admin of that server or something. Once you have entered all the relevant information, hit “Test Connection” to make sure it works. If it works, hit “Save Profile”. You should now be back to the “Browse FTP Folder” window. Chose the profile you just created by clicking on the drop down menu. Note: if you have other people watching you, you may want to cover up “Profile Summary” box with your hand or something because your FTP password will be visible. It is not replaced with ***. Hit connect. After you connect, you should be able to browse your FTP server. Just chose the folder you want your file transfers to go to, and hit “Save Destination Folder”. Once you are satisfied with the folder locations, go to “E-mail” tab.
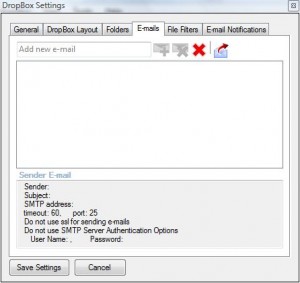
From the e-mail tab you can add e-mails you want to send your files as attachments to. If you do not want to add any e-mail locations, skip to the “File Filters” tab. This is what the e-mail tab looks like:
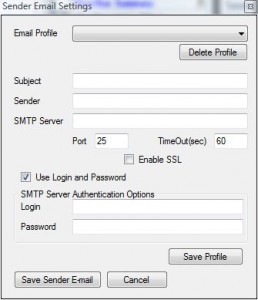
To add an e-mail, just type it in the box that says “Add new e-mail” and hit the button that is placed directly to the right of the box (the first button from the left). You can add as many emails as you want. To remove an e-mail, click on it and press the second button from the left. To edit an e-mail, click on it and the “Add email” button will change to an “Edit E-mail” button (still the first one on the left). To remove all the e-mail, just hit the big red X. There is a bug one should note here: if you click on any e-mail that you already added you will not be able to ‘unclick’ the e-mail. So, if you want to add new e-mails after you have clicked on an added email already, you have to hit the “Edit e-mail” button to unclick/unhighlight an e-mail. Otherwise you will not be able to add new e-mails – just edit the current one you have. After you have added all your e-mails, hit the button that has the arrow (the 4th button from the left). This is where you have to setup your e-mail account information (the account you will be sending an e-mail from):
You should already have an e-mail profile setup. Choose it from the drop down menu. Make any changes if you want and hit “Save Sender E-mail”. There is a bug here that “Delete Profile” and “Save Profile” do not work, which is why I told you to create a e-mail profile before we got started – you cannot create an e-mail profile from here. If you did not create an e-mail profile beforehand, you can still manually fill out all the fields here but you will not be able to save it into a profile for future use. Once you have setup your e-mails and are satisfied with it all, go to “File Filters” tab. Note: As with FTP, your e-mail password will be shown at all times – it is not replaced with *** either. So be weary of prying eyes!
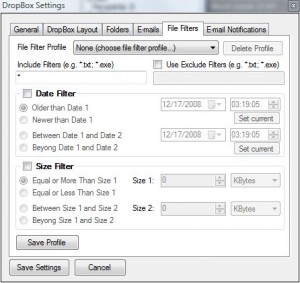
The “File Filters” tab will put a ‘filter’ on your widget. What I mean is that you can specify what type of file will be/will not be transferred if drag + dropped into your widget. If you do not want to add any “Filter Filter”, skip to the “E-mail Notifications” tab. This is what the “File Filters” tab looks like:
If you already have a filter profile setup, chose it from the drop down menu. If you don’t, then no worries – we will create one now. “Include Filters” are files that will be allowed to be transferred if drag + dropped into the widget. The way this filter works is that you add file extensions. For example, if you want your widget to transfer text files, enter “*.txt” into the include filters box (without quotes). If you enter a file extension in include filters, no type of file but that type of file (ex: .txt files) will be allowed to transfer via that widget. For example: I enter *.txt into include filters. I try to drag + drop cool.jpg into the widget. The filter will prevent cool.jpg from transfering. I drag and drop readme.txt and readme.txt transfers. You can add as many filters you would like, just be sure to separate then with a semi colon. Ex: *.txt; *.jpg
Exclude filters work the same way as Include, but they exclude the file type.
Date Filter will check when the file was created. You can setup the date filters to refuse files older or newer then specified date and time. Or you can setup the filter to only accept files created between a certain date/time.
Size filter will check the size of the file and refuse it based on how you set it up.
There is one big bug I have noticed. After you add filters, whenever you try to transfer a file you will get an error that says “File not found”. For some reason, when you add a filter, the program automatically changes the file source location to the folder the program is installed in. So whenever you drag + drop an item, the program cannot find it. For example: I added a *.txt exclude filter. I try to upload wmv.jpg onto my blog. wmv.jpg is on my desktop. I get this error when trying to transfer it:
12/17/2008 4:23:57 AM Action = ‘Upload File’
Source file = ‘wmv.jpg’
Destination file = ‘wmv.jpg’
Action failed, reason = Could not find file ‘C:\Program Files\BrainexSoft\DDWidget Pro\wmv.jpg’.
Before I added the filter, I would get this message:
12/17/2008 4:24:51 AM Action = ‘Upload File’
Source file = ‘C:\Users\Lakjin\Desktop\wmv.jpg’
Destination file = ‘XXX.XXX.XXX/www/images/wmv.jpg’
Succeded
So while I explained how to setup filters, I suggest you do not use them.
After you are done with your filter settings, be sure to “Save Profile” if you plan on using the same filter settings in the future. If you do not, just hit “Save Settings”.
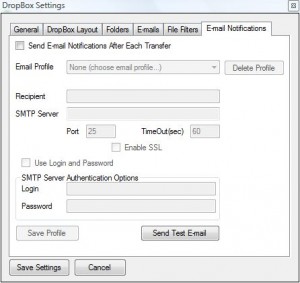
Lastly, there is the Email Notifications tab. From here you can set it so you will get e-mail notifications every time a file is successfully transfers. If you do not want to setup e-mail notifications, just hit “Save Settings”. This is what the window looks like:
Chose your e-mail profile. Everything should be filled out. Remember the “Recipient” field when creating an e-mail profile? Ya well this is what it is for. The SMTP Server, Login and Password do not have to do the ones associated with the “Recipient” e-mail address. For example: I have Recipient as “admin@politicallymotivated.net”, SMTP Server as “smtp.gmail.com”, Login as Ashraf, Password as 123456. Every time a file transfer occurs, ashraf@gmail.com will send an e-mail to admin@politicallymotivated.net. I could also set the recipient to be ashraf@gmail.com in which case I would just be sending an e-mail to myself. After you have set it up, hit “Send Test e-mail” to make sure it works properly.
After you are happy with all your settings, folders, email, filters, etc. hit “Save Settings”. Now a widget should appear on your desktop in the top-left corner. You can click + drag and place this widget any where on your screen. This is the widget where you drag + drop files to transfer. Unfortunately you cannot lock this widget into place. Just drag + drag a file into this widget and the transfer will being. Once the transfer is complete, you will get a message popup from the system tray icon telling you so. If you open up DDWidget, click on the DropBox you just used the transfer for, and click “View Log”, you can see your recent file transfer activity.
One thing I would like to point out: This program could be used as a “back up my files program”. If you setup a widget who’s destination location if a folder on your local computer, you can just drag + drop items into the widget that you would like to be ‘back up’. The files will be copied to that location you set and you effectively created a backup of the file.
One major bug that keeps occurring to me is that files are “added to queue after filter” but the transfer never occurs. I have to close/reopen the program to fix this bug. This happens arbitrarily after I mess with widget settings. Very annoying, but livable.
Overall I like this program very much. For people like me, who are constantly uploading stuff like images into their FTP server, this program is a god send. There are a few things I would like improved/added though besides fixing the bugs I mentioned above.:
- Replace FTP and e-mail passwords with ***.
- Add the ability to lock widget in place.
- Include a pre-defined list of smtp address for popular e-mail services
- Add the ability to display a name under/around the widget.
Free Alternatives:
Same program as this giveaway but there are limitations: Only one DropBox and 200 file transfers a month.
Using Windows Explorer (thank you Richard)
Richard posted a method (#18 comment) on how you can accomplish the upload to FTP part of this program natively in Windows. I tested it, and it works.
—-
You can accomplish the same thing using Windows Explorer. In the address bar (turn it on: View|Toolbars|Address Bar) enter the FTP address in the following format:
ftp://userid:password@website/
This will create a link in Windows Explorer to the FTP site and treat it as a folder on your computer. You can then drag the icon from Explorer (from the root or a folder) to the desktop while holding down the CTRL-SHIFT keys to create a shortcut. You can create a different icon for each folder on the site if you want.
Now you can drop files into the desktop icon and it will show up on the website. If you have a lot of FTP sites, put them all into a master folder.
If you want super easy access without closing windows to get to your desktop, put the folder/links into your quick launch folder
C:\Documents and Settings\USER\Application Data\Microsoft\Internet Explorer\Quick Launch
in the hidden section. Just drag your file over the Quick Launch bar over the expansion arrows that will pop up your master folder or links and drop the files.
PMnet Verdict: For someone just looking to accomplish FTP transfers, I suggest you use Richard’s method since you do not have to install any program. Other then that, despite all it’s bugs, DDWidget is excellent for what it does. It really makes repetitive file transfer easy, such as uploading images to a website. For me this is a definite keeper. You decide if you need this sort of software for yourself. All I can tell you is that it is worth it.
[/rssless]

 Email article
