Pinning tabs in Chrome allows you to keep a particular tab in place, particularly on the left side of your browser. It also helps you remember important sites like Gmail, Evernote, Twitter, etc. The thing is you can only pin tabs right after you load the site. You also cannot do it automatically. So if you want to automatically pin a tab based on the URL or the site that you’ve loaded, then go ahead and read the rest of this post.
How to automatically pin tabs based on URL in Chrome
- Go to the Chrome Web Store and then install “Pin Tab”.
- After installing the said extension, right-click on its shortcut icon on your browser’s omnibar and then on the pop-up menu, select “Options”.
- You will then be taken to its options page. Once you’re there, read the welcome guide first so that you’ll know how to configure the extension to automatically pin tabs by URL.
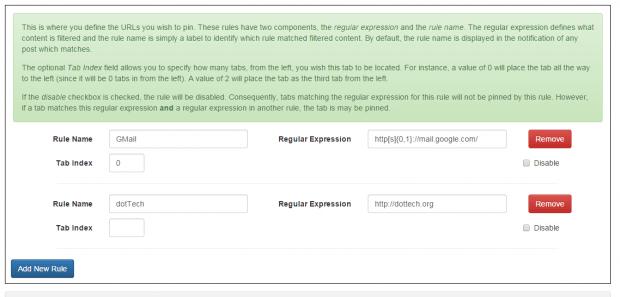
- Do keep in mind that the extension works by adding rules. For each rule, you need to set and define the “Rule Name” as well as the “Regular Expression”. The “Rule Name” is basically the label for your “Regular Expression”. As for the latter, you can just enter the URL of the site or page that you want to automatically pin on your web browser.
- For example, in the rule name, you can enter “dotTech” and then enter the full URL of the dotTech site in the field provided for regular expression. So if you visit dotTech, then your browser will automatically pin its tab.
- As for the Tab Index, it’s an optional component but a very useful one especially if you want to highlight the order of your tabs. If you set 0, then the pinned tab will be automatically placed to the very far left side of your browser.
- Once you’re done, do not forget to click “Save” to confirm the changes that you’ve made.
- So there you have it. Your Chrome web browser will automatically pin the tabs for the sites or URLs that you want.

 Email article


