{rw_text}Giveaway of the day for December 29, 2008 is Moyea FLV Editor Pro.
[rssless]————————-{/rw_text} –>
{rw_good}
- Easy to use.
- Fairly quick export of videos.
- You can have the program shutdown the computer after export of video is complete.
- You can add multiple image or text watermarks to each video/clip.
- You can add effects to your videos.
- You can crop your video.
- You can change the duration (‘trim’) of your video.
- You can merge two or more videos together.
- You can save/export each video into many different output formats.
- You can take ‘snapshots’ of your video while it is playing.
- You can increase/decrease the volume of the audio.
- You can enter in Author name, Album name, Copyright information, etc. for each video.
- You have the option to download a separate FLV video downloader for free.
{/rw_good} –>
{rw_bad}
- Cannot edit/import all .FLV videos.
- Questionable interface layout.
- Too few effects.
- You can only add one effect + one flip to a single video at once.
- Video automatically plays in preview tab if clicked upon.
- “Time offset” for watermarks does not seem to work.
- Program is a bit buggy (has crashed on me 4 times so far + gotten couple of errors).
{/rw_bad} –>
{rw_score}
{for=”Features as Described” value=”9″}For the most part this program does all of what the developer claims. The fact that not everything is “stretchable and flexible” in the interface and a bug or two earn this a 9 instead of a 10.
{/for}
{for=”Ease of Use” value=”9″}The program is really easy to use no doubt about it. I only give this a 9 instead of a 10 because of the question interface layout.
{/for}
{for=”Usefulness” value=”7″}This gets a 7 because not everyone has the need to edit .FLV videos but with the increasing popularity of websites such as YouTube.com…this program will be handy to many.
{/for}
{/rw_score} –>
Installation and registration went okay. If you are on Vista, just be sure to run Activate.exe as Administrator in order to register properly. If you did not register the program properly, everytime you run the program, you will be prompted with a video asking you to buy a license.
Moyea FLV Editor Pro is pretty good at what it does – it is very easy to use and it works very quickly. Adding watermarks to .FLV videos is a really nice feature especially considering it is so easy to rip videos off places like YouTube and pass them off as your own nowadays. Being able to add effects to the video is nice also, but in my opinion there are too few effects. To top it off, you can export your video into many different output formats.
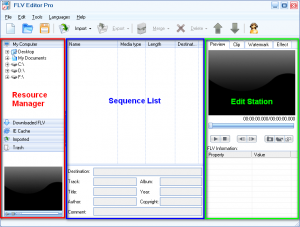
This is what the program window looks like:
To aid in this review, I have labeled three sections of the program window (I used the names that were listed in Help).
I can’t put my finger on why, but to me the interface came across as making the program look a lot more complex then it actually is. Initially looking at the interface, I expected for program to be an advance video editor. Rather, it turned out to be a pretty simple program that does simple tasks such as add watermarks, or some effects.
From the left of the window, the area labeled as “Resource Manager”, you can navigate and find .FLV videos that you would like to edit. You can preview any video you find by double clicking on it – it will start to play in the video viewer at the bottom of the Resource Manager section. To add a video to edit, just click + drag it into the Sequence List. Each tab, starting from “My Computer” and ending with “Trash” is clickable – if you click on either one, you will be able to browse for .FLV videos in that particular area. Under “My Computer” tab, you are able to browse your computer for .FLV videos. Under “Downloaded FLV” you are supposed to be able to see videos that you used the FLV downloader (if you download/installed it) to download but for some reason, whenever I download a video with FLV downloader, it does not appear under this tab. Under “IE Cache” you are able to look for .FLV videos that might be in your IE Cache. Under “Imported” you will be able to see videos/clips you have already imported. Under “Trash” you will be able to see videos/clips you deleted.
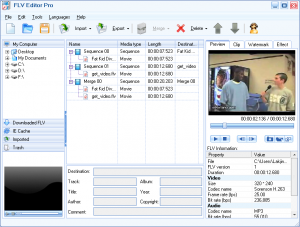
In the area labeled as “Sequence List” you will see all the videos/clips you have already imported and/or are working on. An individual video/clip will be put under a heading of “Sequence XX” while if you merged multiple clips/videos together, they will be put under the heading of “Merged”:
To add a video to the Sequence list, you can either drag + drop from the Resource Manager, or you can click on the “Import” button in button toolbar. If you click on the “Import” button, you will be given two options:
- Import FLV – this will allow you to browse your computer and import .FLV videos. If you want to import more then one, just Ctrl + Click on multiple videos and they will all be imported at once, but they will all be different “sequences”.
- Import Merge FLVs – the difference between this and “Import FLV” is that when you select multiple videos to import with this option, the program will merge the videos together automatically and place them under a heading of “merged” instead of “sequence”.
To export your videos, click on a heading (“sequence XX” or “merged XX”) and click on the “Export” button from the button toolbar. You will be given two options:
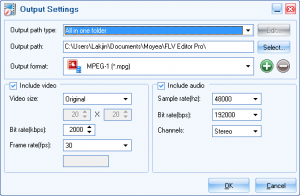
- Export – this will bring you to a menu where you export your videos. With this option, all the videos you have listed in “Sequence List” will be exported. Every ‘heading’ (every ‘sequence’ or ‘merge’) will be a single video. You get to chose the output file paths, names, formats, and other things:
As you can see, if you have “Output path type” set to “All in one folder” you have the ability of choosing what that folder is. What this will do is that it will place all the videos you export in one folder. However, you can also set “Output path type” to “In Original Folders”. This will disable “Output Path” and it will place your exported video into the same folder as your source video.
As for output type, it is almost limitless. I would take a screenshot of it all, but the way the program is coded, that would be impossible. So, I will try to list a majority of them. The output format include MP4, AVI, 3GP, WMV, FLV, DVD, VCD, SVCD and more. Output type also has options such as “ipod” or “iphone” where the output type will be optimized for that particular device.
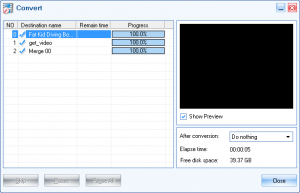
Depending on the output type, you may be able to change the video/audio settings. You can also turn off video, or turn off audio in your output file – just check the one you do not want. After you are done, just hit “OK”. You will see this window:
As you can see, you will be able to follow the progress of your exporting. The one thing I would like to point out is that from the drop down menu labeled “After Conversion” you can chose two things: Show output folder or Shutdown computer. Depending on what you chose, that action will occur when all the videos are done being exported.
- Export Selected – the only difference between this option and “Export” is that you will only export the video that you have selected instead of all of the ones listed in “Sequence List”.
Besides importing and exporting, this is also the area where you can merge two or more videos/clips together. Just highlight the videos/clips you want to merge (Ctrl + Left Click) and hit the “Merge” button from the toolbar. you will be give two options:
- Merge – this will take the videos and merge them together by placing them under the same ‘heading’.
- Copy Merge – this does the same thing as Merge but it ‘copys’ the videos you have selected and merges those instead of the original (kind of). So in the end you still have the ‘sequence’ videos, but you have a ‘merged’ video also.
When exporting these Merged videos, the clips listed under the “Merge” heading will be played in sequence. Meaning the first clip will play, then the next, then the third and so on and so forth. For example, in the screen shot above, I have “Fat Kid Diving…” and “get_video.flv” under the heading of “Merged”. If I were to export “Merge”, the end file would have “Fat Kid Diving…” play then “get_video.flv” play right after it. So if you want to change the order of which video/clip plays first, click on it and click the correct green arrow (up or down) from the toolbar.
Lastly there is the “Edit Station”. This is where the ‘main features’ of the program occur such as watermarking, adding effects, etc. In the “Edit Station” there are four tabs:
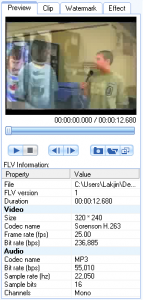
- Preview – from this tab you get to preview your file. Every change you make to your file you will be able to preview here as you go along – you do not have to save your video file to see it here. For example, if you cropped your video to half the size, you would be able to come back to the preview tab and view it cropped. Also, information about the FLV video, such as duration, video codec, audio codec, resolution, bit rates, etc. is displayed here:
The buttons explained (this portion is directly from the FLV Editor Pro Help):
—Select a file on the list and click this button to play the current clip. Then you can see the video in the preview panel. As soon as you click on the play button, it will change to the
and you may click again to pause the playing of the video.
—Click to stop playing the current clip.
—Click this button to jump to the previous frame.
—Click this button to jump to the next frame.
—Click on the button to open the snapshot folder to view the captured pictures.
—Click on the button to grab the current frame as the thumbnail for the output file.
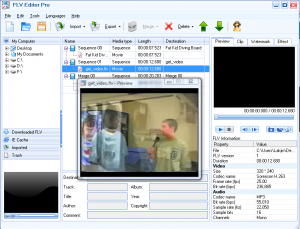
—Click this button, and then an enlarged float window pops up, as the following picture:
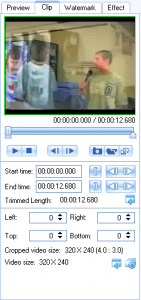
- Clip – from this tab you can visually crop your video or you can trim down the duration (change start/end times) of your video:
You can manually trim down your video by entering the start and end time – just enter the time you want the video to start and when you want it to end. The
and
buttons will take you one frame backward and one frame forward respectively. Alternatively, you can play the video and hit the
button when you reach the point when you want your video to start – this will set the start time to that place automatically. Samething for the point when you want your video to end – use the
button.
You can also crop your video. You can manually enter how many pixels from each respective sides you would like to crop away, or you can click + drag on the green frame that surrounds the video.
After you are done, all you have to do is move on to the next tab – all the changes you make are automatically applied to the video as you make them.
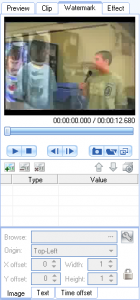
- Watermark – from here you can add an image or text watermark to your video:
To add a watermark click
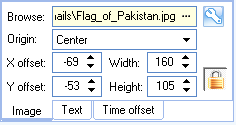
. You will then be prompted to add an image or add text. If you choose “Image”, the tab at the bottom will turn to “Image” (if its not there already):
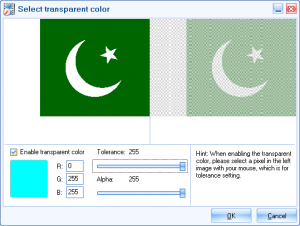
The program will automatically resize the image to fit your video. If the lock button is clicked (and it is by default) the program will be sure to keep your ratio aspects when resizing your image. You can always change the size manually if you want. You can also change change the location of the watermark by manually changing the values at the bottom, or you can click + drag the watermark in the video preview above. You can also change the transparency of the watermark by clicking
. If you click it, it will bring up this window:
Your original image is displayed on the left, while the image after you change the tolerance/alpha is displayed on the right. Hit “OK” when you are done.
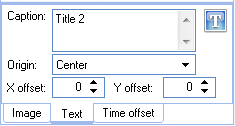
If you choose “Text”, the tab at the bottom will change to “Text” tab:
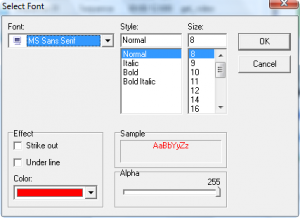
Just type whatever you want the watermark to say in “Caption”. You can change the properties of the text watermark by hitting the T button you see above. It will bring up this window:
You can also change the location of the watermark on your video by manually changing the orgin, X and Y value, or you can click + drag the watermark on the preview of the video above.
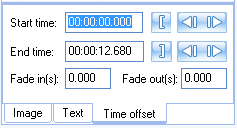
Regardless of if you did image or text watermark, there is the “Time offset” tab that is supposed to allow you to be able to control when the watermark shows and how long it takes to fade in/fade out:
Unfortunately, no matter what I try, this feature does not work. The watermark shows from beginning to end even if I try to change the start/end times. Also, the fade in/fade out don’t change either.
After you are done, all you have to do is move on to the next tab – all the changes you make are automatically applied to the video as you make them.
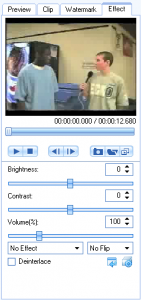
- Effect – from here you can change the brightness, contrast, add effects (sort of like filters), flip the video (vertical or horizontal flip), and change the volume of the audio:
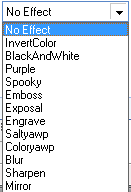
The effects you can add are:
All the changes you make are automatically applied to the video as you make them so after you are done, you should be ready to export your video (I described the export feature above).
Besides all that I have said above, there are two more thing:
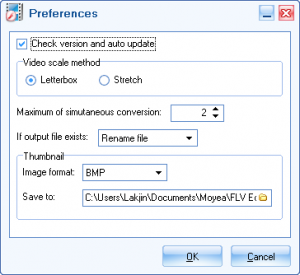
Preferences (Tools -> Preferences)
The thumbnail refers to the ‘snapshot’ you can take of your videos.
FLV Downloader
This actually brings you to this page. You have the option to download a completely free program that allows you to download YouTube videos off the internet. After you have installed and downloaded the program, “FLV Downloader” will launch the program whenever you click on it.
Overall, I think this is a simple program that is good for what it does. But there are a few problems (many of which I mentioned above):
- I question the layout of the interface. The emphasis should be put on the actual editing of the video (adding watermarks, effects, etc.) not on the video/clip information (the ‘sequence list’). By placing the ‘sequence list’ in the middle of the way, and making it the biggest section of the window, the emphasis, in my opinion is taken off the actual editing of the video and put on the video source/clips. By putting the actual video editing in a confined section of the program window, the developer, in my opinion, creates an undesirable interface. Not to mention all of the windows are resizable but the ‘edit station’ – the section of the window where you do the actual editing of the video.
- You can only add one effect and one flip to a video.
- There are too few effects. 12 effects just aren’t going to cut it.
- You have no control over the ‘effects’ – no way to change how much ‘blur’ you do, for example.
- Everytime you click on a clip in “Sequence List” it will automatically start playing in the “Edit Station”. This gets really annoying (and possibly laggy) for those people who are constantly switching from one clip to another.
- The program is a bit buggy. It has crashed on me 4 times so far, and I have received 2 popup errors.
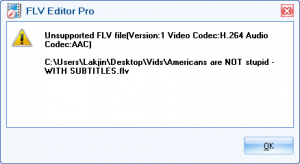
- You cannot import/edit all .FLV videos. For a YouTube video I used RealPlayer to download, I got this message:
Apparently H.264 codec is not supported.
Free Alternatives:
Avidemux is a free video editor designed for simple cutting, filtering and encoding tasks. It supports many file types, including AVI, DVD compatible MPEG files, MP4 and ASF, using a variety of codecs. Tasks can be automated using projects, job queue and powerful scripting
—-
Avidemux is a really nice video editor – it is a lot more powerful then Moyea FLV Editor Pro. It supports .FLV file as input and you should also be able to output as .FLV according to this wiki, but I am having trouble outputing as .FLV. You can do almost everything Moyea FLV Editor can do (most of it is done from Video -> Filters) + more, but it is not done as easily as you can do it in Moyea FLV Editor.
VirtualDub is an excellent, powerful free video editor much like Avidemux is. However, VirtualDub does not support the input or output of .FLV video files. So you would have to convert your .FLV to .AVI with FormatFactory, make you edits with VirtualDub, then convert back to .FLV with Format Factory. Move everything you can do with Moyea FLV Editor Pro you can do with VirtualDub + more since VirtualDub is a much more powerful video editor, but like Avidemux, it is not done as easily as with Moyea. Here is a guide on how to add watermarks with VirtualDub.
PMnet Verdict: Despite some bugs (nothing ground breaking however) this program is pretty good at what it does – edit FLV videos. This program allows one to customize FLV videos in an easy and quick fashion. Moyea FLV Editor Pro can be very useful for those who are constantly uploading videos onto websites such as YouTube, Google Video, Metacafe, etc. because of it’s ability to add watermarks (images and text). Also the easy merge of videos is nice. If you are looking to add ‘effects’ to your video, this program will not be as helpful in that area because of its limited effects. And the fact that this program cannot import/edit all FLV videos is a big con. But regardless, in the end, this program is a keeper for those who work with FLV video files on a regular basis.

 Email article
