Most people are familiar with the term ‘Lock Screen’ or ‘lockscreen’ from using smartphones for many years. Microsoft also introduced a Lock Screen to the desktop environment in Windows 8. That same feature is kept with Windows 10. The only problem is not all people want to have the Lock Screen running. Sometimes the feature is proving useless since one of it’s main reasons for existing was to show users app notifications but the notifications aren’t working. The Windows team still hasn’t really found a solution for this problem yet, so we can just get rid of it completely by turning it off. Here’s how to disable the Lock Screen in Windows 10:
DISABLING THE WINDOWS 10 LOCK SCREEN
Open the search bar and type ‘Regedit’ to open the Windows register editor.
- Click the first search result which should say a desktop app.
- Point to this location: “HKEY_LOCAL_MACHINE\SOFTWARE\Policies\Microsoft\Windows”.
- Right Click over the Windows folder and create new key by navigating to New > Key from the next menu.
- You’ll see the DWORD value from the same menu as the key.
- Create a new DWORD value by clicking on that option.
- Choose between the 32-bit or 64-bit DWORD value option depending on your operating system.
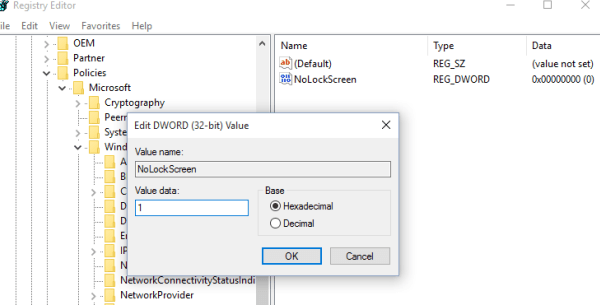
- Inside the DWORD box, give the words “NoLockScreen” without any spaces as the value name. You’ll see the field you need to enter that at the top as shown in the screenshot below:

- From within the Same box, set the Value data to “1” and choose the Hexadecimal base.
- Reboot the Windows PC and you’re done. You will now have no lock screen.
For those of you who would like to have the lock screen back again in the future, go back and delete the Personalization key you just created.

 Email article


