If you are a regular on a Windows PC like me, you probably know all about the Hibernate Mode from older versions of Windows. Windows has always come with the sleep, hibernate and shutdown options. Out of the three I use hibernate the most for the reason that it doesn’t use much more power than shutting the PC down. Sleep will boot quicker, but it continues to use the power more than hibernate. To save the most power you obviously want to completely shut the PC down. The problem with that is it takes the longest to boot back up. That’s why if you know you are coming and going from the computer a great many of times during the day or night, you might prefer using the sleep or hibernate options.
The problem with that is for some strange reason, Microsoft haven’t included the hibernate option by default in Windows 10. The following guide teaches you how to enable Hibernate Mode in Windows 10. Once you enable Hibernate Mode in Windows 10, you won’t have to wait anywhere near as long to boot the PC back up and you aren’t consuming much more power.
HOW TO ENABLE HIBERNATE MODE IN WINDOWS 10
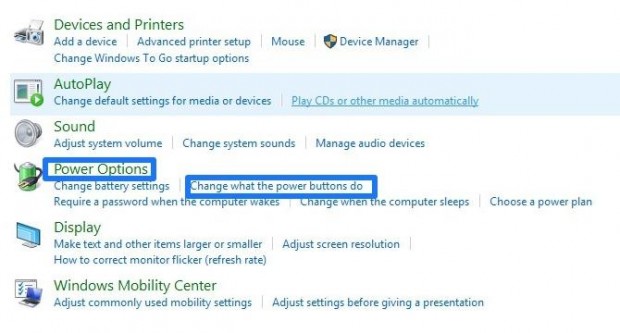
1. Navigate to the Control Panel > ‘Hardware and Sound’, followed by ‘Power Options’ like in the screenshot below.
Alternatively, you can click the battery icon from the system tray and then click the more power option button. Additionally, you can type ‘power options’ in the search field and it will take you to the same place.
Now all of you should have the power options open.
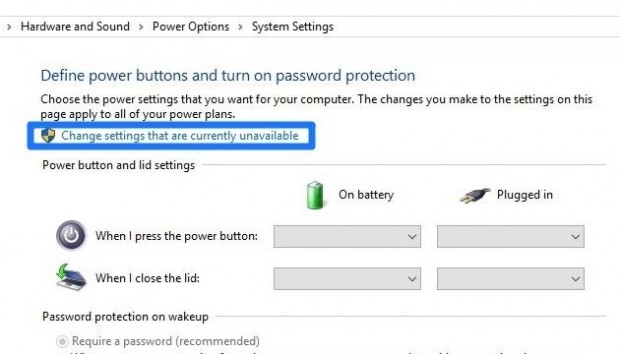
2. Click on the ‘Change settings that are currently unavailable’ option you can see in the next screenshot.
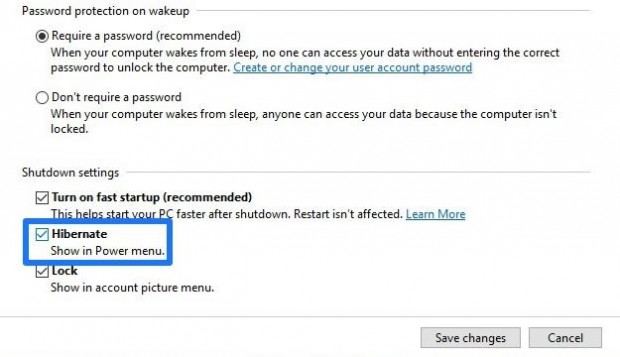
3. Check the box where it says ‘Hibernate’ under the Shutdown Settings from the Power menu. Click the ‘Save changes’ button on the bottom right side of the box after you have checked the Hibernate box.
4. Now when you go to shut down the PC running Windows 10, you’ll see the Hibernate menu available.
Hopefully that helps you enable Hibernate Mode in Windows 10. Cheers!

 Email article


