 Email article
In this tutorial, I will show you how to create a simple animated GIF flame flickering across the bottom of the image by using GIMP, a free image editor.
This is part 2 in an ongoing series on dotTech intended to teach you how to created animated GIFs using GIMP, a free image editor. Be sure to check out part 1 if you have not read it already.
ABOUT GIMP
GIMP (GNU Image Manipulation Program) is a free, open-source, cross-platform, and powerful image editor for photo retouching, image composition and image authoring. It can be used as a simple paint program, an expert-quality photo retouching program, an online batch processing system, a mass production image renderer, an image format converter, and so on.
GIMP Portable is a modified version of GIMP optimized for flash memory for Windows XP, Vista, and Windows 7 (Windows 8 support unknown). You can download it from here. (There are Linux and Mac OS X versions of GIMP, too, but they are not portable.) Download the self-extracting EXE, and extract to a folder of your choice. It writes settings to the application folder. GIMP Portable is Unicode supported. It has “Stealth” which means there will be zero left-over once the drive containing this program is withdrawn from your computer.8558
When you open GIMP, you can see 3 windows, viz., main window (GNU Image Manipulation Program) in the middle, Toolbox – Tool Options in the left, and Layers – Brushes in the right. If you ever close the Toolbox or the Layers window, you can bring it back by going to Windows > Recently Closed Docks.
THE TUTORIAL
To create an animated GIF flame flickering across the bottom of the image do the following:
- Run GIMP.
- Set the background to black by clicking the background button and selecting the color black (from “Change Background Color” window).
- Go to File > New… (Ctrl+N). “Create a New Image” with a Width of 256 pixels and a Height of 256 pixels.
- Go to the Blend Tool in the “Toolbox”, or Tools > Paint Tools > Blend (L). Click the Gradient button, and select the gradient called Incandescent. Incandescent has the same colors as real flames do except for the black. Therefore, we’re going to get rid of the black. Make sure Incandescent is still highlighted in “Layers – Gradients” window. It should be, but if it isn’t, click it once. Right click the Incandescent button to select Duplicate Gradient to make the “Gradient Editor” window appear. In the window that appears, find the tiny black arrow on the far left side. Right click on it. On the menu that appears, select Left Color Type > Background Color (Transparent). This make the black transparent, leaving the colors orange and yellow, just like the colors of a real flame. Click the Save button in the lower left corner of the “Gradient Editor” window, and close it. If Failed to save data error message appears, go to .gimp folder (GIMP Portable v2.8.4\GIMPPortable\Data\.gimp), and create a folder inside it called gradients, and try to save again (it should work then).
- On your black canvas, click approximately at the top middle of the canvas. Continue to hold the mouse button down while you drag it about to the bottom middle of the canvas. Keep the line as straight as possible. When you reach the bottom, let go.
- Go to Filers > Distorts > IWarp… You will see a picture of your canvas on the left side of the box. Make sure that Move is selected. Click and drag your mouse up and down across the orange and yellow section ONLY (from left to right).

- Repeat this 3 or 4 times until it begins to look like flames.
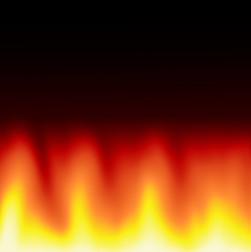
- Now, select Swirl CW. Click and drag across the tops of the flames until your screen looks something like mine. Click OK.

- Go to Layer > Duplicate Layer.
- Go to Filers > Distorts > IWarp…
- Now, select Swirl CCW. Click and drag your mouse across the top of the flames again. When they look the way you want, click OK.
- Continue to duplicate layers, and use the “IWarp” box 5 or 6 more times.
- Go to Filters > Animation > Optimize (for GIF).
- Preview the animation by going to Filters > Animation > Playback…, and clicking Play.
- To save the file, this new version (2.8.4) wants you to export if you prefer the standard formats like GIF. Go to File > Export… (Shift+Ctrl+E). Choose where you want to save your image by selecting the appropriate folder from Places in “Export Image” dialog box, and Select File Type (By Extension) makes you choose the image format. Give the image a suitable Name, and press the button Export. On the next screen (‘Export Image as GIF’), check As animation option.
- Done!
Enjoy!
This is part 2 in an ongoing series on dotTech intended to teach you how to created animated GIFs using GIMP, a free image editor. Be sure to check out part 1 if you have not read it already.


