{rw_text}Giveaway of the day for January 23, 2009 is LeaderTask v 6.1.3.
————————-{/rw_text} –>
{rw_good}
- Every ‘feature’ is integrated and connected with each other.
- Provides the ability to categorize and sort all tasks.
- Automatically creates backups everytime you exit of your currently loaded profile.
- ‘Filter’ feature allows you to view only specific tasks/entries.
- You can have multiple ‘profiles’
- You can password protect each profile separately.
- Has the traditional features you expect of a PIM (reminders, priority status, calendar, etc.).
- Ability to import from Outlook and iCalendar format files and export to Outlook, CSV and TXT formats.
{/rw_good} –>
{rw_bad}
- Poor load/save interface for multiple profiles.
- .ltb profile extension is not recognized by LeaderTask by default (at least in Vista).
- Adding new task is done poorly.
- If Vista users don’t run program as Administrator, they will face a few bugs.
- No ‘Undo’ or ‘Redo’ feature.
- Does not come with a sound file to use for the remind feature.
{/rw_bad} –>
{rw_score}
{for=”Features as Described” value=”10″}Can’t find any fault here.
{/for}
{for=”Ease of Use” value=”7″}Once you get to understand the program it is pretty easy to use. But initially, the learning curve is noticeable and it can be overwhelming.
{/for}
{for=”Usefulness” value=”9″}Usually I give PIMs a 10 because in today’s busy world most of us can use them. But the extended features and interconnectedness of LeaderTask actually work against it in this category – many of us would do just fine with a simple to do list and calender.
{/for}
{/rw_score} –>
Registration and installation was not a problem. Just be sure to read the readme. As I stated on GOTD comments, the readme clearly states:
In order to activate your copy of the software you should run activate_leadertask.tkey included in the downloaded archive.
Some reliable posters, like reghakr, say that just moving it into the folder works also. Well for me, on Vista, moving it into the folder did not work so I had to run it. If you are having problems registering it, be sure to try both ways (put into the program folder then run activate_leadertask.ltkey). Also after you run activate_leadertask.ltkey, it will tell you to restart the program. Be sure to close the program from the system tray – it will most likely be sitting there.
I must say that LeaderTask has impressed me. LeaderTask is a very nice PIM that allows you to categorize and sort all desired tasks. You have the ability to link each task to a project, a category, a person, etc. You can also specify ‘filters’ that allow you to view tasks that fulfill your designated criteria. All what I just said is probably a bit confusing (I know if I was reading it I would be confused) but don’t worry – I will explain it in more detail…w/ screenshots of course. :)
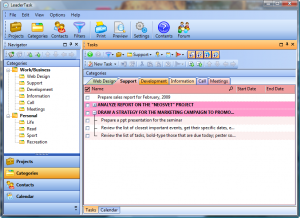
Okay so this is what the program looks like:
If you are overwhelmed initially by the program, no worries, I was too. So lets first start off by explaining a few things. “Projects”, “Categories” (by default you see “Categories” when you first run the program) and “Contacts” can all be considered ‘subgroups’. Within each ‘subgroup’ you can add specific tasks. For example, you create a new project, and then you have the ability to create tasks and place them under that certain project. Same thing with categories. With contacts, you add a new contact then add tasks that you can associate with that contact. For every single task you can assign a specific project, category and contact that it is associated with. You can also assign a specific date and time to each task which will then show the task in the calender.
There are two main panels of the program window that we are going to deal with: navigator and tasks.
- Navigator Panel
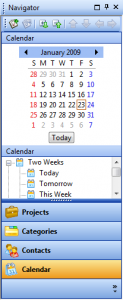
From here you can navigate from projects to categories to contacts to calendar. Just click on the specific thing you are interested in and you it will be shown. In the above screenshot you see “Calendar”. If you click on “Two Weeks” or “Today”, or any of the entries below that, in your “Tasks” panel (which we will discuss next) the tasks associated with that date will be shown. Same thing if you had project, or category, or contacts – clicking on an entry in the navigator displays the tasks associated with that entry in the “Tasks” panel. Right clicking will allow you to add a new entry (new project, calender date, new category, new contact) under that specific ‘subgroup’.
- Tasks Panel
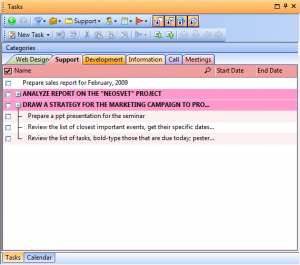
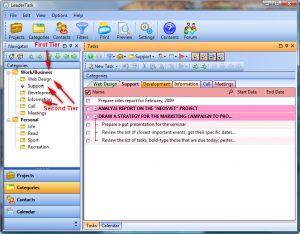
From here you get to view all your tasks, edit them, add new ones, etc. The above is a screenshot of categories, but it is the same for contacts, projects and calendar. The tabs you see, that list “Web Design”, “Support” etc. are specific second tier categories:
If you click on “Work/Business” then the tabs will change to “Work/Business” and “Personal”. All the tasks under each category will be displayed. The same method is followed with projects, contacts and calendar.
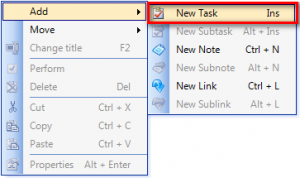
Now to add a new task, just navigate to the specific category, project, contact or date on the calendar you want to associate the task with. Right click on the area where the tasks are displayed, go to “New” then “Create Task”:
You can also just hit the ![]() button. It doesn’t matter. Both will lead to the creation of a new task – a new task will be added to the list:
button. It doesn’t matter. Both will lead to the creation of a new task – a new task will be added to the list:
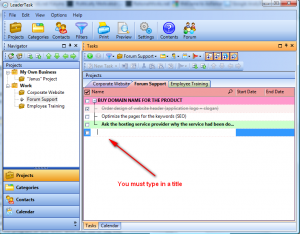
As the screenshot says, you must type in a title after you create a new task, otherwise no new task will be created. There is no character limit on how long the title can be, but there is a visible space limit, so you will only see a part of the title if it is too long. After you type in a title, double click on the task to open up the ‘properties’ of that task:
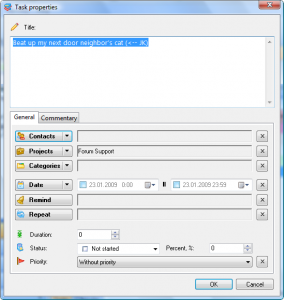
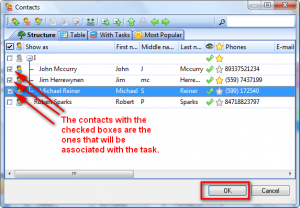
I created my task under Project -> Work -> Forum Support therefore you see that “Forum Support” is automatically the project that is assigned to this task. However, I can also add a contact and/or a category to it if I wish. Or I can associate more projects to this task. All I would have to do is press the Contacts or Categories or Projects button and chose the specific contact or category I want to associate with that task. You can associate as many contacts or categories or projects to one task as you like. For example:
The method to add projects and categories is the same. I added more projects and categories to this task:
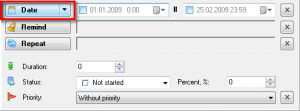
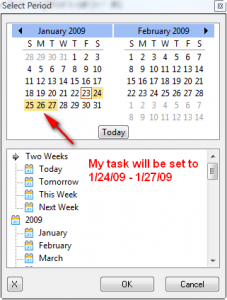
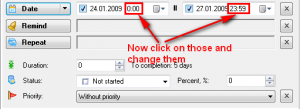
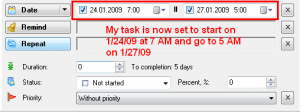
After you are done with assigning the task to contacts, projects and categories, you can set the date and time for this task. Click on the “Date” button. That will bring up a window where you will see calendars. To set the starting/ending dates for this task just click + highlight the desired dates. If the task is only a one dayer, just highlight that one day. Click “OK”. Then to set the time, click on the time portion of the date box, and type in the time (it is in 24 hour format). For example to set my task to start on 1/24/09 at 7 AM and go until 5 AM on 1/27/09 I did the following:
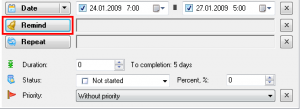
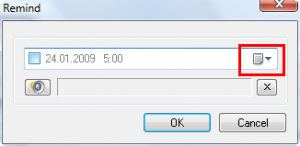
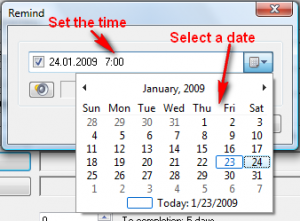
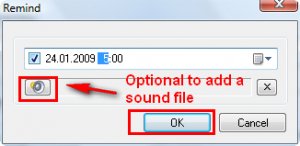
Then after I have set the date and time, I can also set a reminder for myself. Click on the “Remind” button, choose the date and time, set a sound file (optional – you don’t have to) and click “OK”:
An odd thing is that LeaderTask does not come with any sound file to use with the remind feature – you have to find your own. So far, I have tested that a .wav format will work for remind. Visit this website for free sounds.
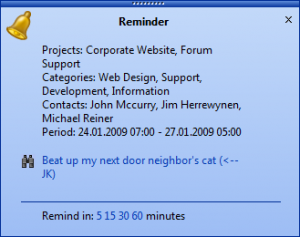
When it comes time to remind you of your task, if you set a sound file, the sound will play but it will not loop. Also, a small reminder window will popup at the bottom right of your screen:
Clicking on the title of the task (“Beat up…”) will open LeaderTask window and display the task. You can also set the program to remind you again of the task in 5, 15, 30 or 60 minutes (just click on the one you want). To close the reminder, just hit “X”.
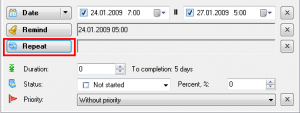
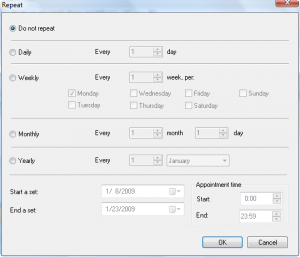
After you have set the reminder you can also set the task to reoccur if you want. Just hit the “Repeat” button, and set your settings:
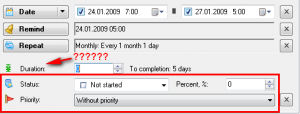
After you have set that, you also have the ability to set the priority of the task, the status and how much you have completed. For the love of god I can’t understand what it it means by “duration” – the help isn’t very helpful either:
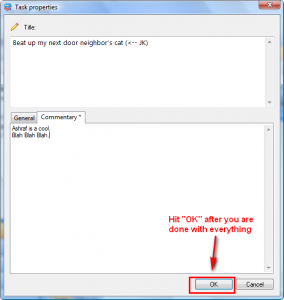
The last thing you can do with tasks is add any sort of commentary to it:
After you are done with everything, just hit okay. You just finished adding a task. You should see that task displayed under all of the projects, categories, contacts and calendar dates you associated with it.
Once you are done with a task, check the little white box that is to the left of every task – that will mark the task as ‘complete’:
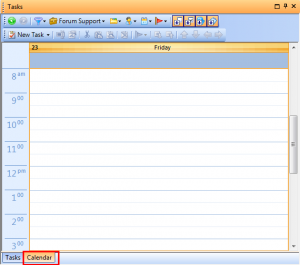
If you click on the “Calendar” tab near the bottom, you will get a list of tasks that are to occur that day sorted by their designated times:
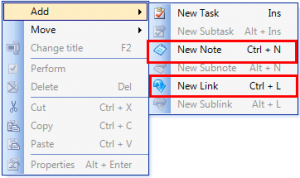
Besides adding a task, you can also add a note or a link:
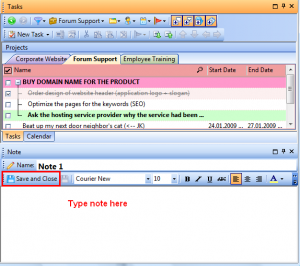
When you add a new note, first you have to title it just like a task; after you title it, a little window pops up at the bottom where you get to type in whatever you want. After you are done just hit “Save and close” to save the note and close it:
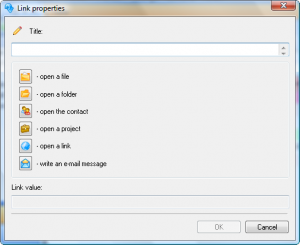
When you add a new link, this window will open up:
Just title the link and choose what you want to happen whenever you double click on that link. For example, if you want to open a sound file whenever you click that link, click on that button next to “Open a file”, browse to that sound file and select it. Hit “OK”. Now whenever you double click on that link, the sound file will open.
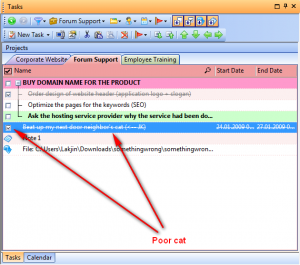
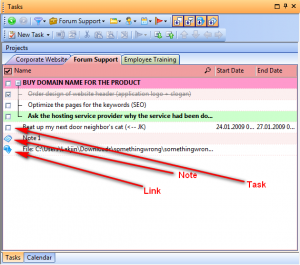
Both notes and links will be displayed in the tasks list, albiet they will look a bit different:
Double clicking on a note will open the note; double clicking on a link will activate whatever that link is supposed to do.
You also have the ability to search through all the entries you see. Click on the magnifying class and type in your search query in the text box that appears next to it:
It will only search the title – not what is inside the task or note.
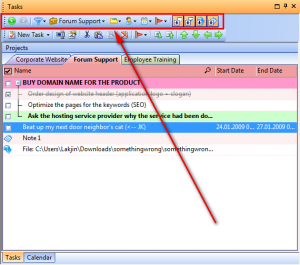
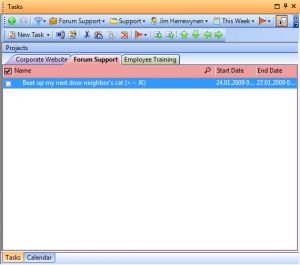
I will end with discussing the tasks panel by explaining how you can ‘filter’ what tasks/notes/links you see in the task panel. Look at this toolbar:
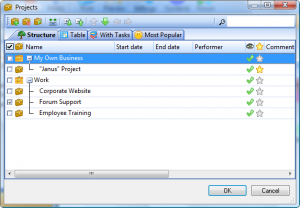
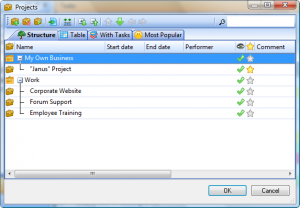
From this toolbar you can ‘filter’ what tasks/notes/links you want to see. The ![]() button allows you to choose what project tasks you want to see. Only the tasks in the project you chose will be shown (like how in the above screen shot I only see tasks associated with “Forum Support” because that is the one I have chosen). Click on the button and go to select. You will see this window:
button allows you to choose what project tasks you want to see. Only the tasks in the project you chose will be shown (like how in the above screen shot I only see tasks associated with “Forum Support” because that is the one I have chosen). Click on the button and go to select. You will see this window:
Just check the projects you want to see and hit “OK”. You can select as many projects as you want. When you return to the main window, only the tasks associated with the projects you checked will be shown.
The ![]() button will do the same for categories, the
button will do the same for categories, the ![]() button will do the samething for contacts and the
button will do the samething for contacts and the ![]() will do the samething for the dates. You can add as many of each as you want, and you can add all of them at the same time if you want. For example, I only see the tasks that are associated with “Forum Support” project, “Support” category, “Jim” contact, and that occur “this week”:
will do the samething for the dates. You can add as many of each as you want, and you can add all of them at the same time if you want. For example, I only see the tasks that are associated with “Forum Support” project, “Support” category, “Jim” contact, and that occur “this week”:
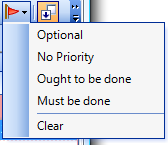
You can also sort the entries within each list by the priority you set for each task:
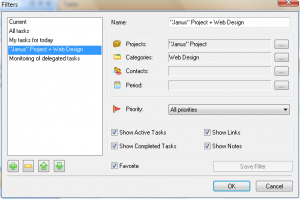
Lastly, if you do not want to go through each time and set the project, category, etc. settings, you can create a formal filter. Click on the ![]() button and go to select. You will see
button and go to select. You will see
This feature is particularly important because it allows you to ‘filter’ what tasks you view. For example, in the above screenshot I have “Janus Project” + Web Design clicked on. You see that under “Projects” “Janus” Project is designated and under “Categories” “Web Design” is designated. If I was to hit “OK”, all the tasks that are associated with “Janus Projects” AND “Web Design” would be displayed in my tasks menu. All the options you see will influence what tasks you see in the tasks menu. Think of it like running a query or doing a search of your tasks. It combines all the filtering abilities of all the buttons I described above and creates a formal filter out of it – a filter that you can reuse over and over.
That just about describes the main features of this program – adding tasks, notes and links. As you can see this program is pretty powerful in this area – it allows you to link tasks together by many different criteria making it very useful for the very hectic people.
Before we go into free alternatives lets discuss the rest of the layout of the program. First of all it is good to note that you can click+drag around toolbars/panels and change the layout of the program as you wish. With that out of the way:
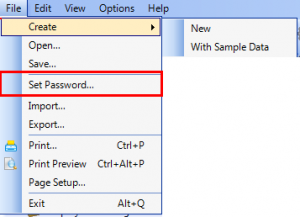
- This is the file menu, as I like to call it. There is only one menu I would like to point out – the rest you can go through by yourself:
I have “Set Password” boxed because that is the main feature I would like to point out. You have the ability to password protect each profile you are using. Also, as I mentioned in my pros, you can have multiple profiles with this program. Just create a new profile and save it. Remember one thing about this program however: it automatically saves the last profile that was loaded. What I mean is that you don’t have to hit “Save” every time you make changes. You only have to hit “Save” if you plan on changing to another profile. Also, the last loaded profile is the one that will be loaded when the program is reopened.
Also worth noting is the import/export ability. The program can import from Outlook and iCalendar format files and export to Outlook, CSV and TXT format files.
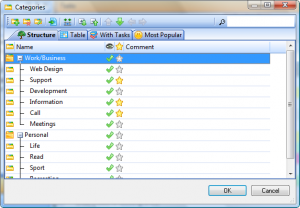
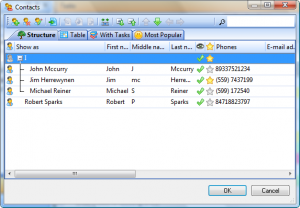
- This is the ‘main toolbar’. You can turn off this toolbar if your right click and uncheck “Toolbar – Main”. Clicking on the “Projects”, “Categories”, “Contacts” and “Filters” button would do the same thing as if you went to Options -> Projects/Categories/Contacts/Filters. It brings up the ‘housekeeping’ and/or ‘management’ window for each of these features. From these windows you get to change the order of subcategories under each of these, view the ones that have tasks in them, etc. Nothing too ‘complicated’ or ‘ground breakingly important’ for Projects/Categories/Contacts so I will not spend time discussing them, I will just show what they look like:
However, clicking the “Filter” button will bring up a window that allows you to create/edit filters:
This is the same window as I described above with the same functions.
Besides all that, there is the “Print” and “Preview” buttons. The “Preview” button will let you preview what you would get if you hit “Print”. Whatever is under “Tasks” is what will be printed.
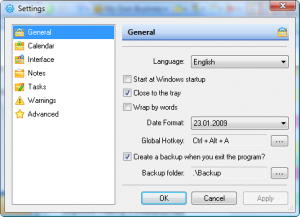
The “Settings” button brings up the same menu that going to Options -> Settings would:
From the settings menu you can change certain things like what day the calender should start on, the font size/type for notes and tasks, what warnings to display, etc. Look through all the settings to see them all. The only one I would like to point out is the backup setting. If you look at the bottom of the screenshot above, you will see that the program is set by default to make ‘backups’. These backups are just .ltb files that are saved right before you exit the program. There is only one backup designated for each day. So every time you exit the program, the backup of that day is overwritten. The process keeps happening every time you exit the program for that day. The next day, a new backup is created. Therefore in an year, you would only have 365 backup files.
The “Content” and “Forum” buttons open on the developer’s website and takes you to the specific section on their website – Content being the help section, Forum being the forum.
Phew. Been at this review for 3+ hours now and the finish line is in sight!. Unfortunately I still did not cover *all* the features of this program, so you will have to go do that yourself, but I did cover most of them. Now while I really like this program, it has a nice interface and the internal integration really makes it handy for the busy, there are a few problem I have with this program:
- For one it isn’t officially Vista compatible. While it will work on Vista without running as Administrator, I ran into a few bugs while not running into Administrator so it is recommended to run as Administrator.
- The help section for this program is very poor.
- There is no ‘undo’ or ‘redo’ feature in case you make a mistake like delete a task (although you are prompted to ‘make sure you want to delete’).
- .ltb extension (the extension profiles are given) is not recognized as belonging to LeaderTask (at least in Vista). So you have to manually choose the program.
- The save/load method for multiple profiles is done poorly. For one loading a profile by doubling clicking on the icon that is on your computer is not working (at least in Vista) – you just get a blank program. Secondly, when saving a profile, there is no “Save” function like just saving over your current profile. It acts like a “Save As” every time.
- It doesn’t come with a sound file, like I mentioned above.
- I hate how when adding a new task, you must double click on the task after you have titled it to edit its properties. That window should open up automatically.
- No desktop widget (to display tasks) like Rainlender. I see that you can click + drag the tasks panel out of the main program window but I did not find any way to pin it onto the desktop.
Free Alternatives:
Rainlendar is an alternative to the schedule/task feature of this program.
Rainlendar is an excellent, excellent tool that helps you keep track of your events and tasks. With Rainlendar, you can:
- Create a “To Do” list, and an “Events” list.
- Set Rainlender to remind you of your task or event X amount of time before it happens (days, hours, minutes depending on what you choose.
- Set priorities to each tasks (high, medium, low, none) to help prioritize yourself.
- Once a task is completed, you can make it go away by Right clicking the task -> Completed.
- Set a task or event to be reoccurring.
- Display both lists directly on your desktop alongside a calendar in the form of “widgets” (kind of).
The interface is very easy to use and adding/removing a task/event is also easy to do. Excellent program!
—-
Rainlendar and LeaderTask are aimed at two very different audiences. Rainlendar is for those people, like college students, who just need a to do and an event list to help them keep on track. LeaderTask is for those business people or the people who are extremely busy and involved in many thing; the type of people who have so many things going on, they would get lost unless they categorized everything.
Sunbird is also an alternative to the schedule/task feature of this program. Sunbird is a calendar/task/event management/reminder program by Mozilla. It is very much like Rainlendarbut different interface.
EssentialPIM is a very similar program to LeaderTask. If Rainlender was on the left, LeaderTask on the right, I would place EssentialPIM inbetween the middle and the right. It does a lot of what LeaderTask does, but LeaderTask has a bit better integration and organization abilities (like associated tasks with contacts and projects not just with categories like EssentialPIM).
PMnet Verdict: Despite the fact that the program is not officially Vista supported, and ignoring the bugs that occur if you don’t run as Administrator, I really like LeaderTask. For the forever busy and the people who are involved in hundreds of activities this program is great. With a capital g (G?). Its ability to allow tasks to be associated with projects, categories and contacts is unprecedented. Being able to filter your tasks according to your criteria is nice. The interface is a bit overwhelming but nothing you can’t get use to. If you are one of those people who are so busy that you will be lost if you don’t categorize each task, this program is definitely for you. For other people, like my self, who just need a simple to do and event list to help us keep on track, Rainlender is the way to go.

 Email article
