{rw_text}Giveaway of the day for December 18, 2008 is Wondershare Movie Story 4.5.0.
[rssless]————————-{/rw_text} –>
{rw_good}
- Easy to use.
- You can use pictures or movies for ‘slides’.
- You can add many different effects to each ‘slide’.
- You can add text to each ‘slide’.
- You can add background music.
- You can make a recording and add it to video.
- You can add subtitles.
- Ability to add in a DVD menu.
- Comes with many pre-defined templates for DVD menu.
- You can publish your movie in many different formats.
- You can burn a DVD or VCD directly from the program.
- You are given an option to ‘recover last project’ if the program crashes.
{/rw_good} –>
{rw_bad}
- An error window shows up arbitrarily (does not effect program performance though).
- Tab changes from ‘storyboard’ to ‘timeline’ every time you play the video while editing (annoying!).
- You are limited to two simultaneous subtitles.
- You are limited to two simultaneous background songs.
- No flash (.swf, .flv or .exe) output format.
- ‘Rotate counterclockwise’ button does not work.
- Interface gets a bit laggy as more and more slides are added.
- Video Publish is a bit buggy (lots of errors).
{/rw_bad} –>
{rw_score}
{for=”Features as Described” value=”8″}It does everything the developer claims, but the bugs knock the score down to an 8.
{/for}
{for=”Ease of Use” value=”10″}As easy as Windows Movie Maker (and WMM is pretty easy).
{/for}
{for=”Usefulness” value=”9″}I like this software so much, I wanted to give this a 10, but I know that not everyone will need to make movies, or slideshows.
{/for}
{/rw_score} –>
Registration and installation went well as usual. One thing to note: the instructions in Readme.txt were a bit different then usual. Usually we are told to run Activate.exe then Setup.exe. Today we were told to run Setup.exe then Activate.exe. Not sure why is that but I did what the readme says and it works perfectly. Just note that Vista users need to run Activate.exe as Administrator for it to register properly. Make sure you have the program closed while you are running Activate.exe to avoid any problems.
Wondershare strikes again. Very nice program; I would say two thumbs up but my neighbor’s dog ate my left thumb. Just kidding. While I was not particularly impressed with the actual video creation (because Windows Movie Maker does very similar things, although Movie Share is still better), I was impressed with the DVD menu creation and the movie publishing options, despite the bugs.
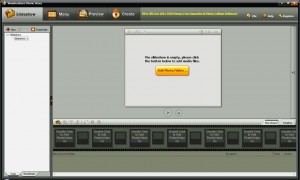
This is what the program looks like:
If you have used Windows Movie Maker before you will notice a striking resemblance between the interface (and the program names for that matter also) of WMS (Wondershare Movie Story) and WMM (Windows Movie Maker). Along with the interface, the actual movie creation is pretty similar to WMM also although not exactly the same thing.
To get started we have to first decide what type of video we want. You may have noticed that with this program you can create a DVD menu. Each “Slideshow” you see listed on the left (Slideshow 1, Slideshow 2, etc.) will correspond to a thumbnail entry on the DVD menu. Think of each slideshow as a DVD ‘chapter’. So you have to make a decision on if you want to split up your video into chapters or not. If you do, you will have to create a new slideshow every time you want a new chapter. If you don’t, just make your whole video in one slideshow. Once you have made that decision, you can get started.
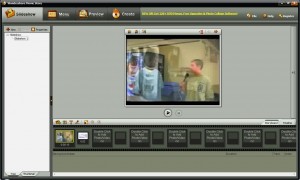
Now to get started, obviously, we have to import something to put in the video. WMS allows us to import images, such as .jpg or .png, or videos, such as .avi or .flv. Either press the big yellow button you see in the middle of your screen, or double click on a slide box (the box that says “double click here to…”) at the bottom. You can also click on the first icon from the left on the bar that has the storyboard and timeline tabs (the icon that is a folder and a plus sign), and choose “Add Photo/Video”. The choice is yours and all three methods will get the desired effect of creating the first ‘slide’ of your movie:
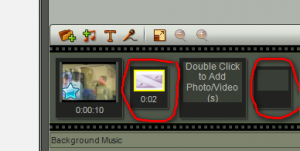
You may notice that not only was your image/video added (video in my case), but something was inserted into the small rectangle that is directly to the right of the ‘slide’ rectangle. That small rectangle is the transition effects rectangle and we will discuss that later.
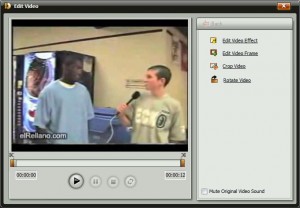
Okay so you have added your video/image into a slide. What now? Well now you can add many effects to your slide that include filter like effects and video ‘motion’ effects. First lets discuss the filter like effects. Double click on the slide you want to add the effect to, or click on the slide once and press the “Edit clip” button (it is the third button from the left on the toolbar that is directly above the video play screen). You should see this window popup if your slide consists of a video:
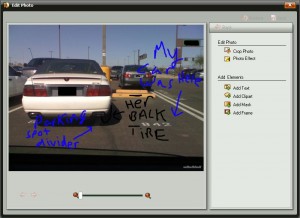
Or if you slide consists of an image, you will see this window popup:
First lets discuss the video one, then picture.
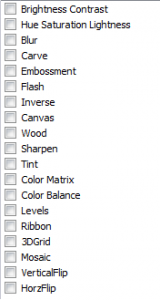
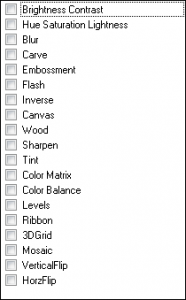
- Edit Video Effect – think of these effects as ‘filters’: they change how your whole video looks, not each frame of it. You can add the following effects (you are not limited to just one – add as many as you like):
After you are done with the effects, just hit “Back” (located right above the scroll window where you can chose effects from).
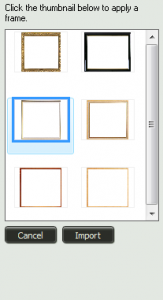
- Edit Video Frame – you can add a ‘frame’ around your video. These frames are just images that are transparent in the middle so the only part of your video that is being covered is the actual frame. There are 6 frames that come with the program. Obviously, you can only add one frame:
You can import your own frame, but remember that it will be placed onto of your video, so if your frame is not transparent in the middle, your video will be covered by your image and you will not be able to see your video. After you chose your frame, just hit “Back”.
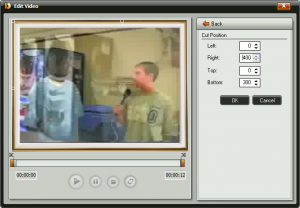
- Crop Video – you can crop your video so that only a certain area is shown:
From the right, you will be able to move your cropped area pixel by pixel. That is very anal and I do not suggest it. Instead, you can crop your video by click + dragging on the handle bars (the little squares) that appear on the corners of your video. You can move around the rectangle by click + dragging on it. Once you are happy with your crop, you must hit “OK” to save it (as opposed to just hitting “Back”). If you ever want to change your crop later on do not worry – you will be able to do so just by coming back to this screen.
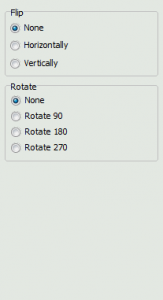
- Rotate Video – from here you can rotate your video, flip it, or a combination of the two:
Just hit “Back” after you are done.
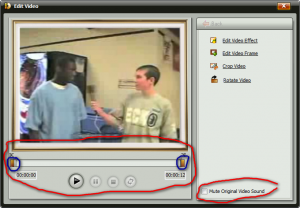
- Besides all that are mentioned above, you can mute the sound that is on the video, or you can change the length of the video/how much you want to show and/or where you want the video to start:
Circled in blue are the two objects that you must click + drag to change the length of the video. You can drag either one meaning that you control when you want the video to start and when you want it to end. Once you are satisfied, just hit “X” (located in the top right corner).
Now for the picture one:
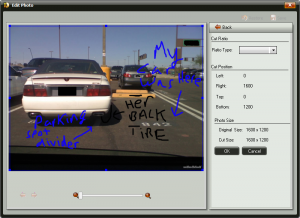
- Crop Photo – as you could crop a video, you can crop a picture too. The cropping for the picture works in a similar fashion with a few differences:
In video cropping, you had the option of choosing the the cropped area pixel by pixel or by click + dragging on the handle bars (boxes) . For picture cropping you can only chose the cropped area by click + dragging on the handle bars. As you make your crop, the location of the crop will be displayed under “Cut Position” and the size of the crop will be displayed under “Photo Size -> Cut Size”. You can also click + drag to move around the crop box. One cropping tool that you could not do with video that you can with picture is chose “Ratio”. “Ratio Type” drop menu allows you to chose if you want 4:3 or 16:9 ratio of your image. It will resize the crop area accordingly to what you chose. Once you are happy with your crop, hit “OK”.
- Photo Effect – just as you could add effects (‘filters’) to videos, you can do the same with pictures. The effects/filters are the same:
Again you are not limited to just one. And again just hit “Back” after you are done.
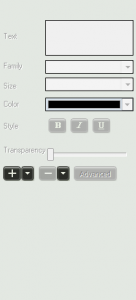
- Add Text – lets you add text to your image:
To add text, you must click the “+” button. This will add a text box to your image. It will initially be located in the top left corner but you can click + drag to place it wherever you want. You can also rotate your text by clicking on the blue circle above the text and rotating. To edit the text in a text box, click on that text box and make your changes from where it says “Text” in the above screenshot. If you go to “Advanced” you will be able to add Shadow and Halation to your text or chose from a bunch of wordart. The button with the arrow next to the “+” button allows you to add filename, slideshow name, slide number or photo taken time as text onto your image. The “-” button will delete the text box. The button with the arrow next to it allows you to remove filename, slideshow name, slide number or photo taken time from ALL image slides. After you are done with the text, hit “Back”.
- Add Clipart – allows you to add clipart to your image. Bunch of cliparts already come with the program or you can import your own (imported clipart must be a valid image format, such as .jpg or .png). You also can control the transparency of the clipart. Hit “Back” once you are done.
- Add Mask – allows you to add a mask effect. think of this as cropping your image in a predefined pattern. Hit “Back” once you are done”
- Add Frame – just like adding a frame to a video except there are about twice as many frames that come with the program by default. You can also import them. Hit “Back” once you are done.
- Besides all that is mentioned above, there is a “Restore” button that, once pressed, restores the image to its original state. There is also a zoom bar at the bottom. This zoom bar is only for you to be able to zoom into the image – it does not effect the zoom of the image in your video. Hit the “X” button in the top right after you are done with all your changes.
After you have made all your changes, hit the play button once you are back on the main window to see how you like all the changes you made.
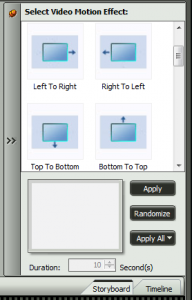
Now, as mentioned earlier, there are also something called “Video ‘motion’ effects” that you can add to each individual slide. Video motion effects are effects that occur while your slide is actually playing. For example, if you chose “Left to Right” effects, your slide will move left to right while it is playing. Video motion effects can be added to video and picture slides both. The only difference between video and pictures is that for pictures you get to chose the duration of this effect while for video it is set to the duration of the whole video (you cannot control it). To add these effects, click on that little star you see in the bottom left corner of each slide rectangle:
This will bring up a menu on the right of the program window that looks like this:
There are many effects you can add. Chose one and click “Apply”. Or if you cannot make up your mind, hit “Randomize” and the program will add a random effect for you. Once you have added an effect, the star I mentioned earlier will turn light blue indicting that there is an effect on that slide. To remove an effect, right click on that star and click on “Delete Motion”. In the screenshot above you will noticed that “Duration” is grayed out – I cannot mess with it. That is because the slide I have that motion effects window open up for is a video. For pictures you can change the duration.
That is basically all you can do to each individual slide. There are other things you can still do however. Click on “timeline” tab. The bottom of your window should look something like this:
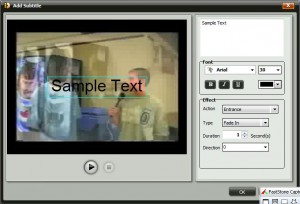
From here you can add subtitles, background music, or a custom recording to your video. If you want to add subtitles, click on one of the subtitle tracks. This window will show up:
Subtitles are kind of like PowerPoint – the type that flies in and stuff. It is all pretty self explanatory. If you want to change how the text enters, chose “Entrance” under action and change the settings. If you want to change what happens to the text while it is on the screen, chose “Emphasis” and change settings. If you want to change how the text exits, chose “Exit” and change settings. You do not have to pick and chose – you can change the settings for all three if you like. After you are done, just hit “OK”. As you add subtitles, it will be placed on your timeline. You can click + drag each subtitle to change when it starts/ends. As mentioned above, you can have upto two subtitles displaying at once.
If you want to add background music, click on one of the background music tracks (“Audio Track 1/2”). You can then browse your computer for a music file. As you add music files, it will be added to the timeline. You can change how much of each music file you want to listen by double clicking on the music file after you have added it and change the length. As with subtitles, you can have upto two background music files going on at once.
If you want to add custom recording, click on “Audio Track3”. Record what you want, click okay. It will be displayed on the timeline. As you add more recordings, they will be placed one after another. You can only have one custom recording going on at once.
The last thing to discuss about the actual video making process are the transition effects. Recall I mentioned the small rectangles that are next to the slide rectangles earlier:
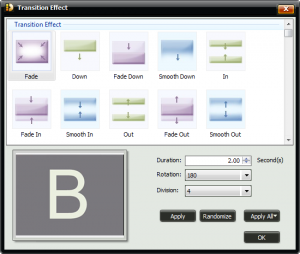
By default a transition effect will be added everything you add a new slide for videos and picture slides both. To change the effect, left click (single click!) on the appropriate transition effect box. This will popup:
There are many (seriously, there are a lot) of transition effects you can chose from. When you are happy with your effects, just hit “OK”.
That is basically all there is to the actual video making process. Besides video making, there is a feature where you can create a DVD menu for your video. If you do not plan on publishing your video as a DVD you can skip this step.
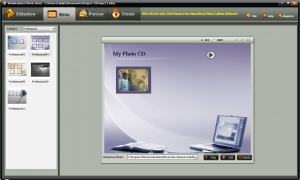
This is what the program looks like under the menu tab:
There will be a thumbnail placed here for every slideshow you have. In the screenshot above, I only have one slideshow, so there is only one thumbnail. Each of these thumbnails, and the play button, will be clickable once you create the DVD.
There are a bunch of menu templates that come with this software. You can find them by navigating each category from the drop down menu. You can change the background of the menu by right click -> set background image. Or if you want the background to be a solid color, right click -> set background color. You can add text also: right click -> Add Text. If you do not like how a thumbnail looks, right click on it -> Edit Frame. You can also change how the place button looks: right click on it -> Edit Button. If you see, near the bottom there you can chose what music plays while you are at this screen. Everything is customizable. After you are happy with your DVD menu screen, go to “Create” tab to actually start creating your movie.
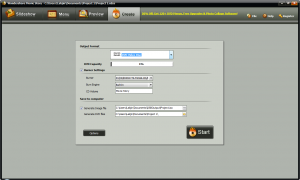
This is what the “Create” tab looks like:
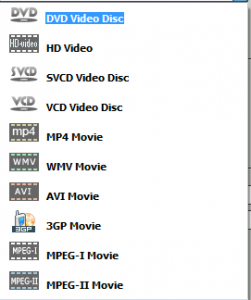
From the drop down menu chose the format you want your video to be in. These are the output formats supported:
With DVD, SVCD, and VCD, you can burn your video directly onto a CD, or you can just save the video as a disc image on your computer. Everything else will just save the video as a file of the respective format on your computer. Take note of the “Options” button before you actually create the video. Depending on your output format, you will have different options such as ratio size, codec, etc.
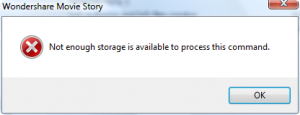
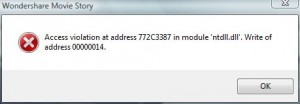
Now the program is a bit buggy when creating videos. You may get some errors, especially this one:
But rest assured, even though you are getting errors, your video has been outputted correctly – just be sure to let the program run (don’t click “OK”) if you see the status bar ticking away in the background. The best way to know if your video has been outputted despite the error, is to open up your target folder, and watch until your video is finished. Atleast that is how it has been working out for me so far. If your video does not publish, try opening/closing the program and publishing again. If it still doesn’t work, contact Wondershare. T
If creating a video worked without any errors, you will be able to browse directly to where you put the video. If there are errors, you might have to close down WMS Alt + Ctrl + Del style. If you do, reopen WMS and when prompted to recover project, click no. If you do not do this after you outputed your video and closed WMS Alt + Ctrl + Del style, you will get an error when trying to play your output video saying that the “video is in use”.
Overall, I like this program, even with all it’s bugs. There are a few things problems I have with this software (besides just fixing the bugs mentioned):
- You cannot output video in a flash format (.swf .flv or .exe). For webmasters and people who want to put their videos on the web, this is a pain to have to go through another step to convert into a flash file.
- Everytime you play your video, the tab switches from Storyboard to Timeline. This can get really annoying if you prefer to work in storyboard.
- ‘Rotate CounterClockwise’ button does not work.
- Interface is a bit laggy.
- I sometimes get this error window. It shows up arbitrarily and it does not seem to mess up the program or what I am doing…its just annoying:
Free Alternatives:
Windows Movie Maker gives you the tools to create, edit, and share home movies. Compile and edit a movie from video clips with drag-and-drop functionality. Add special effects, music, and narration with ease. Share your movie over the Web or master it to DVD media. You can also save your movie back to the DV tape in your camera.
-Download.com
—-
Simple and free, I have used Windows Movie Maker for my video editing/making needs up til now (which were not very high at all). In terms of video creation, you can do almost everything WMS can minus the DVD menu creation. WMM also does not support as many output formats as WMS. But WMM is a really nice free alternative to this program. You should have Windows Movie Maker installed on your computer already. If you do not, you will have to download it. Here is the download for XP, and here is the download for Vista. This link will provide you many WMM tutorials (thx Fubar).
VirtualDub is a video capture/processing utility for 32-bit Windows platforms (95/98/ME/NT4/2000/XP), licensed under the GNU General Public License (GPL). It lacks the editing power of a general-purpose editor such as Adobe Premiere, but is streamlined for fast linear operations over video. It has batch-processing capabilities for processing large numbers of files and can be extended with third-party video filters. VirtualDub is mainly geared toward processing AVI files, although it can read (not write) MPEG-1 and also handle sets of BMP images.
-Download.com
Avidemux is a free video editor designed for simple cutting, filtering and encoding tasks. It supports many file types, including AVI, DVD compatible MPEG files, MP4 and ASF, using a variety of codecs. Tasks can be automated using projects, job queue and powerful scripting capabilities.
-Avidemux Developer
PMnet Verdict: WMS and WMM are both programs that ‘put together’ videos. Think of these programs like making a slide show, then converting to a video. VirtualDub and Avidemux, on the other hand are actual video editors where you can edit a video frame by frame. That being said, WMS is a really nice program and I recommend keeping it, despite the bugs it has. With WMS, I suggest getting Avidemux, incase there is a need for frame-to-frame video editing. VirtualDub and Avidemux are very similar programs, but I just suggest Avidemux because I like the interface better. WMM is a nice alternative to WMS but it lacks the DVD menu capability. Bottom line: WMS is a keeper.
[/rssless]

 Email article
