dotTech

  • /Home
  • /Giveaways
  • /Reviews
  • /Tips & Tricks
  • /Downloads
POPULAR ➞ Download Paid Software For Free!
Previous Post
Next Post

How to manage Google account permissions [Guide]

Tip / Trick
By Kent - July 9, 2014 - no comments Email article | Print article

Are you aware of the fact that most of the apps and extensions that you use on Chrome require access to your account? As a matter of fact, this is not just limited to your Chrome extensions and apps. The same goes for your web apps. For as long as a web app would ask you to log-in or link your Google account, then you are allowing that app to view or access some parts of your personal account or data. Like, for example, you’re allowing Appbrain or Facebook to access your basic account info.

The thing is some apps will retain that access even if you have already stopped using them. So to be sure, you can opt to manually revoke the app’s access to your account. Speaking of which, here’s how to remove the apps linked to your Google account.

Step 1

Log in to your Google account using your email and password.

Step 2

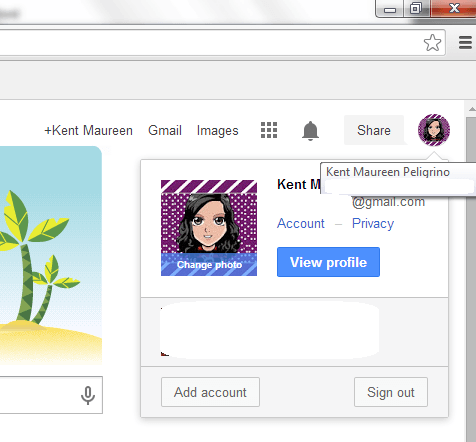
Once you’re logged in to your Google account, go to your Google or Gmail home page then click your profile photo.

revoke app access Google account

Step 3

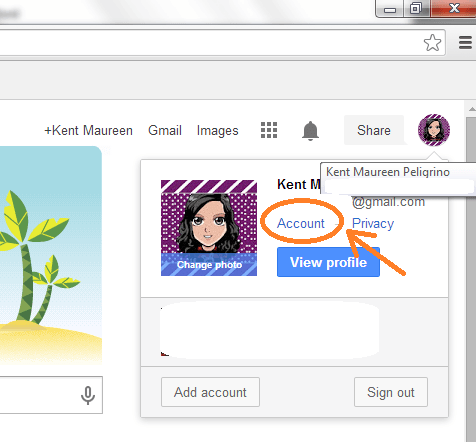
A small window will appear and there, you’ll be able to view your profile, change your account privacy or sign out. Just click “Account” to go to your “Personal Info – Account Settings”.

revoke app access Google account b

Step 4

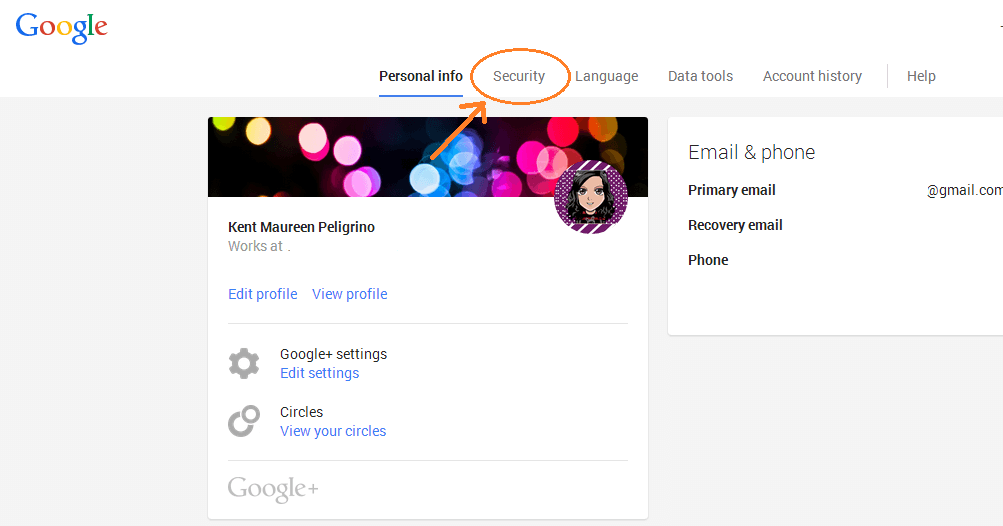
On your “Personal Info – Account Settings” page, click the “Security” tab.

revoke app access Google account c

Step 5

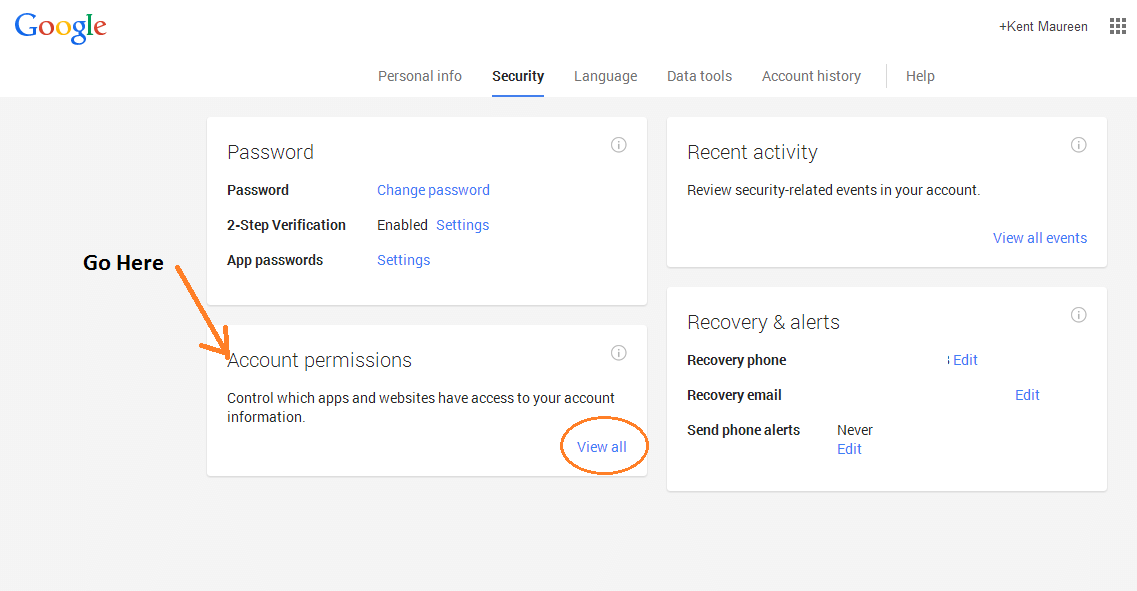
Under your “Security” tab, go to the section for “Account Permissions” then click “View All”.

revoke app access Google account d

Step 6

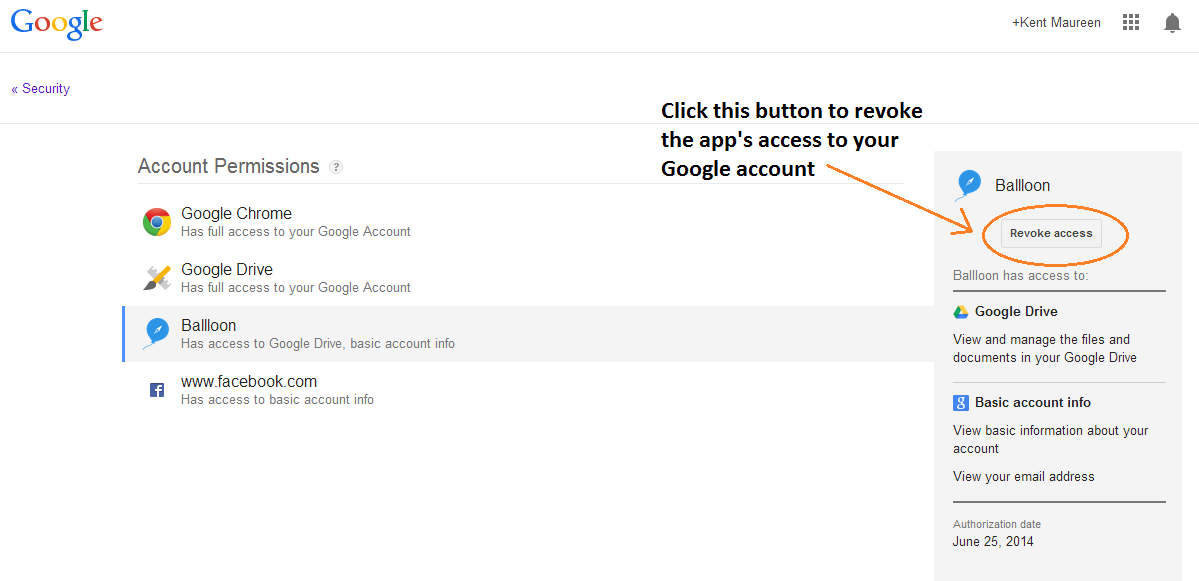
On your “Account Permissions” page, you’ll see the full list of apps and extensions that can freely access your account. Some of these apps may have full account access while there are also those with very limited access. Just click on any app to determine the type of permissions that you’ve granted.

revoke app access Google account e

Step 7

To remove an app or extension from your account, just click on it then on its corresponding sidebar menu, just click the button for “Revoke Access”.

revoke app access Google account f

Just keep in mind that once you delete the app from your “App Permissions” page, you’ll have to re-authorize it if ever you wish to use it again.

Anyways, this method can be quite useful especially if you want to clean up your Google account. This will also help keep your account safe from privacy breach and other forms of malicious attacks.

Related Posts

Previous Post
Next Post
TagsGoogle Account Tips Google Tips and Tricks main Tips & Tricks Tips and Tricks web Web Tips & Tricks Web Tips and Tricks

About Kent

dotTech's resident web and Android app hunter. Writes reviews in her free time. Full-time freelancer. Currently hooked to playing ArcheAge and watching loads of K-Pop reaction videos online.
View all posts by Kent →

Related Posts

  • S>G Recorder Window
    Review
    How to record your desktop screen, edit and export like a pro with ScreenToGif [Windows]
  • Mp3tag Main Window
    Review
    How to edit your audio tags using Mp3tag [Windows]
  • APNG Bouncing Ball
    Review
    How to create animated PNGs [Windows]
  • LICEcap
    Review
    How to create simple animated GIF screen captures with LICEcap [Windows]

Recent Posts

  • How to record your desktop screen, edit and export like a pro with ScreenToGif [Windows]
  • How to edit your audio tags using Mp3tag [Windows]
  • How to create animated PNGs [Windows]
  • How to create simple animated GIF screen captures with LICEcap [Windows]
  • How to edit MP3 files fast and easy with mp3DirectCut [Windows]
  • How to become a crossword (cheat) champ [Windows]
  • How to locate files and folders by filename instantly [Windows]
  • How to broadcast your PowerPoint 2010 (or later) presentation [Windows]
  • PDFelement vs Acrobat Pro DC [Tip]
  • How to fix disk signature collision problem of a drive without formatting in Windows [Tip]
  • How to turn ads off in uTorrent in Windows [Tip]
  • How to use an MP3 song as a ringtone in an iPhone [Tip]
  • The Best 4 Software to Install on Your PC in 2018 [Tip]
  • How to stop killing your battery by overcharging your laptop [Tip]
  • How to reencode videos using XMedia Recode [Windows]
  • How to download videos using 3D Youtube Downloader [Windows]
  • How to highlight cells having keywords in Excel [Tip]
  • How to prevent users from changing desktop wallpaper in Windows [Tip]
  • Download and record any song or video from the web with KeepVid Music [Windows]
  • Download 1080p and Ultra HD videos from any site with KeepVid Pro [Windows]
  • How to add/remove apps and programs in Windows 10 [Tip]
  • How to save space by cleaning up Component Store (WinSxS folder) in Windows 10 [Tip]
  • Download videos online from any site with KeepVid Online [Web/Browser]
  • How to enable/disable OneDrive for file storage in Windows 10 [Tip]
  • How to find out what edition, version and OS build of Windows 10 I have? [Tip]
  • How to change name Cortana calls you [Tip]
  • How to encrypt a single file or folder in Windows 10 [Tip]
  • How to encrypt internal hard drive in Windows 10 [Tip]
  • Download HD videos fast with KeepVid YouTube Video Downloader [Android]
  • How to turn on/off sync settings in Windows 10 [Tip]
  • How to enable or disable automatic updates for Windows Update in Windows 10 [Tip]
  • How to turn on/off driver updates using Windows Update in Windows 10 [Tip]
  • How to hide or show Windows updates in Windows 10 [Tip]
  • How to set wireless network as metered/non-metered connection in Windows 10 [Tip]
  • How to turn on/off system protection for drives in Windows 10 [Tip]

The Hidden Stash (aka Categories)

© 2008-2017 dotTech.org | All content is the property of its rightful owner. | We are part of the Azadi Network.