I think it’s safe to say that the major use of most people’s PCs these days is to surf the internet: reading the news, shopping, gaming, correspondence, work, research, killing time… these are all things that many people do every day. Your PC is connected to tons of other computers through the internet. You are in the danger of being hacked from the moment you connect to the internet. You need to build a trustworthy relationship between your computer and the networks it connects to. A firewall can prevent the hackers from gaining unauthorized access to your computer. A firewall can also prevent your important information from leaking out of your computer. So it serves as two-way protection. There are thousands of antivirus programs equipped with a firewall feature. However, since a free firewall comes with Windows systems and is easy to use, let’s not worry about other firewalls for the moment and just take a look at how to set up and use your Windows OS firewall.
HOW TO SET UP THE WINDOWS OS FIREWALL
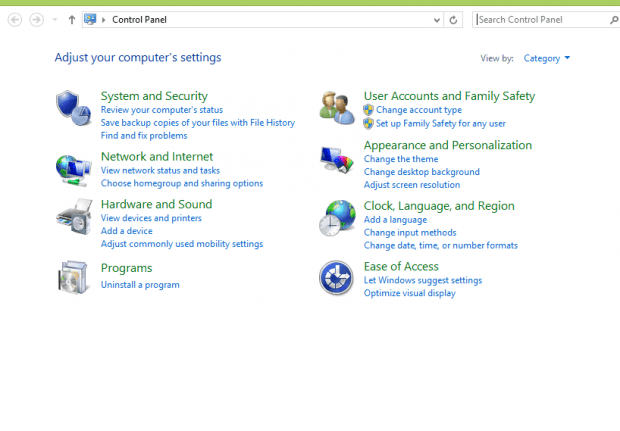
Ever since Microsoft released the Windows 7 Operating System, the built-in firewall function has been improved a lot more compared with the older versions’. First of all, it is now easy to access the firewall. You just need to click on the “Start” menu and choose “Control Panel”. Choose “System and Security” and then “Windows Firewall” if you are in Category view; otherwise just scroll down to “Windows Firewall”.
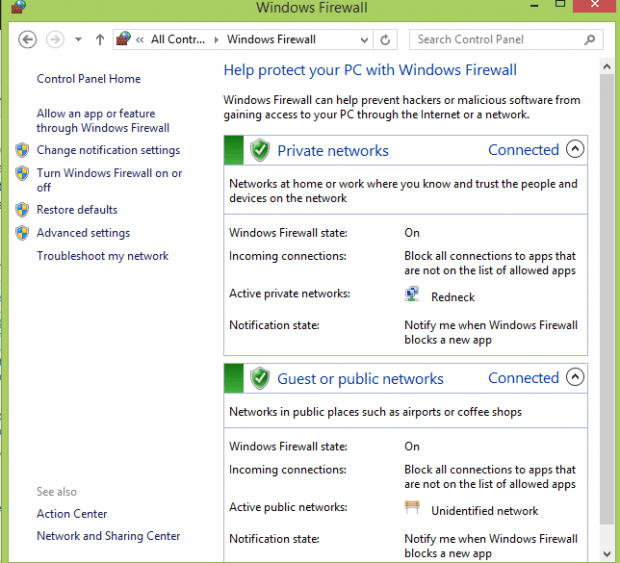
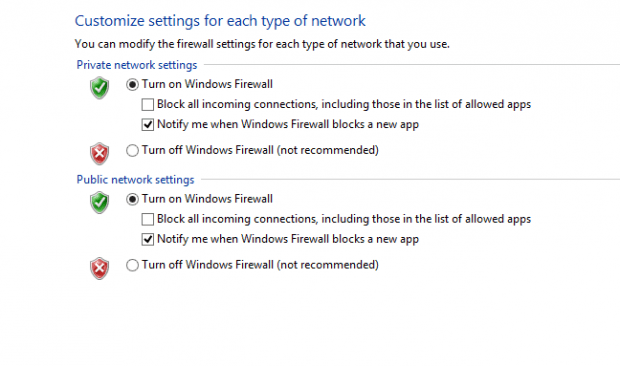
After you click on the “Windows Firewall” icon you can see a list of selections on the left sidebar. Choose “Turn Windows Firewall on or off” and then go to “Customize settings for each type of network”. There are two selections: Private network settings and Public network settings. Choose “Turn on Windows Firewall” for both of them. If you don’t want the firewall to accidentally block a trusted app (such as “World of Warcraft”) you’d better check the item “Notify me when Windows Firewall blocks a new app” to be informed of what the firewall is trying to do and be able to choose to allow or block the app in each instance.
Every computer user has different security needs. (The bottom line is: no one wants to be hacked.) Normal computer users who don’t store confidential documents on their PC and who use their computer mostly for casual use, like as a gaming or web surfing tool, usually don’t need high level protection software such as expensive, well designed full protection antivirus software. Furthermore, most people want to play games and chat online in public as freely as possible, without their antivirus or firewall blocking every single thing they try to do. Therefore, a firewall is a good solution, as long as you spend a few minutes to adjust the settings so that it allows your common actions.
Go back to “Window Firewall” and choose the section “Allow an app of feature through Windows Firewall”.
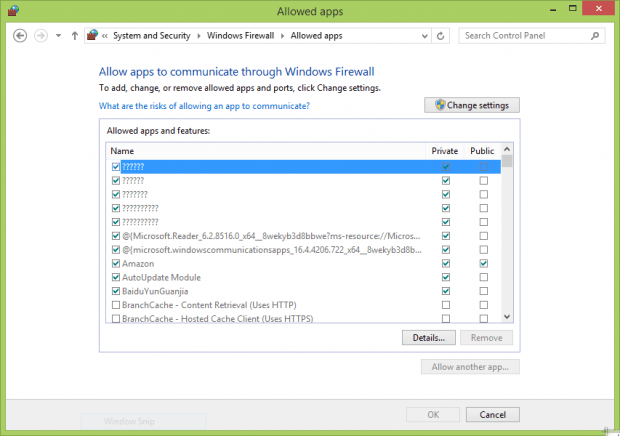
A dialog box that shows a list of apps and features will appear. You can choose to allow an app to communicate through Private and/or Public networks. When you install an app, sometimes you automatically allow it to send information to or from your computer through the firewall. This puts your computer in jeopardy and might drill a hole in your security system that hackers and malware can use to get to your files. In order to decrease your security risk, you can remove apps from the list of allowed apps as shown below. This boils down to a balance between risk and convenience. If you value ease of use, allow all of the apps that you use so that you never have to give individual permission to the firewall when you use them. However, if you value more security, you can only allow a select few apps (or none at all); but in this case you will have to manually give permission every time you use them.
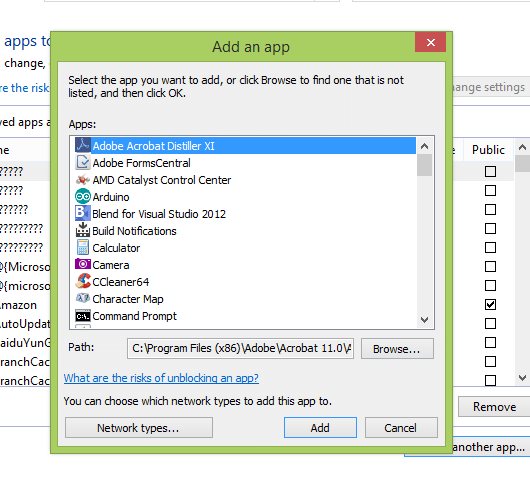
If you want to add an app that is not on the list, you can choose “Allow another app…” and locate the app in your computer.
CONCLUSION
This article has described the basic settings for the built in Windows Firewall. There are advanced features such as inbound and outbound rules that we will talk about in a future article.

 Email article
