 Email article
 The cloud is the future of tomorrow. Today Google announced Google Chrome OS and the Chrome Web Store, so now more than ever before the cloud is on everybody’s mind. The cloud, being the cloud, mainly operates through the web browser. Unfortunately, there is minimal integration of cloud-based services with our desktops – but what if that could change? Say, you are a Google Docs users and deplore the way you must access Google Docs via your browser every **** time you want to create a new document. Here’s a quick guide on how you can better integrate Google Docs with your desktop by adding the ability to create new Google Docs documents via the New menu in Windows Explorer’s right-click context menu.
Standard Google Docs Entries
The first thing you need to do is download the ZIP file* that contains the files you need.
After downloading the ZIP file, extract it. Copy googledocs.ico, googledrawing.ico, googlepresentation.ico, googlespreadsheet.ico, and googledocsrunner.exe to C:/Windows. If you are on Windows Vista or Windows 7, you may get a message similar to the following:
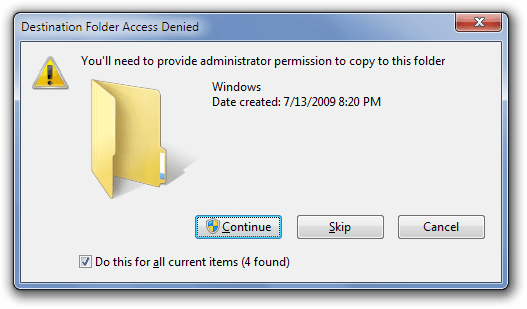
If you get this message, just hit Continue.
Once you have placed the five files into your Windows directory, it should look something like this:

Now, go back to the contents of the original ZIP file you downloaded and run the AddGoogleDocsToNewMenu.reg file (double-click on it). You may be asked if you want to merge these entries:
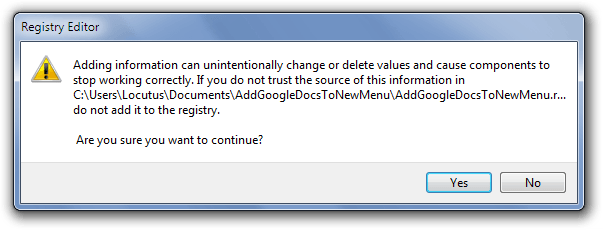
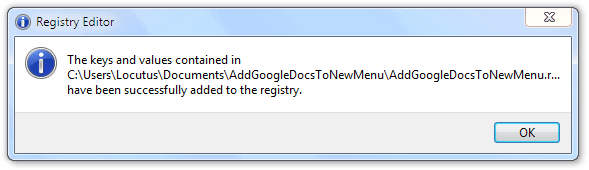
If asked, hit Yes. If you did it successfully, you will get a confirmation message similar to the following:
Hit OK and you are done! All you need to do now is allow for your context menu to refresh; this can be done by either logging in or out of Windows, restarting your computer, restarting Explorer.exe, or clicking on the Refresh entry found in the right-click context menu. When all is said and done, you have should have something like this in your right-click context menu’s New menu:

Clicking on Google Document/Google Drawing/Google Presentation/Google Spreadsheet will open Google Docs in your default web browser and create the respective document.
Lastly, if at anytime you want to remove the Google Docs entries from your right-click context menu, run the UninstallGoogleNewMenu.reg file that came in the ZIP file you downloaded and remove the five files (googledocs.ico, googledrawing.ico, googlepresentation.ico, googlespreadsheet.ico, and googledocsrunner.exe) from C:/Windows.
*The ZIP file download was created by the How-To-Geek and has simply been uploaded onto dotTech for use in this article. We take no credit for creating it.
Making your own
The files that come with the previously mentioned ZIP file can serve as a nice template if you want to add your own entries into the right-click content menu’s New menu. To make it easier to create your own custom entries, dotTech has modified the original AddGoogleDocsToNewMenu.reg file and created a template. So, first you need to download this new ZIP file.
Once you have downloaded the new ZIP file, right-click on AddCustomEntryToNewMenu.reg and select Edit. You should see this:

To create your own entry, you need to
- Everywhere you see Entry Name, EntryName, or entryname, replace it with what you want to call your entry. Be sure to not change the spacing (i.e. don’t add spaces if there are none in the template).
- Where you see http://dottech.org, replace that with the website/webpage you want to open.
- Where you see http://www.dottech.org, replace that with the domain of the website/webpage you want to open.
- Where you see customentry.ico, replace that with the name of the icon you want to use (you need to supply your own).
For example, if I wanted to add an entry in my right-click context menu’s New menu that allowed me to create a new post on dotTech my AddCustomEntryToNewMenu.reg would look like this:

If you want to add multiple entries, simply copy + paste the template and modify each template to reflect each entry you want to add. Once you are done, save AddCustomEntryToNewMenu.reg and close it. After you have closed it, double-click on it and merge it with your registry.
Next you need to move customentryrunner.exe and the .ICO file associated with your custom entry to C:/Windows. Finally, just refresh your context menu by either logging in or out of Windows, restarting your computer, restarting Explorer.exe, or clicking on the Refresh entry found in the right-click context menu.Your end result should be something similar to how now I have a dotTech post button in the menu:

Removing the entry is as easy as modifying RemoveCustomEntryFromNewMenu.reg to remove the particular entries you added.
Conclusion
These are great shortcuts for any Internet user and are just one step closer on to the way to a cloud-based life. The best part is, they’re open source, so you’re free to modify them however you please.
[via How-to Geek]


