 Windows 10 by Microsoft was launched in 2015, and it is a big hit because of its additional features and the user-friendly interface. If your system meets the requirements that are needed to install Windows 10, then you can install it using USB on your system. Windows 10 has a technical preview that is a beta version and beta versions have some errors and issues in them. Microsoft is improving Windows 10 day by day by sending updates to resolve the issues and bugs. This technical preview of Windows 10 is very much stable.
This is a stable version, and any home user can use this version of Windows 10. But there are some problems with the Wi-Fi connectivity. Let’s assume that there are two or three networks on your connection list and among them one or two don’t connect to your device and shows an error if you try to connect them. You want to forget them, but you don’t know how to do this? In Windows 8 or 8.1 it was very easy to forget a saved network but in Windows 10 PC Settings and Wi-Fi connectivity screens are not embedded in the taskbar, and it is a bit challenging to search and delete the saved Wi-Fi network.
How to Delete a Wi-Fi Network in Windows 10 Using PC Settings:
Here are some simple and easy steps using which you can easily forget or delete the Wi-Fi network:
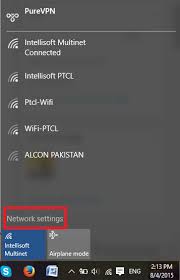
- Click the Wi-Fi icon displayed in the taskbar.
- A window will be indicated on the screen. Now click on Network settings icon after clicking the option a window will pop-up that will display the Wi-Fi network settings of the system.
- In the network settings window there will be an option to manage Wi-Fi settings, hit the option.
- Under the option of Manage Wi-Fi Settings window, there will be a list of all available Wi-Fi connections at the bottom of the page. Just click on the desired connection and select the Forget button.
- If you want to reconnect to the forgotten network, then go back to connections tab and click on Wi-Fi and enter a password for the deleted network again to connect to it.
This is a simple solution you can try in case you are having any Wi-Fi connectivity issues on your Windows 10 system. Keep it in mind that if you forget or delete a network, then the password for that wireless connection will be removed, and you have to enter the password again to connect with the network.
How to Delete a Wi-Fi Network in Windows 10 Using Command Prompt
You can delete or forget any wireless network stored in Windows 10 with the help of Command Prompt.
- Open the cmd (command prompt) window as an administrator and type the following command netsh wlan to show profiles. The command will display all the wireless network connection profiles that are stored by Windows 10.
- Choose the Wi-Fi network that you need to remove or to forget and then write in the command to ignore or delete it netsh wlan delete profile name=profile name.
In just a few and simple steps, you can easily forget or delete the Wi-Fi network from the connection list of your system.

 Email article


