{rw_text}Giveaway of the day for January 11, 2009 is StarBurn v11.
[rssless]————————-{/rw_text} –>
{rw_good}
- Has almost every trick in the book that deals with burning CDs (including DVD ripping, VCD burning, ISO creation, etc.).
- Has the ability to detect your CD drive and report to you its capabilities.
- Network burning capabilities.
- They don’t charge $495 for it anymore. :P
- Has built in ability to mount ISOs.
- Fairly light on resources (uses ~8 MB RAM idle)
{/rw_good} –>
{rw_bad}
- Minimizes to your system tray when you minimize.
- No ‘back up your files’ feature per se.
- File browser seems a bit unnecessary; program would look a lot better and more compact without it.
- Cannot burn ‘video’ Blue Ray/HD-DVDs (?)
- Program only works with ISO image files and not other formats.
{/rw_bad} –>
{rw_score}
{for=”Features as Described” value=”10″}There were too many features to test them all, but the ones I did test, this program passed with flying colors, so I take the liberty to assume that all of them work as described.
{/for}
{for=”Ease of Use” value=”9″}I did not give this a ten because I am not particularly thrilled of how they setup their ‘add files to CD’ feature when burning something like a Data CD while using expert mode.
{/for}
{for=”Usefulness” value=”10″}With so many features it is hard to say that not everyone will find this program useful.
{/for}
{/rw_score} –>
{rw_verdict}[tupr]{/rw_verdict} –>
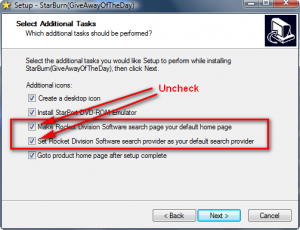
On Vista Home Premium installation and registration went fine. However, note that during installation, by default, it is set so that Rocket Division search page is made your homepage and your default search provider. You have to be sure to uncheck these boxes during installation:
One interesting thing to note is StarBurn (under Help -> About) says StarBurn Version 11. However, if you go to the developer’s website it lists Version 10.5 as for sale. So are we getting a version they are not even selling yet or…?
Anyway, StarBurn is a program that literally has every trick in the book that is related to CD burning. I tried to compile a full list of features that this program has – please let me know if I missed any:
- Burn data CD/DVD/Blue Ray/HD-DVD
- Burn audio CD/DVD/Blue Ray/HD-DVD
- Burn VCD, SVCD and a video DVD (the type that you can play on your DVD player).
- Burn ISO image to CD/DVD/Blue Ray/HD-DVD
- Erase rewritable CD/DVD/Blue Ray/HD-DVD
- Rip Blue Ray (remove DRM)
- Rip DVD (remove DRM)
- Turn a CD/DVD/Blue Ray/HD-DVD into an ISO image.
- Build UDF ISO Image
- Build ISO Image
- Rip audio from CD
- Compress audio (aka feature-limited audio converter)
- Mount ISO image files.
- Mount a CD drive from your network.
- Create a bootable disc (CD/DVD/Blue Ray/HD-DVD).
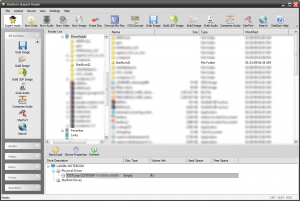
The program itself is pretty self explanatory with a nice GUI that has everything labeled + a tooltip is provided upon hover to explain even more. This is what the program looks like:
Before I go on, let me gripe about how the developer put in the file browser. In the middle of the program, as you see in the above screenshot, there is a ‘file browser’. You get to navigate your computer. This file browser does not serve any purpose with creating images, or burning. It is just there to enable you to browse your computer/make any changes you want. I find that it just clutters the interface and it is rather annoying.
All of the main features are listed in button format across the top of the program window:
You can customize this toolbar (add/remove buttons or remove the whole toolbar in general) if you click on that little arrow located at the very bottom right hand corner.
If you see on the left of the program window, there is a list of actions that goes “All Action”, “Audio”, “Video”, “Data”, “Erase”, “Starport”. A lot of what is listed under each of those tabs is already accessible via the buttons that are laid across the top of the program window. In fact, all of it is. The only difference is that from the menu on the left, you have buttons such as “Burn DVD”, “Burn VCD”, and “Burn SVCD” where as the button menu on top only had “Burn Video” and after you clicked this “Burn Video” button you got to choose if you wanted to burn a DVD, VCD, or SVCD. Think of it this way: for some features, they are not listed directly at the top, but rather a ‘shortcut’ is used to enable to to reach those features. The features are then laid out in detail in the side left menu. The buttons I have boxed in red in the following screenshots are the buttons that are represented in the top button toolbar by a ‘shortcut’:
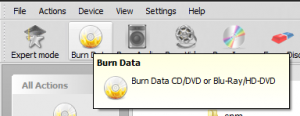
As I said above, everything is well labeled and self explanatory. If you hover your mouse over the feature that interests you will receive more information on it such as which media is supported. For example, hover your moues over “Burn Data”. A tooltip will appear telling you that “Burn Data CD/DVD or Blue Ray/HD-DVD”:
I wish I could go over every feature step by step but with so many features, I would never finish. Thank fully the developer made the program really easy to use – all you have to do is click on the button that is associated with the feature you are interested in and follow on screen instructions. Everytime you are prompted to choose “File System”, just leave it at default unless you have specific reason to do otherwise. However, there are two things that confused me and I thought they might be a little confusing to others too:
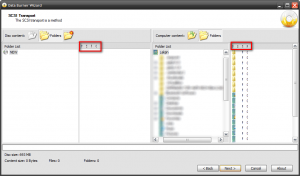
- If you are in expert mode, instead of having to use the file list to add files onto the data disc you are burning, you will get to use the following interface:
The areas I have boxed in red are actually columns that you have to resize to be able to view whats under them. The left half of the above screen is your disc. The right half is your computer. To put files on your disc, click + drag them from the right to the left. To name your disc, right click on “New” -> Rename.
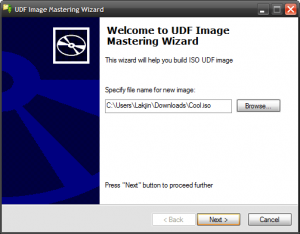
- When creating using the “Build Image” and “Build UDF Image” feature, be sure to put “.iso” without the quotes at the end of the names or else you will get an error. Also, if you want to specify a location that you want to place the ISO image file after it is done being created, enter the file path in the name. Otherwise the ISO image file will be placed in the same folder as the last file that was added to the ISO:
- “Create DVD” under “StarPort” is a feature that allows you to mount an ISO file (i.e. make the computer think you inserted a disc in your drive with the ISO file burned on it) just like you would do with Daemon Tools.
Everything else is pretty self explanatory. If anyone has problems with any other features, feel free to ask and I will try to help to the best of my ability.
Difference between “Expert” and “Non-Export” modes
Simply put, when you have “Expert Mode” turned on, you will be allowed more customization and more features when using a feature. For example, when burning a data disc if you have “Expert Mode” on, you will be asked if you want to make a bootable disc. Also, the interface of how to add files to the data disc will change from a simple click and browse to the click + drag I showed above.
Now as I mentioned somewhere above, there are too many features for me to sit here and test all of them. However, I did test quite a few of them and all of them passed so I am taking the liberty and going out on a limb to claim that all the features work. However if you find a feature is not working, please do let me know. The features I tested:
- Grab Image
- Create DVD (under StarPort)
- Burn Data Disc
- Build Image
- Burn Image
Once I get my hands on a CSS protected DVD, I will try the the “DVD Decrypt” feature also.
Lastly, I would like to mention two things:
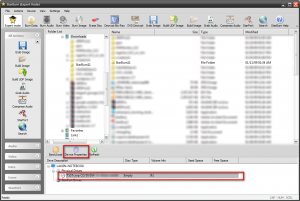
- You can view the capabilities of your disc drive (i.e. can it read/burn DVDs?) with StarBurn. It is a handy tool for newbies. Look at the bottom of the program window. Click on your CD drive and hit “device properties”:
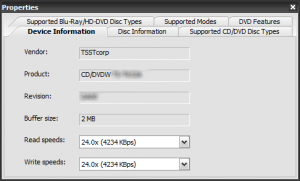
That will bring up this window:
Flip through the various tabs to view more information on your disc drive. You can find out information such as what type of discs your drive can read/write (“Supported CD/DVD Disc Types” or “Supported Blue-Ray/HD-DVD Disc Types”).
- If you go to View -> Skin or View -> Themes you will be able to change the look of StarBurn. You have lots of options.
Overall, I really like StarBurn. It does all the basics of a disc burning program but adds in a lot of bells and whistles. However, there are a few problems I have with this program:
- Every time you minimize the program window, it minimizes to the system tray. I have yet to find a way how to disable this feature and it is getting annoying. Minimizing a program to the system tray makes people like me forget we have the program open because we do not glance at the system tray often. And StarBurn is not one of those programs I need/want to keep open all the time.
- There is no feature that is a ‘back up your files’. You can use the burn a data disc as a backup tool, but I wish StarBurn had a ‘back up’ feature like Ashampoo does – one that allows you to back up whole folders and drives burning all the data to discs one at a time.
- The file browser issue I mentioned above.
- You cannot burn a video Blue Ray/HD-DVD (however you can burn a data Blue Ray/HD-DVD or burn ISOs to Blue Ray/HD-DVD).
- The program only works with ISO image files and not other formats like BIN/HUE.
Special Request: How do I rip my DVDs and place them on my computer so I can watch them without having to put in the disc every time?
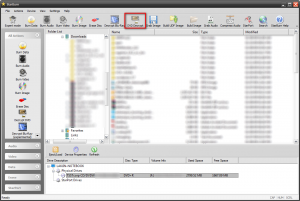
To do this, first put in your DVD. After you DVD has loaded, open up StarBurn. Click on the “DVD Decrypt” button:
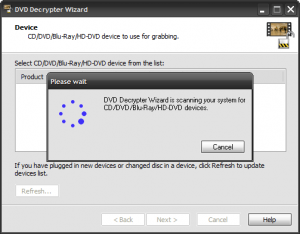
This will bring up this window:
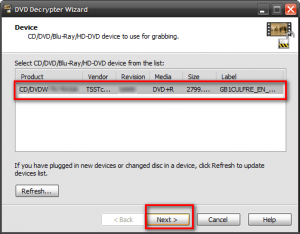
Wait for the program to detect your DVD drive. It should not take long. After a couple of seconds you should see all your disc drives listed. Select the drive that you put your DVD into. If you only have one drive, then just select that one. Hit “Next”:
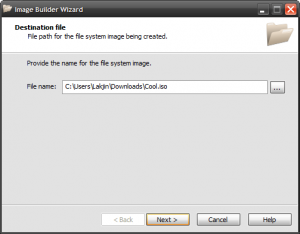
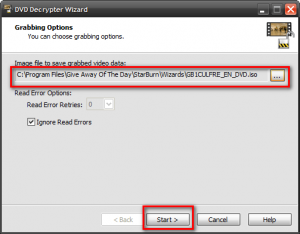
Now a window will show up where you will be able to choose where you want to place the file that will hold your DVD content on your computer. You also get to choose what you want to name it:
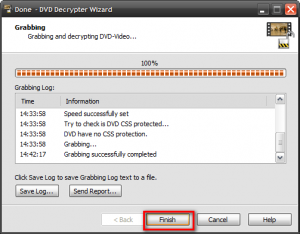
To choose the location on your computer where you want to place the ISO file and to give it a name of your choice, hit the “…” button. You can also leave everything at default – just be sure to remember where it is (the default location is C:\Program Files\Give Away Of The Day\StarBurn\Wizards\). The default name will be [Name of your DVD].iso. After everything is set, hit “Start”. That will start the actual process of ripping your DVD. The program will do everything by it self so you just sit back and relax. You will be able to monitor the progress. Once it is finished, hit “Finish”:
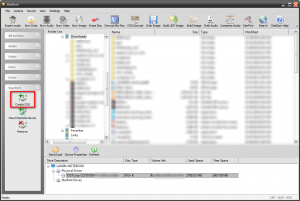
You have successfully ripped your DVD and placed it on your computer. However, the DVD is now in ISO format on your computer. In order for you to be able to watch the DVD, you have to mount the ISO file. To do this, click on “Create DVD” under “StarPort” from the left hand menu:
That will bring up a window:
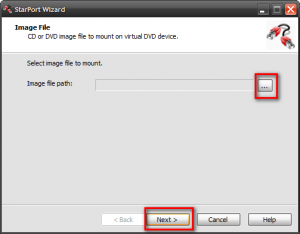
From this window you must browse your computer and find the ISO file you made of your DVD earlier when you were ripping the DVD. If you left the file location at default, it should be at C:\Program Files\Give Away Of The Day\StarBurn\Wizards\. Click the “…” button to browse your computer and find the file. After you have found the file and added it, hit “Next”. After you hit next, a window should confirm that you mounted your ISO file correctly:
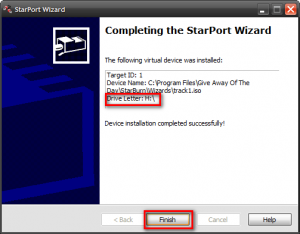
Be sure to note the Drive Letter – this will correspond to the letter of the virtual disc driver that you will see in My Computer. Hit “Finish”. What happens now is that the computer is fooled into thinking you inserted an actual CD/DVD into your disc drive – every thing now should work as if you inserted an actual CD/DVD. If the original CD/DVD you made the ISO rip/copy of had autoplay features, you should be prompted by Windows to autoplay depending on what your settings are. If you are not prompted by Windows, go to My Computer. Find the CD/DVD drive that corresponds with the “Drive Letter” I told you to make note of earlier. Treat is just as you would treat any other CD – double click to run it, right click to see more options such as explore, etc. You should now be able to start watching your movie. At this point you can close StarBurn if you want – there is no need for it while you watch your movie.
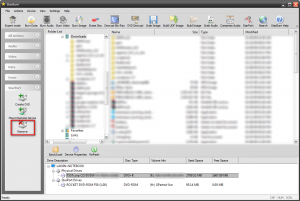
After you are done watching your DVD you will have to unmount the ISO image file. Open up StarBurn. Go to “Remove” under “StarPort” from the left hand menu:
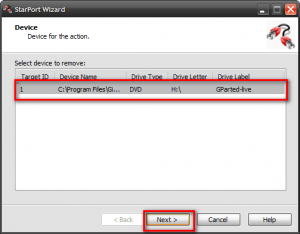
This should bring up this window:
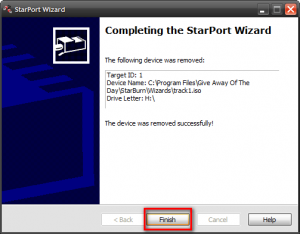
Select the drive/device of the ISO file you want to remove. Hit “Next”. You should see this window:
Hit “Finish” and you are done! Repeat this process every time you want to rip a DVD and watch it on your computer. However if you rip a DVD once you do not have to rip it again as long as you don’t delete the ISO file – you can just go straight to the step where you mount the ISO file.
Free Alternatives:
InfraRecorder is a free CD/DVD burning solution for Microsoft Windows. It offers a wide range of powerful features; all through an easy to use application interface and Windows Explorer integration.
Create custom data, audio and mixed-mode projects and record them to physical discs as well as disc images. Supports recording to dual-layer DVDs.
Blank (erase) rewritable discs using four different methods. Record disc images (ISO and BIN/CUE).
Fixate discs (write lead-out information to prevent further data from being added to the disc). Scan the SCSI/IDE bus for devices and collect information about their capabilities.
Create disc copies, on the fly and using a temporary disc image. Import session data from multi-session discs and add more sessions to them. Display disc information. Save audio and data tracks to files (.wav, .wma, .ogg, .mp3 and .iso).
-InfraRecorder Developer
CDBurnerXP is a free application to burn CDs and DVDs, including Blu-Ray and HD-DVDs. It also includes the feature to burn and create ISOs, as well as a multilanguage interface. Everyone, even companies, can use it for free. It does not include adware or similar malicious components.
- burn all kinds of discs
- audio-CDs with or without gaps between tracks
- burn and create ISO files
- data verification after burning process
- create bootable discs
- multi-language interface
- bin/nrg ? ISO converter, simple cover printing and much more!
- Operating Systems: Windows 2000/XP/2003 Server/Vista
-CDBurnerXP Developer
ImgBurn is a lightweight CD / DVD / HD DVD / Blu-ray burning application that everyone should have in their toolkit!
It has several ‘Modes’, each one for performing a different task:
- Read – Read a disc to an image file
- Build – Create an image file from files on your computer or network – or you can write the files directly to a disc
- Write – Write an image file to a disc
- Verify – Check a disc is 100% readable. Optionally, you can also have ImgBurn compare it against a given image file to ensure the actual data is correct
- Discovery – Put your drive / media to the test! Used in combination with DVDInfoPro, you can check the quality of the burns your drive is producing
-ImgBurn Developer
—
Because of it’s unorthodox emphasis on images, ImgBurn is only recommended for advance users.
Does your burning software do everything but you can’t find anything? Did installing it take up several gigabytes of hard drive space and fill up your Taskbar? Ashampoo Burning Studio 8 is different. It’s compact, fast and amazingly easy to use. You just choose from a list of tasks and the software guides you through every step. And even though it has all the functions you would expect from a complete burning suite, the entire software takes up less than 85 megabytes on your hard disk.
- Burn and update data discs
Burn data to discs and update previously burned discs by adding and removing files and folders.- Back up your data to single or multiple discs
Back up your valuable data to one or more discs. Single backups can span multiple discs. Restore your backups in a single easy operation.- Rip and burn music
Rip music from CDs and burn music to audio CDs and MP3 discs on CD, DVD and Blu-ray in a variety of formats.- Burn movies and photos to DVDs and data discs
In addition to the new slideshow DVDs you can author and burn video DVDs, Video CDs (VCD), Super Video CDs (SVCD) and data video discs. Video files are automatically converted to the necessary formats.- Copy CDs, DVDs and Blu-ray discs
Just insert a disc, select Copy and you’re ready to burn.- Create and burn disc images
You can both create and burn ISO, CUE/BIN and Ashampoo’s own special ASHDISC image formats.- Erase rewriteable discs
Quick and easy erase functions for reusing rewriteable discs.- Expert burn functions for full control
Burning experts can create modified copies of existing discs (read in data structure and make changes and additions) and burn discs of all kinds with full control of all main configuration options.- And more!
-Ashampoo Developer
DVD Flick aims to be a simple but at the same time powerful DVD Authoring tool. It can take a number of video files stored on your computer and turn them into a DVD that will play back on your DVD player, Media Center or Home Cinema Set. You can add additional custom audio tracks, subtitles as well as a menu for easier navigation.
- Burn near any video file to DVD
- Support for over 45 file formats
- Support for over 60 video codecs
- Support for over 40 audio codecs
- Easily add a menu
- Add your own subtitles
- Easy to use interface
- Burn your project to disc after encoding
- Completely free without any adware, spyware or limitations
-DVDFlick Developer
Daemon Tools is not a CD burning program. It is a program that allows you to mount disc images and run them. Daemon Tools is a lot more powerful then the “StarPort Create DVD” feauture of StarBurn because it supports more then just ISO files.
PMnet Verdict: There are tons of disc burning software out there. However, with the abundance of features and relative ease to use, StarBurn really does stand out. I would definelty call this a keeper if you have a need for a disc burning software. As for free alternatives, the one that stands out is Ashampoo Burning Studio. Ashampoo is just as abundant in features as StarBurn and is just as easy to use – plus it is always free. Most of what you can in StarBurn you can do in Ashampoo and vice versa. The key differences between StarBurn and Ashampoo as I see them are the following: Ashampoo supports CUE/BIN and ASHDISC along with ISO image format. Ashampoo has a ‘back up’ feature. Ashampoo has a label/cover designer. StarBurn has network burning capabilities and DVD rip abilities (removing DRM). StarBurn uses up less computer resources – 8 MB vs 35 MB while idling. Both Ashampoo and StarBurn are great programs and both are recommended by me – you just have to make up your mind which one you want. I personally prefer StarBurn solely on the basis that I find the interface to be more ‘professional’ and StarBurn uses less computer resources. Also, if you are looking for a program that enables you to mount disc images, definitely get Daemon Tools. Daemon Tools is much more powerful then the buitl in “StarPort Create DVD” feature in StarBurn.
[/rssless]

 Email article
