There is TeamViewer for those that need remote access or remote control or screen sharing capabilities. However, TeamViewer is not ideal for sharing one mouse and one keyboard across multiple computers in a local network. For that purpose there is Synergy.
Synergy Is…
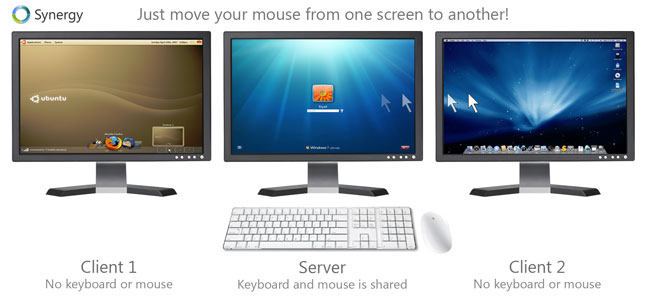
Synergy is an open source, cross-platform program that allows users to share one mouse and one keyboard across multiple computers. Don’t confuse this with one mouse and keyboard for multiple screens on the same computer. This is sharing one mouse and one keyboard on multiple computers, each computer having their own screen.
Synergy allows users to share a mouse/keyboard across all computers in a local network — Windows, Mac OS X, or Linux. (Yes, it works cross-platform, e.g. Windows computers can share mouse/keyboard with Mac OS X and/or Linux computers.) All that is needed is an active network connection between the computers; and since Synergy works over a local network connection, there is little to no lag when sharing mouse/keyboard.
Using Synergy
Synergy has a learning curve; however, once you learn how to use it you should have no issues whatsoever.
Synergy is based on client-server architecture, in a sense. The computer sharing the keyboard and mouse (i.e. the computer with the physical mouse and keyboard) is the server. The computers whom the mouse and keyboard are being shared with are the clients. You need to download, install, and setup Synergy separately on the server and the clients.
Note: Synergy works on Windows, Mac OS X, and Linux. However setting up Synergy on each OS may differ slightly. The directions below are for the Windows version of Synergy.
Setting Up Synergy On Server
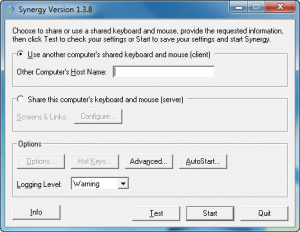
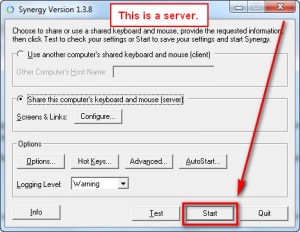
Once you download, install, and run Synergy, you are prompted with the following window:
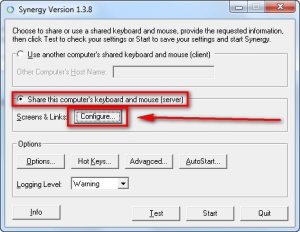
Since you are on the server computer (the computer that will be sharing the mouse and keyboard), you need to click on Share this computer’s keyboard and mouse (server) and then click Configure…:
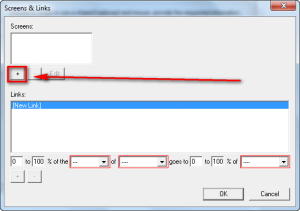
At the Screens & Links window click the + button under the Screens column:
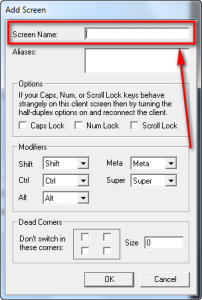
Now type in a name for your server computer in the Screen Name box; it is recommended – but not required – to enter the Windows computer name (the one you would see if you go to Control Panel -> System, e.g. Ashraf-PC):
If you decide to not enter the Windows computer name as the Screen Name, enter the Windows computer name under Aliases. You are welcome to edit the other settings at this Add Screen window but you don’t have to. If this is your first time using Synergy it is recommended to leave these settings at default. Click OK when done.
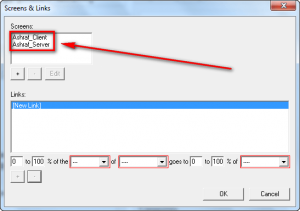
Repeat this same process of adding a screen for each client computer you plan on using. When you are done you should have your server and clients listed under the Screens column at the Screens & Links window:
In the screenshot above I have only one client but you can have as many clients as you want.
Once you have added your server and clients, you need to create Links between them. Synergy works by moving mouse/keyboard to another screen via the edges of screens, e.g. you move the mouse past the left edge of a screen to move the mouse/keyboard to another screen. Links are what tell Synergy which screen to take the mouse to when the mouse cursor is moved past the edge of a screen (keyboard is automatically activated on the computer who’s screen has the mouse). Links can be between server-client, client-client, and client-server. In other words, you can create a link which allows your mouse to go from your server to a client, from a client to another client, or from a client to the server.
Links work like this. You have to tell Synergy “0 to 100% of the [direction – left, right, top, bottom] of [screen name] goes to 0 to 100% of [screen name]” then press the + button to apply the link. (Make sure you have “New Link” selected before trying to create a new link or else you will only edit an existing link.) Each movement needs its own link, i.e. you have to create one link to go from one screen to another and another link to go from that second screen back to the first screen. Confused? Let’s look at an example.
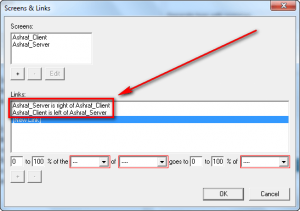
Let’s say I have a server (Ashraf_Server) and one client (Ashraf_Client). The client screen is physically placed to the left of my server screen. To move the mouse/keyboard from the server to the client I create the link “0 to 100% of the left of Ashraf_Server goes to 0 to 100% of Ashraf_Client“. This link makes it so when I move the mouse cursor past the left edge of my server screen, the mouse and keyboard go to the client screen. To allow the mouse and keyboard to move from the client to the server I need to create the link “0 to 100% of the right of Ashraf_Client goes to 0 to 100% of Ashraf_Server“. This link makes it so when I move the mouse cursor past the right edge of my client screen, the mouse and keyboard go to the server screen. Since I only have one client, these two links are enough to share the mouse and keyboard between my two computers; this is what it looks like in Synergy:
If I had more clients, I would need more links. Let’s see an example of a server with multiple clients.
Let’s I have a server (Ashraf_Server) and three clients (Ashraf_ClientR, Ashraf_ClientL1, Ashraf_ClientL2). Ashraf_ClientR is physically placed to the right of Ashraf_Server. Ashraf_ClientL1 is physically placed to the left of Ashraf_Server. Ashraf_ClientL2 is physically placed to the left of Ashraf_ClientL1. So the physical setup is, from left to right, Ashraf_ClientL2 – Ashraf_ClientL1 – Ashraf_Server – Ashraf_ClientR. For this setup these are the links I would create:
- 0 to 100% of the right of Ashraf_Server goes to 0 to 100% of Ashraf_ClientR
- 0 to 100% of the left of Ashraf_ClientR goes to 0 to 100% of Ashraf_Server
- 0 to 100% of the left of Ashraf_Server goes to 0 to 100% of Ashraf_ClientL1
- 0 to 100% of the right of Ashraf_ClientL1 goes to 0 to 100% of Ashraf_Server
- 0 to 100% of the left of Ashraf_ClientL1 goes to 0 to 100% of Ashraf_ClientL2
- 0 to 100% of the right of Ashraf_ClientL2 goes to 0 to 100% of Ashraf_ClientL1
These six links would allow me to:
- Move the mouse/keyboard from Ashraf_Server to Ashraf_ClientR via the right-edge of Ashraf_Server’s screen.
- Move the mouse/keyboard from Ashraf_ClientR to Ashraf_Server via the left-edge of Ashraf_ClientR’s screen.
- Move the mouse/keyboard from Ashraf_Server to Ashraf_ClientL1 via the left-edge of Ashraf_Server’s screen.
- Move the mouse/keyboard from Ashraf_ClientL1 to Ashraf_Server via the right-edge of Ashraf_ClientL1’s screen.
- Move the mouse/keyboard from Ashraf_ClientL1 to Ashraf_ClientL2 via the left-edge of Ashraf_ClientL1’s screen.
- Move the mouse/keyboard from Ashraf_ClientL2 to Ashraf_ClientL1 via the right-edge of Ashraf_ClientL2’s screen.
If I wanted to I could create another link to move the mouse/keyboard from Ashraf_ClientL2 to Ashraf_ClientR via the left-edge of Ashraf_ClientL2’s screen (to create a “full circle” and make it easy to move between Ashraf_ClientL2 and Ashraf_ClientR); or I could create the same link except for Ashraf_Server, to make it easy to move directly to Ashraf_Server from Ashraf_ClientL2 instead of having to go through Ashraf_ClientL1. Since each screen has four edges I can create up to four outbound links (i.e. sending the mouse/keyboard) for each screen; inbound links (i.e. receiving the mouse/keyboard) can be unlimited for each screen since inbound links aren’t dependent on the receiving screen’s edge. Furthermore, the link directions don’t necessarily have to follow the physical setup; it is just mentally easier if they do. In other words, you could have a client and server sitting side-by-side but when setting up links you can use top/bottom instead of left/right.
After you have setup all the necessary links, click OK to go back to Synergy’s main program window.
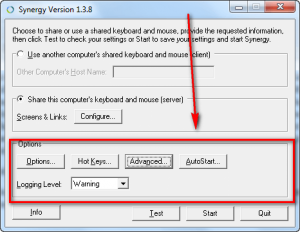
Once you have setup all screens and links, and are back at Synergy’s main program window, you are done setting up the server — you now need to setup Synergy on your client(s). There are, of course, other options and settings you can tweak…
…but those are optional. I recommend first learning how to use Synergy before messing with Options, Hotkeys, Advanced, or AutoStart.
Setting Up Synergy On Clients
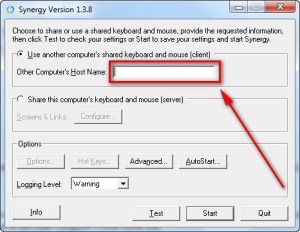
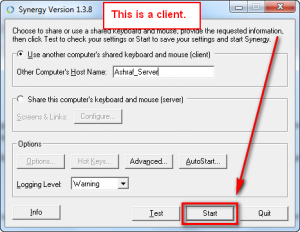
Settings up Synergy on client computers is much easier than on server computers. On clients, after you download, install, and run Synergy, simply enter the Screen Name of the server in the Other Computer’s Host Name box:
If you decided to not use the Windows computer name as the Screen Name for the server (when adding screens during setup on the server), you need to enter the Windows computer name in the Other Computer’s Host Name box instead of the Screen Name.
Once you enter the server’s name in the Other Computer’s Host Name box, you are done setting up the client. Repeat this process for all client computers.
Running Synergy
After you have setup Synergy on the server and all clients, simply hit the Start button from Synergy’s main program window on each computer (the server and all clients):
After hitting Start on the server and all clients, Synergy will connect the computers. You know Synergy has been successfully started and connected to the client or server when the system tray icon looks like the following:
When Synergy is connected, you are good to go — you can start sharing your mouse and keyboard between the server and clients!
Options, Hot Keys, Advanced, AutoStart
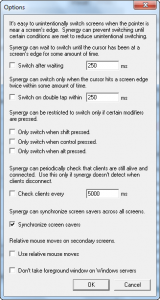
As mentioned above there are some extra settings you can mess around with aside from the basic required settings of Synergy mentioned above:
From Options there is the ability to enable things such as double-tap mouse cursor at screen edge to move between screen, only switching screen when shift/control/alt is held, etc.
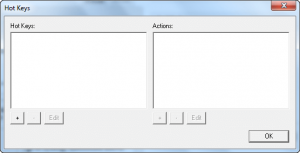
From Hot Keys you can setup any hotkey combination you wish to perform some actions:
The most important setting you can change from Advanced is the Screen Name that the specific computer you are on is known as. By default this Screen Name is the Windows computer name, which is why I recommended above to use Windows computer name when inputting Screen Name when adding Screens. If you insisted on not using Windows computer name when adding Screens (maybe because two or more computers on your network have the same name), then from Advanced you should change the Screen Name for each computer to the Screen Name you entered when adding Screens. After you do that, you no longer have to use Windows computer name for any part of the setup, neither on server or client setup — use the Screen Name instead.
From AutoStart you can set Synergy to autostart on login or Windows boot.
Sharing Clipboard
In addition to sharing mouse/keyboard between computers, Synergy also allows you to share Windows Clipboard data. There is nothing special you need to do to share clipboards between computers; as you move the mouse/keyboard between screens the clipboard data goes with it, so all you have to do is copy + paste like you normally would.
No Security
Take note that Synergy provides no encryption whatsoever of data transfer between computer to computer. The only way to get any encryption/security is if you manually setup SSH on your server computer; and that is something most people don’t know how to do nor want to do nor can do. So it is highly recommended to only use Synergy on secure WiFi networks, not public networks. Even if you are on a secure network, if you don’t trust the people you are sharing the network with, then you probably shouldn’t use Synergy.
Lack of Multiple Configurations
The most annoying aspect I found about Synergy is the inability to save and load multiple different configurations. It seems Synergy can only handle one configuration at a time so if you plan on using the same computers in a multiple server-client setups, then you need to reconfigure each time. This is bloody annoying, especially considering it can take a good amount of time to configure Synergy if you have multiple clients.
Conclusion
I know I probably shouldn’t be amazed at a tool that does something so seemingly simple, but dang I was in awe when I first setup and starting using Synergy. Aside from the showoff factor of impressing friends, family, or colleagues, Synergy is an extremely useful tool for those that work with multiple computers. The fact that it works cross-platform and is open source just makes the deal even sweeter.
You can grab Synergy from the links below:
Supported OS: Windows, Mac OS X, Ubuntu, Debian, Fedora, Red Hat
Download size: 5.7-6.5 MB for Windows versions
Malware status: VirusTotal scan results (0/43) – Windows version
[Direct download – Windows 32-bit]
[Direct download – Windows 64-bit]

 Email article
