{rw_text}
Update: An updated review for Image Commander v1.07 is now posted in the Commercial Software Reviews section.
Giveaway of the day for February 3, 2009 is Image Commander v1.00.
Software description as per GOTD:
Image Commander a full-featured software that allows you to add text or image watermark to any picture. Protect your copyrights with a copyright notice or your logo. Add text comments to any image.Create advanced thumbnails with cool styles and effects. Prepare your image collections to be published on the web. Resize, crop and rotate thumbnails. Batch processing thousands of images. Support for BMP, JPG, GIF, PNG, TIFF and PSD image types.
{/rw_text} –>
{rw_good}
- Simple and easy to use.
- Batch processing.
- You can add image or text watermarks.
- You can add multiple image/text watermarks to one image.
- Ability to add a multiple extra effects (like shadow/glow) on the go.
- Can resize watermark to fit image size!
- You can resize multiple images to one size very easily.
- Batch processing.
- Very fast processing/generating of images.
- Uses very less resources with lots of images loaded into the program.
- You can add a prefix/suffix to your generated/processed images.
- You can save in jpg, png, bmp and gif formats.
- You can crop images.
{/rw_good} –>
{rw_bad}
- Uses a lot of RAM when idle.
- CPU usage can go high while processing images.
- Will overwrite files if two files have same name in output folder without prompt.
- No help section.
- You can only place watermarks in the direct middle if you ‘fit’ them to the images.
- If you hit “X” on an image or text watermark, the whole program closes.
- You are not promoted to save/generate image if you hit “X” and close the program.
- You can’t save watermark settings.
- One repeated error (nothing big).
- No predefined macros/wildcards to name the processed images.
- Not sure if it is registered or not.
- You can’t rotate your watermarks.
- You can’t click + drag the watermark to custom position it on the image.
{/rw_bad} –>
{rw_score}
{for=”Features as Described” value=”10″}Despite one repeated error, and one small bug, I still give this a 10.
{/for}
{for=”Ease of Use” value=”9″}Very easy to use, except a few problems that can be avoided once you know about that.
{/for}
{for=”Usefulness” value=”8″}Usually I would not give a watermarking tool such a high score, but this program has so many extras, it really can be useful in many departments.
{/for}
{/rw_score} –>
{rw_verdict}[tupr]
{/rw_verdict} –>
Installation went fine. Registration also seems to have gone okay…but no where in the program does it confirm that it is registered, so I can only hold my breath.
The description on GOTD makes this program appear as a watermarking tool. Yes, it is a watermarking tool, but it also has a lot more ‘extras’ that I honestly think make this tool more valuable then just a watermarking tool. Here are the main list of things this program can do:
- Resize image.
- Add image ‘mask’.
- Crop image into predefined shapes.
- Add bevel effect.
- Add shadow effect.
- Add glow effect.
- Add image reflection.
- Add image watermark.
- Add text watermark.
And since this program can do batch processing, you can do all the above to multiple images with just one click of a button. For example, you can load multiple images into then resize all of them to 100×100 at once. Also, you are not limited to only using one of the features mentioned above at a time. You can use all the features all at once if you wish.
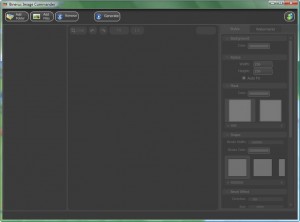
This is what the program looks like:
It is pretty straightforward. You can add images by pressing the ![]() button. This allows you to browse your computer and select images. You can select multiple images, you don’t have to load images one at a time. Alternatively, you can add all the images in a particular folder by pressing the
button. This allows you to browse your computer and select images. You can select multiple images, you don’t have to load images one at a time. Alternatively, you can add all the images in a particular folder by pressing the ![]() button. There is one thing to note when using the “Add Folder” feature. With most programs, all you have to do is browse your computer and select a folder. However, with this program, you can browse your computer, open the folder that you desire to add, and select and add one of the images in that folder. Once you select and add one of the images, all the images in that folder will be added.
button. There is one thing to note when using the “Add Folder” feature. With most programs, all you have to do is browse your computer and select a folder. However, with this program, you can browse your computer, open the folder that you desire to add, and select and add one of the images in that folder. Once you select and add one of the images, all the images in that folder will be added.
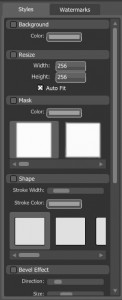
Once you have your images loaded, you can add all the effects, resize, and add watermarks from the right side of the window. One thing to note is that you cannot selectively add one effect to one of the images you loaded and add another effect to another. Any effects, resizes, or watermarks added are added to all the images that are loaded in the program. You can navigate from image to image to see how that particular image would look with that particular change made, but you will not be able to exclude X image from X change. Anyway, as you can see, there are two tabs, “Styles” and “Watermark”. Resizing and effects will be found under “Styles”, which is selected by default, and watermarks will, obviously, be found under “Watermark”. To activane an effect, including resize, just check the little black box you see next to the name of each effect. For example, if you wanted to resize your images, you would first have to check the box that I have boxed in red in the following screenshot:
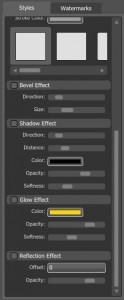
Then after you check the box you can go about changing the settings and making the effect how you want it to look. The following screenshots show you what kind of ‘settings’ you have with each effect:
Everything is pretty self explanatory, in my opinion, except for the following:
- You see “auto fit” checked in the above screen shot. That is done by default. That ‘auto fit’ refers to how the image is displayed on your screen. It is ‘auto fit’ to fit inside the designated space in the program window.
- The “offset” for reflection effect works in an odd way. To change the offset value, you can click on the box and type in a value. However, you can also click + drag left and right on the box to change the value. There is no bar there, which is what makes it odd. Also, the offset it self is pretty odd. The values go from 0-180, but 0 is when the reflection is directly under the image, while 180 is when the reflection is almost 8/10 overlapped by the image. I did not quite understand why is that.
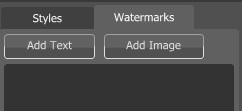
Then there is the watermarks. Click on the ‘watermark’ tab to get to the where you can add watermarks. Claiming to be mainly a watermarking program, I would have expected the watermark tab to be selected by default and not the styles tab, but it was not. Whatever, no big deal. When you click on the Watermarks tab, you will see this:
To add a text watermark, just click “Add Text”. For image, click “Add Image”. You may add as many text and image watermarks as you like. You can also mix and match, meaning you can have both text and image watermarks on the same image.
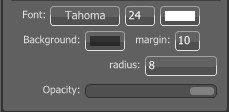
When you click on “Add Text”, a little box, that displays all the ‘settings’ of the text watermark, is added to the scrolling window below those two buttons:
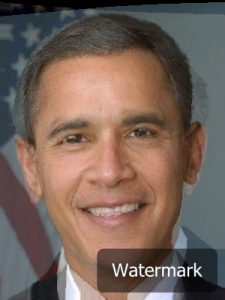
As you can see, there are three tabs under the text settings. The bottom part of that text settings, the part where you set the font, size, color, opacity, etc. never changes no matter what tab you go to. Meaning, those settings you will always have the ability manipulate. However, when at the “Position” tab, you have the ability to chose from 9 predefined positions of where to place the text watermark. Just click on the box desired and the watermark will be placed there. Also, you can offset the watermark from that position that you put it to. The offset works similar to how the reflection offset worked that I mentioned above. So between the predefined positions and the offsets, you can literally fit the watermark in any nook of the image as desired. The following is an image with the default watermark (how the watermark looks by default w/o any changes being made to it) in the bottom right corner:
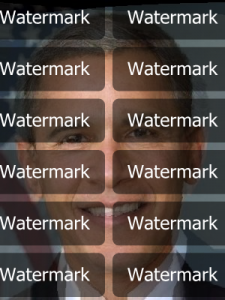
If you go to the “Tile” tab, your watermark will be tiled on your image, horizontally and vertically. Unfortunately there is no way to chose only horizontal or vertical tiling:
The “Horizontal Space” and “Vertical Space” only define how much space, in pixels I assume (no help file, so I can’t know for sure), there is between each watermark tile. Default is ten ten. Here is an image tile watermarked:
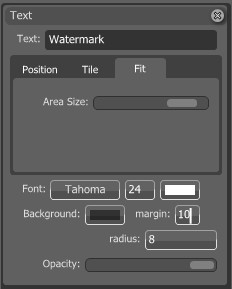
Lastly, there is the “Fit” tab. This is my favorite tab. And the best tab in my opinion. If you go with this tab, the program will automatically resize the watermark to fit the specific size of the image the watermark is being placed on! So if you are batch processing, you can easily add watermarks to all the images without worrying if the watermark is too big, too small, etc.:
The “Area Size” bar you see above allows you to resize the watermark. Whatever size you chose here will be the base size used when the program resizes the watermark for all your other images. Meaning the ratio will be kept the same. The “Area Size” bar is kind of funky tho. IF you drag the bar from the very right to the middle you will see that the watermark gets smaller and smaller and even becomes almost non existant at the very middle. Then as you keep going left, the watermark becomes bigger bug it appears upside down. When the bar is at the very left, the watermark is as big as it was when the bar was on the right, but it is upside down. What is up with that?
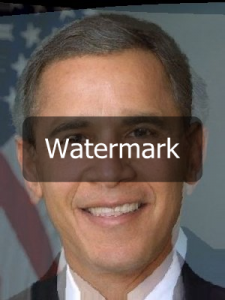
Unfortunately, the only bad part about “Fit” is that you can only place the watermark in the smack dab middle. The following is an image where I “Fit” the watermark. If I had batch processed, all the images would have the watermark in the same relative location and relative size:
Now to change the actual look of the watermark, you gotta mess with the settings that you see at the bottom of each tab:
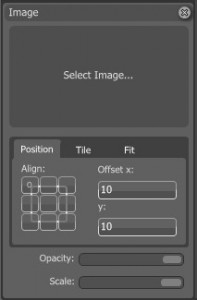
In addition to text watermark, as I mentioned above, if you hit “Add Image”, a similar image watermark settings box will appear:
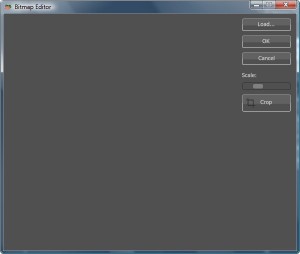
Just click on “Select Image” and you will see this window:
Load your image. Crop it if you like. Scale it if you like. Note that the scale here is different then the scale you saw in the above screenshot because whatever you scale the image to here is the base that the other scale will be based off of.
The rest of “Position”, “Tile” and “Fit” work the same way as the text watermark. The only thing to note is that the “Scale” bar does not work when you are using “Fit” because the “Area Size” bar takes over the job.
As I mentioned above, you can add as many image and text watermarks as you like. Just click “Add Text” or “Add Image” for every text/image watermark you want. Every time a new text/image watermark is added, a text/image settings box will appear for it. Just dont get overzealous because with this program if you hit “X” on any of the text or image watermark setting boxes, the whole program closes. So in essence you can’t remove a watermark once you add it without having to start all over. The biggest drawback with this program in my opinion. The other draw back, you may have noticed, is that you can’t rotate any of the watermarks to place them at an angle.
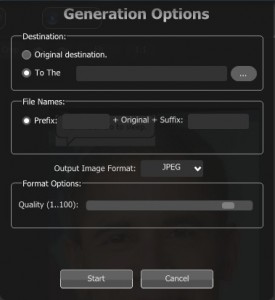
Okay so after you are done adding all the effects and watermarks, hit the ![]() button. A window will drop down from the top from which you can set the location of where you want to save your images, what you want to name your names, and the output format (.jpg, .png, .bmp or .gif):
button. A window will drop down from the top from which you can set the location of where you want to save your images, what you want to name your names, and the output format (.jpg, .png, .bmp or .gif):
Whatever you type in the prefix box will be added before the original file name, and whatever you put in the suffix box will be added after the original file name for ALL the images you are processing. For example, I have two images who’s original file names are one and two. If I put yes in the prefix box and no in the suffix box and leave the output at jpeg, when I hit “Start”, the file names for the files will be yesoneno.jpg and yestwono.jpg respectivelty. Unfortunately there are no macros or wildcards (least none that I have found) to make the images number themselves automatically. When you are ready, just hit “Start” and the program will start processing your images. Remember the effects and watermarks will be added to ALL the images you have loaded in the program at the time. The program processess the images very quickly.
Now I would like to talk about the resource usage of this program. Just sitting idle, the resource use, in terms of RAM, is pretty high: ~18MB. However, when I have a lot of images loaded into this program, the resource use is fairly low compared to how other programs scale a lot when you load many images in there. For example, I had my whole screenshots folder images loaded into the program (100+ images) and the program was only useing ~33MB of RAM! Very impressive. One thing to note that while the program does process images quickly, I saw it use upto 50% of my CPU while doing so. And I have dual core.
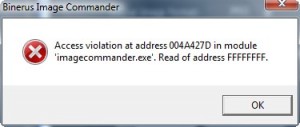
Lastly, when at the generate image window, if I clicked on the “…” button to browse, then hit “cancel” at the browse window, I get this error every time:
This error does not seem to do anything because the program works fine before and after this error, no crashes or anything and I am still able to chose my image output location. But this is something the developer should look into.
Overall, while this program needs finishing touches, and there are still a few things to work out, like the whole program closing if you X out a watermark, this program definitely deserves a thumbs up. This is one of the first programs I have used that can resize watermarks to fit image size and it does it well and quickly. Highly recommended.
As a quick list on what the developer needs to work on/add:
- Add a help section.
- Try to make RAM usage less while idle.
- Allow rotation of watermarks.
- Fix the error window I show above.
- Allow watermarks to be placed in more then just the middle when “Fitting”.
- Prompt user before overwriting images.
- Allow user to save watermark settings.
- Add some sort of predefined naming system.
- Allow the user to click + drag and to custom position the watermark.
{rw_freea}
PhotoWham puts an end to the repetitive tasks required to resize, rename, and watermark your digital photos and image files. Set your preferences once, and then simply drag and drop batches of photos to the form or even the icon to batch process your images. Or if you prefer to process entire folders, choose a folder and sit back and watch.
Features: Resize by entering a maximum size for the long edge of the photo, rename by prepending or appending text, send output images to a specified directory or subdirectory, add a watermark to the images – this can be any text, including a copyright symbol, adjust JPEG quality for smaller file sizes.
-Download.com
—-
PhotoWham makes it really easy and quick to add a text watermark to the bottom left of your picture.
PicMarkr lets you to add custom watermark (image or text) to your images online and free.
It is useful when you need to protect your copyrights or if you want to add comments
to your photos.-Developer
Picture Shark allows you to add image watermarks to multiple images easily and quickly. It is old, but it still works!
Your local image editor
You can use any image editor such as Photoshop, or free ones such as Paint.net or GIMP to add watermarks. IrfanView will also work for this task. However, programs like uMark make it a lot easier, especially for multiple images, but you have a lot more control if you use an image editor.
{/rw_freea} –>
{rw_verdict2}
Simple, effective, and easy to use, Image Commander is recommended. Not only can you add watermarks with this program to multiple images very easily, but this program can double as a batch image resizer or image format converter also. Not to mention the other extra effects you can add onto images. Yes the developer needs to put finishing touches onto this program and fix a few things that I mentioned above, but they are not such big cons that one can’t deal with them. In my opinion, this program is definitely worth it, especially for those who need to add watermarks to many images at once (this program is the only program I have used so far that resizes the watermark to fit all the images properly that you are batch processing). Thumbs up, despite all the cons. Expect to see all my screenshots watermarked by tomorrow =).
{/rw_verdict2} –>
[/rssless]

 Email article
