{rw_text}Giveaway of the day for August 14, 2009 is:
Version reviewed:
v2.9
System Requirements:
Windows NT4/2000/XP, 2003 or Vista (x32)
Software description as per GOTD:
Batch Picture Resizer is a new easy and user-friendly resize pictures and watermarking tool. It helps you to resize large groups of pictures in one go for the purpose of sending via email, publishing on the web or just to save space on your hard drive.Batch Picture Resizer works with the major image formats (including JPG, BMP, RAW, TIFF, GIF, PNG, PCX, TGA etc). It can resize pictures with high quality, and flip, mirror or rotate them without losing quality (lossless rotation). The picture resizer offers users a one-click function to optimize color levels or convert pictures to grayscale, while text or image watermarks can be added to protect images.
Ashraf’s Note:
***WARNING***
Avira detected malware in the BatchPictureResizer.zip. Avira did not detect any malware in the trial version I used to write my review so my suspicion is that Avira is raising a red flag about the new Software Informer client (it is optional to install – you can decline) bundled in with GOTD from now on. Many third party toolbar/client things are often detected as malware. This is most likely a false positive but thought I should give you a heads up. You can read more about the Software Informer client being bundled with GOTD from now on at the GOTD blog.
————————-{/rw_text} –>
{rw_good}
- Allows for batch resizing, renaming, rotating, and adding of watermarks (text, image, or both).
- Support all major image formats (+ more) as input.
- Allows you to output as all major image formats.
- Has a “keep original format” output option.
- You can resize by pixel or percentage.
- Give you the ability to change some image settings such interpolation, DPI, etc.
- Not too heavy on computer resources.
- Not too slow in processing images.
- Fairly good output quality.
- Can be used as an adhoc image converter.
{/rw_good} –>
{rw_bad}
- Watermark previews is a little buggy.
- The interface could have been more aesthetically pleasing.
- The renaming files feature does not allow for totally changing the whole name.
- Output format is set to JPG by default.
- You can only add one text and one image watermark – not multiple of each.
- Watermark is not resized according to image.
- Transperancy for text watermark not working.
- The Help file can be improved upon.
- What a generic name… use some creativity please!
{/rw_bad} –>
{rw_score}
{for=”Ease of Use” value=”8″}Fairly easy to use. The interface seems overwhelming and cluttered at first but once you get used to it there is no problem. Also a little bit of technical image knowledge is needed to take advantage of the full features.
{/for}
{for=”Performance” value=”8″}Not too resource intense, fairly fast, output quality is good. However it is a little quirky at times and the transparency for text watermarks does not work.
{/for}
{for=”Usefulness” value=”9″}Supporting many image input/output formats, allowing for renaming, and allowing to add watermarks I can see this program being fairly useful to many people.
{/for}
{for=”Arbitrary Equalizer” value=”7″}This category reflects an arbitrary number that does not specifically stand for anything. Rather this number is used to reflect my overall rating/verdict of the program in which I considered all the features and free alternatives.
{/for}
{/rw_score} –>
{rw_verdict}[tup]
{/rw_verdict} –>
Batch Picture Resizer is a program that not only allows you to resize images (as the very generic name suggests) but also allows you to add watermarks, rename, and rotate your images. You can even use it as a adhoc image format converter if your please. All this can be done in batch mode.
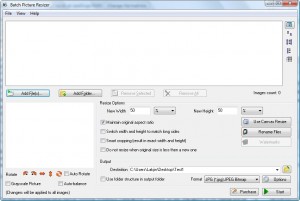
This is what Batch Picture Resizer looks like:
As generic as the name is, the interface is just as un-aesthetically pleasing. Also, with many of the options/features presented right on the main screen, one can be a little overwhelmed by the interface at first. However after you get used to it you will appreciate the get-the-job-done-ness of the interface.
You can use Batch Picture Resizer for a single image file or many image files. You choose to individually add image files to the program (via the “Add File(s)” button) or you can had whole folders (via the “Add Folder” button). As the name suggests, you may select multiple images to add at once with the “Add File(s)” button.
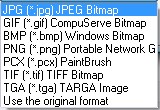
Batch Picture Resizer allows you to input all of the following image formats…
…and allows you to output as all of the following image formats:
As you can see the all major image formats are support for both the input and output. One thing I would like to point out is the “Use the original format” option for outputs. I find that many image converter/resizer/etc. program do not have this option. It is great that this program does. I say this because sometimes when you want to batch process many images, not all images may be the same format. When you batch process different format images you may not want to convert all of them to the same format; rather you want them to retain their original format and just resize (for example). However the one annoying thing is that JPG is the set to be the default output format everytime so if you want either of the options you will have to change it every time. I would have preferred for “Use the original format” to be the default options – it makes more sense in my mind.
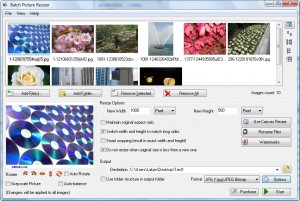
Once you have added your images they will appear at the top:
By default they will show in as thumbnails but you can change them to show as large icons, small icons, list, or details views. You can this via the “View” drop down menu or the buttons near the top:
After your images have been added you are allowed to either resize by percent or by pixels. You may also do a mix of percentage and pixel resize (not sure why anyone would want to however). To help with resizing, you have some options:
- “Maintain original aspect ratio” – allows you to set the width and the height is automatically determined according to the aspect ratio. Note that even when you have this select you can manually select the height but when you process your images, the value you entered for height will be ignored. According to the help file this is supposed to allow you to also set the height and have the width automatically determined but I was unable to do that.
- “Switch width and height to match long sides” – I was not really sure what this feature does so I looked it up in the Help file. To be honest the Help file did not help me understand what this feature does at all. It told me “if selected the width and height will depend on image orientation”. Okay try that again… but in English this time! However by my testing I have come to the conclusion that if you have this option select the “width” will be determined to be the longer side of the image while the “height” will be the shorter side.
- “Smart cropping (result in exact width and height)” – this feature only works when you are resizing by pixel. Again I was not very sure what this feature did so I looked it up in the Help file. Again the Help file was of no use. It told me “Check to enable smart image resizing and cropping to selected width and height.” Unfortunately this time I was unable to determine what this means via my testing. If anyone has any input on this please feel free to post below.
- “Do not resize when original size is less then a new one” – this feature is self explanatory and handy if you are trying to resize images many different images and want to make them all a certain width/height but don’t want the smaller ones to be enlarged.
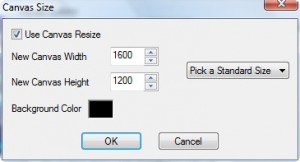
An interesting feature to supplement your image resizing is “Canvas Resize”:
Canvas resize allows you to control the size of the overall image (i.e. the canvas) while still resizing your actual image. In other words lets say you have an original image size of 1000×1000. You can resize that image to 500×500 but still keep the canvas at 1000×1000. This way the overall image size when you view it will be 1000×1000 but the original image will only be 500×500 and the rest of the space will be filled up by the “Background Color”.
In addition to resizing you can do the following to your images:
- Rotate:
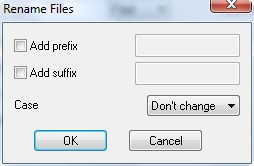
- Rename:
Take note that when renaming, you can add prefix, suffix, and change the case to all caps or all lowercase. What you can’t do is totally rename the file. In order words the original file name will still be intake. For example you can’t change “Cool.jpg” to “New.jpg”. At best you can do “NewCool.jpg”. I find this annoying. Also as far as I can tell there is no way to set any naming scheme with macros.
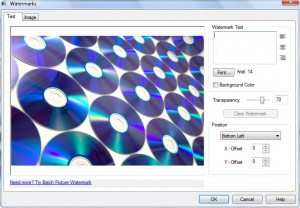
- Add watermark:
You can add a text or image watermark or you add both. However you cannot add more than one text or more than one image watermarks. For image watermarks the same input image formats are supported as mentioned above.
You get to choose where to position the watermark on the image:
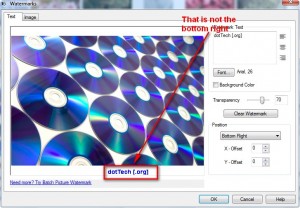
As you create your watermark and choose where to position it you are able to preview it live right there. However there is a small bug in the watermark preview. The live preview does not properly reflect the position of the watermark. For example this is where it shows the watermark for “Bottom Right”:
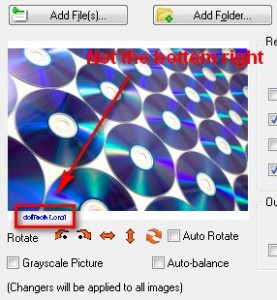
The problem also occurs in the live preview at the main window screen:
The good thing, however, is that when you actually process your image the watermarks are correctly positioned.
Another problem is that the “transparency” for text watermarks does not work. No matter what I change it to the transparency does not change. For image it works though.
Also the last thing you should know about watermarks are that they will not be resized to fit each image. What I mean is lets say you are batch processing multiple different size images. You resize them all to 50% of their original size an add a text watermark. Depending on the size of your images your result may be something like the following:
Notice that the text watermark is perfect for the top (larger) image yet is way too big for the bottom (smaller) image. I processed both image to 50% of original size and added watermark all in one batch. This non-resizing of watermark for each image is a problem with many watermark programs and it is very annoying.
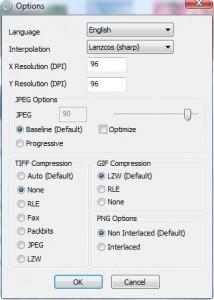
Lastly, before you process your images and after you select your output format and output destination, you can mess around with few image options:
Changing these options is recommended for advanced users only who know what they are doing – not the technically challenged (like me).
The last thing I would like to point out is that in addition to batch resizing, you may use this program as a adhoc batch image format converter, renamer, or watermark adder. All you have to do is set the width/height to 100% when you want to use it as any of the others.
That basically is the whole program in a jiffy (sort a jiffy). As for the performance of this program, it was not very heavy on computer resources and conversion speed was not too slow (not amazingly fast either however). Output quality was always excellent. However one thing to note is that because of this near 1:1 output quality when converting images to different formats the output files may be much larger in file size than the original because of the inherent differences between image formats. For example one of my 200 KB JPGs turned out to be a 1 MB GIF. For that reason alone I would not recommend using this program as a image converter alone – FormatFactory does a much better job at keeping the file size low and good image quality also.
Overall I give this program a thumbs up. Sure it is not the most aesthetically pleasing program and it does have its quirks but it gets the job done and does it pretty well. The only *major* problem is the fact that transparency for text watermark is not working. That needs to be addressed but it is not a deal breaker for me.
This review was conducted on a laptop running Windows Vista Home Premium 32-bit. The specs of the laptop are as follows: 3GB of RAM, a Radeon HD 2600 512MB graphics card, and an Intel T8300 2.4GHz Core 2 Duo processor.
{rw_freea}
FastStone Photo Resizer is an excellent program that basically does everything Batch Picture Resizer does plus adds in a little more options such as adding border, changing colors, and making adjustments. Plus it has a superior renaming tool and transparency for text watermarks work. The only thing major thing FastStone Photo Resizer is missing that Batch Picture Resizer has is the “Use original format” option for output formats.
{/rw_freea} –>
{rw_verdict2}Batch Picture Resizer is a nice for program what it does. It does have its ups and downs (the major down being the text watermark transparency problem) but overall it is worth the download if you need a batch image resizer: thumbs up. Now the question is do I recommend it? Well that depends. As I said the only major thing FastStone Photo Resizer is missing that Batch Picture Resizer has is the “Use original format” output option; otherwise FastSTone Photo Resizer is superior in my eyes. So if you think you will make use of that “Use original format” output option a lot, go download Batch Picture Resizer. If you think you can live without it, stick to FastStone Photo Resizer.
{/rw_verdict2} –>

 Email article
