{rw_text}Giveaway of the day for March 1, 2009 is:
Version Reviewed:
6.24
Software description as per GOTD:
Extra Photo SlideShow allows to create an exciting photo slide show with background music, subtitles and transition effects. Using Extra Photo SlideShow pictures from holidays, wedding or family party can now be grouped to a creative photo sildeshow. Simplified three-step approach enables users of all levels to build any slide shows easily. It is also a good option of viewing, storing and sharing the pictures.
Key features:
- Supports BMP, EMF, GIF, J2K, JPEG, PCX, PNG, RAS, TGA, TIFF, WMF Image Files
- Supports background music, with WMA, MP3, WAV, ADPCM, PCM, GSM, OGG audio files
- Supports extracting audio from video files as background music
- Set subtitile for each photo,you can define theirs location on the screen, font, size, color
- Choose from 142 transitional effects (fade, slide, wipe, etc.) for each individual slide
- Generating RealMedia video file, let you share your pictures on Internet easily
- Generating DivX, XviD video file, with high quality, but small size
- Supports AVI, DivX, Xvid, MPEG, WMV, RealMedia format video files
————————-{/rw_text} –>
{rw_good}
- Works in a straightforward fashion/easy to understand what to do.
- Supports multiple input images formats.
- You can add background sound/music.
- You can choose from many transitional slide effects.
- You can add subtitles to each image.
- Supports multiple input sound formats for background sound.
- Will rip the sound off a video to use for background sound if you tell it to do so.
- You can output into AVI, MPG/MPEG, WMV and RM video formats.
- You can crop background sound files.
{/rw_good} –>
{rw_bad}
- No proper text labels on some program buttons/tabs.
- Cumbersome resize of images.
- During installation it changes the default homepage of Internet Explorer to developer’s website.
- There are no slide effects (I am not talking about transitional slide effects).
- You can’t drag the subtitles around to place them in a certain location.
- No subtitle effects.
- Program crashes or freezes arbitrarily.
- Does not detect any AVI codecs for me.
- Output video is never exactly the size you specify.
- Sometimes the GUI messes up/does not display properly.
- Does not have the ability to output into a Flash format (SWF/FLV).
{/rw_bad} –>
{rw_score}
{for=”Features as Described” value=”8″}This gets an 8 instead of a 10 because I can’t output into AVI video format.
{/for}
{for=”Ease of Use” value=”7″}Lack of drag + drop of subtitles, the ability to resize the program/preview window, and no “timeline” mode earn this a 7.
{/for}
{for=”Performance” value=”8″}Uses up quite a bit of RAM while just sitting idle (~27MB). CPU usage is about ~50% while creates the videos. However the videos are created pretty quickly, which is why this gets an 8
{/for}
{for=”Usefulness” value=”8″}I think many home users would find this program useful.
{/for}
{for=”Arbitrary Equalizer” value=”5″}This category reflects an arbitrary number that does not specifically stand for anything. Rather it represents a number that stands for over all how I “feel” about the program.
{/for}
{/rw_score} –>
{rw_verdict}[tup]
{/rw_verdict} –>
Registration and installation went fine. However, there are two things to note:
- During installation, the program will change your Internet Explorer homepage to the developer’s website. Good thing WinPatrol prompted me about it and I blocked it.
- The button that you must press to open the registration window where you must enter your registration information (that you attain from readme.txt) is not well labeled or obvious. It is located in the bottom right corner of the program:
Extra Photo SlideShow is a program that allows you to create slideshows of your images pretty easily. You can add transition effects and subtitles to your slides. You can add background sound/music. Then you can export your slideshow into 4 different formats (or atleast should be able to export into 4 different formats).
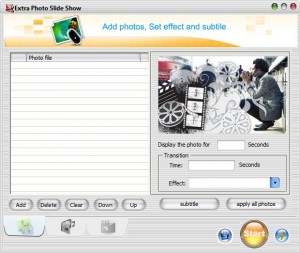
This is what the program looks like:
You may notice that a buttons/tabs at the bottom of the program are unlabeled. The only way to know what a button/tab does is to click on it; after you click on it, you can learn what it is by reading the title. However I decided it may just be easier to explain what they are from the get go insteading of telling you to click on each button/tab to see what it does:
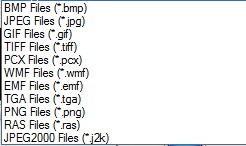
So this program works in a very straightforward fashion. Just click on “Add” in the “Add Images” tab to add the images you want to create the slideshow out of. You will be able to add images of the following formats:
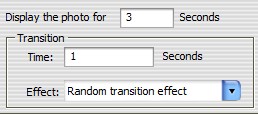
When browsing for images you can select more then one image and add them all into the program at once. After you have added all the images you want, you can choose how long you want an image to appear for, what transition you want the image to use when it appears, and how long that transition lasts:
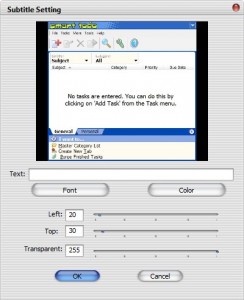
You can also add subtitles to each individual image. Click on the ![]() button. A window will popup where you can enter what you want to appear in the subtitle, change the font settings, and choose where you want the subtitle to appear:
button. A window will popup where you can enter what you want to appear in the subtitle, change the font settings, and choose where you want the subtitle to appear:
As I mentioned in my “The Bad” list, you cannot click + drag the subtitle around to place it any specific location you desire. The only way to move the subtitle is via the “Left” and “Top” values/slider bars options you see in the above screenshot. Once you are done with your subtitle, hit “OK”. Note that there are no effects to add to the subtitle. What happens is that after the image appears (via transition or otherwise) the subtitle then just appears in the location that you set it to – no fancy transitions for the subtitle.
You can set the settings I mentioned above for each individual image. If you would like the same settings to be for all the images hit the ![]() button. This will apply the settings you have set for the current image (display time, transition, transition time AND subtitle) to all the images. After you have set it to apply to all photos you can still go back and edit individual settings for individual images if you want.
button. This will apply the settings you have set for the current image (display time, transition, transition time AND subtitle) to all the images. After you have set it to apply to all photos you can still go back and edit individual settings for individual images if you want.
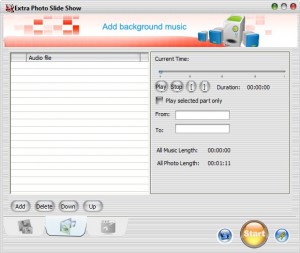
After you have added your images, go to the “Add sound” tab if you would like to add background sound/music to your slideshow:
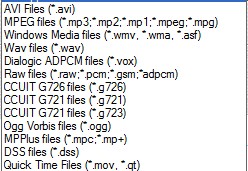
Click on “Add” and find the sounds you want and add them. You will be able to add sounds of the following formats:
You may notice that there are video formats listed in the above screenshot. That is because this program has the ability to rip audio from videos if you choose to add a video the background music list.
After you have added all the sound files you want, you have the ability to crop each individual sound file. So if you loaded a song into the program but don’t want to use the whole song as background music but rather just a portion, you can do so:
It may seem like you can type in specifc times into the “From” and “To” boxes, but you can’t. Those boxes just represent the section of the sound that you have cropped to.
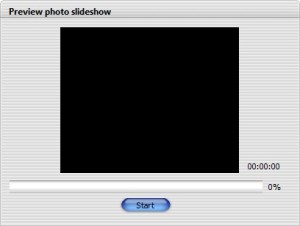
After you have added all your images and sounds, you can preview your whole slideshow if you want by clicking on the preview button which is located in the bottom right corner next to the start button:
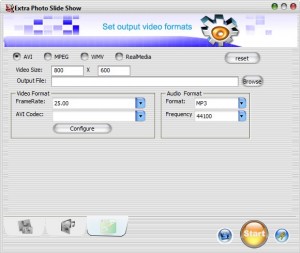
Once satisfied with how your slideshow looks, click on the “Choose output format” to choose how your want your output video to be/look:
As you can see, you can choose from AVI, MPG/MPEG, WMV and RealMedia (RM) output formats. You get to set what size you want your video to be. Concerning video size, there are two things to note:
- I have found that no matter what video size I set, the size of the output video is never exactly the same as what I set. For example, if I set it to 400×500, the output video may be 430×500. Or if I set the output to be 100×100, the output may be 130×80. I am not entirely sure why this happens but it happens.
- If you set the video size to be smaller then the size of some images, those images that are bigger then the video size will be resized to fit properly. However, this resize really messes up the quality of the image to the point that you may just want to consider resizing the image before you use this program because the quality will be a lot better.
Depending on which output format you choose you will have options under “Video Format” and “Audio Format” that you can choose from:
AVI
MPEG
WMV
RealMedia(RM)
You may notice that for the AVI screenshot, there is nothing under “AVI Codec”. That is because Photo Slideshow did not detect any AVI codecs for me. I know for sure I have AVI codecs, especially DivX, on my computer but for some reason Photo Slideshow just does not detect them. This makes it so I can’t output into AVI format.
Lastly, be sure to set your output file name and choose where you want to put the output file. You can do this by click on the ![]() button.
button.
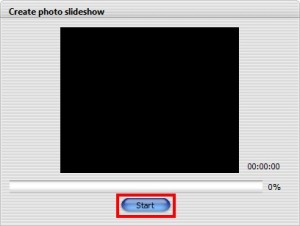
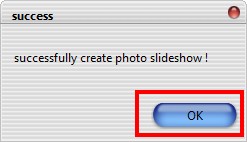
When all is set and done and you are ready to create your slideshow, click on the “Start” button which is located in the bottom right of the program. A window will then popup; you will have to hit the “Start” button on that window also. The creation of the slideshow will then begin. It does not take too long (not too short either however) to create a slideshow so you should not be waiting too long. After the slideshow is done, a window will popup informing you that it is done. You can then browse to it on your computer and view it:
That is it. The program is pretty simple. Overall, I give this program a thumbs up because it works. However it is a reluctant thumbs up because:
- The resize of images (when the image size is bigger then video size) is really cumbersome and lowers the quality.
- The program crashes/freezes on my arbitrarly. Not sure why it happens, but it happens mostly if I try to create a slideshow after I have already created one.
- Sometimes the GUI of the program is cut off/messed up. A simple restart solves this though.
- Can’t output into AVI.
- The program just “feels” wrong, if you get what I mean.
Additionally, there are a few features I would like to see added to this program:
- Slide effects. Not transition effects, but rather effects you can add to specific images, just zooming in on one corner. Much like how you can in Windows Movie Maker.
- Subtitle effects (like making the subtitles zoom in or something).
- Ability to drag the subtitle and place it where you want.
- Ability to export into a Flash format (SWF/FLV).
{rw_freea}
Windows Movie Maker
You can create slideshows with WMM – just place images in place of video clips. You can add transitional effects and slide effects.
FastStone Image Viewer is an excellent program that does many things including allowing you to create slideshows. However, the slideshows created by FastStone are not in movie format but rather EXE format.
Photo Story 3 is a 4 year old software by Microsoft that works on XP and Vista. Photo Story 3 is far superior to Photo Slideshow in every way except for one: you can only output as WMV videos. No problem though – use FormatFactory to convert to any other format shall you wish.
{/rw_freea} –>
{rw_verdict2}As I mentioned above, I give Photo SlideShow a thumbs up because it works; however it is a reluctant thumbs up because this program “just feels wrong” if you get what I mean. Plus the program has more then its fair share of problems but nothing enough to justify a thumbs down in my opinion. That being said my recommendation for today is Photo Story 3. PS3 is far superior to SlideShow in every way except one: you can only output as WMV videos. No problem though; as I stated above, use our trusty and beloved FormatFactory to convert to other formats if you wish.
{/rw_verdict2} –>

 Email article

