{rw_text}Software reviewed in this article:
Version reviewed:
v5.21 Build 233
Supported OS:
Windows 98/Me/NT/2000/XP/XP-x64/2003/Vista/Vista-x64/2008 Server/Windows7/Windows7-x64
Price:
$19.95 (USD) but you can get it for free for a limited time at Giveawayoftheday.com!
Software description as per the developer:
Clean your disk with Wise Disk Cleaner and your computer will run faster. You won’t have to worry about filling up your hard drive or replacing it with a newer, bigger one.
Wise Disk Cleaner is user friendly, fast and easy to use. It will free up disk space by deleting junk files that are no longer used by software programs on your system. Even the least experienced user can easily remove junk files with this tool.
————————-{/rw_text} –>
{rw_good}
- Straightforward and easy to use.
- Users have the ability to choose what types of files you want to find via “Disk Cleaner”.
- Users can choose to delete, perma delete, or compress and move files found via “Disk Cleaner”.
- Users are allowed to scan whole partitions or select folders for junk files.
- Users can specify “Disk Cleaner” to search for junk files with special attributes.
- Has the ability to recover deleted files via “Disk Recover”.
- Users can permanently delete deleted files with “Disk Scrub”.
- Users can defrag their hard drives with “Disk Defrag”.
- Has a portable version.
{/rw_good} –>
{rw_bad}
- “Disk Defrag” does the scanning, analyzing, and defragging all in one step – does not allow the users to decide if defragmentation is needed after the scanning and analyzing.
- “Disk Defrag” can only do one partition at a time.
- Program does not specify what algorithm is being used to securely delete files/scrub hard drive.
- “Disk Recover” has option to only show deleted files but shows all existing folders, regardless of if a deleted files was found in them or not.
{/rw_bad} –>
{rw_score}
{for=”Ease of Use” value=”8″}Very easy to use although a little bit of knowledge if required so you don’t accidentally delete important files thinking they are junk. The only real problems with easiness to use are that the disk defrag can only do one partition at at time and it doesn’t allow users to analyze then decide to defrag or not, what algorithm used for secure deletion is not specified, and the “Disk Recover” shows all existing folders on the computer regardless of if they have any deleted files in them or not.
{/for}
{for=”Performance” value=”10″}Performs well for what it does.
{/for}
{for=”Usefulness” value=”7″}With multiple different features, I can see some people finding this program useful.
{/for}
{for=”Price” value=”7″}Having more than just junk file cleaning feature, I $19.95 is a fair price to ask especially if you consider the fact that there is also a free version of Wise Disk Cleaner.
{/for}
{for=”Arbitrary Equalizer” value=”7″}This category reflects an arbitrary number that does not specifically stand for anything. Rather this number is used to reflect my overall rating/verdict of the program in which I considered all the features and free alternatives.
{/for}
{/rw_score} –>
{rw_verdict}[tup]
{/rw_verdict} –>
Wise Disk Cleaner Professional is a program that is aims to help you maintain your computer by deleting junk files. As an added bonus, it comes with a handful of extra features that help you recover deleted files, defrag, and permanently delete deleted files.
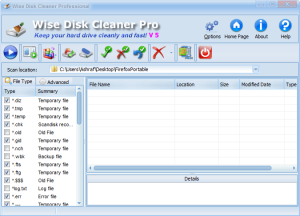
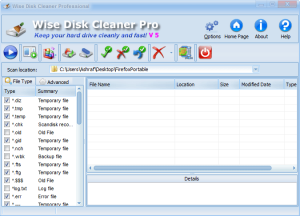
This is what the main program window of Wise Disk Cleaner Pro looks like:
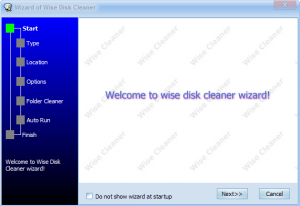
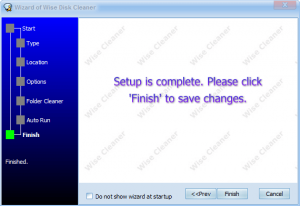
However, when you run WDCP (Wise Disk Cleaner Pro) before you are given access to the main program window, the “Wizard of Wise Disk Cleaner” pops up (you can always “Cancel” the wizard to gain access to the main program window directly):
NOTE: Realize that any settings you set via this wizard will be treated as the default settings when you run the scanner via the main program window.
This wizard guides you throw the disk cleaning features of WDCP, allowing you to set the settings for a scan to occur (such as what file types to look for, where to search, how to delete files, etc.) in a step by step fashion:
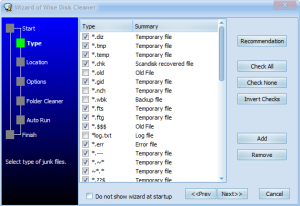
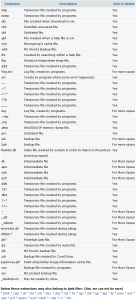
The file types you select will be the junk files WDCP looks for when you run the “Disk Cleaner”. “Disk Cleaner” mostly deals with “temporary” files, but there are other file formats that are supported if need be. Generally speaking it is usually safe (meaning your computer won’t crash burn and die) to remove all kinds of “temporary” files. The other files can usually also be removed without killing your computer, but you may lose functionality of certain features, i.e. if you delete a backup file you will not be able to restore certain backups. There is a list of recommended file types to search for (click the “Recommendation” button) and here is some info from the developer of WDCP on safe removals:
(Click on the image to view the information in full.)
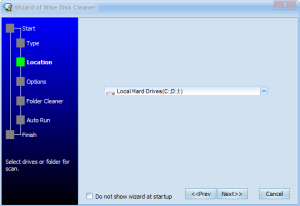
From the “Location” step you have the ability to select the location that will be selected by “Disk Cleaner”. Note that you can set the program to search your whole hard drive, specific partitions, or individual folders.
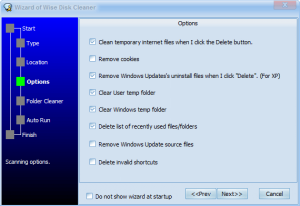
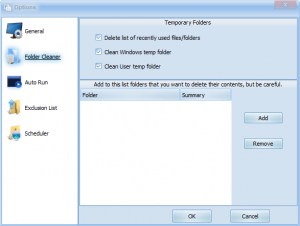
These are just some self-explanatory options you can turn on/off. Do note that the cookies that will be removed are Internet Explorer or IE-fork browser cookies only.
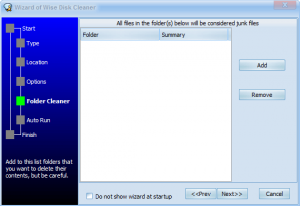
From the “Folder Cleaner” screen you can specify certain folders on your computer to be treated as “junk” folders, i.e. all the files in these folders will be detected by “Disk Cleaner” as junk and you will be prompted to delete them.
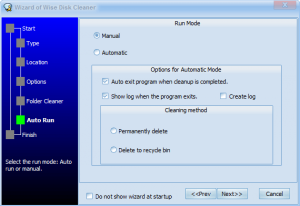
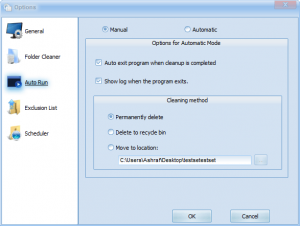
The settings at this window are critical so pay attention =P. If you select “Automatic” then “Disk Cleaner” will be automatically run and all the files found by “Disk Cleaner” will be automatically deleted! I highly suggest you do not set it to “Automatic” because regardless of how good (or bad) a program may be you always want to take a quick glance at all the files the program wants to delete before you delete them.
“Cleaning Method” gives you the ability to choose what happens once the “deletion” process starts (on “Manual” you must hit the “Delete” button but on “Automatic” this will happen automatically). As you can see, you can either set the files to be perma-deleted or sent to the recycle bin. If you decide to go the manual route, you will also have the option to move and compress the files and store them in .ZIP format instead of deleting them. (This feature is actually what I call the “adhoc” backup feature; it is not a “real” backup feature but it can be used as one, i.e. you can compress and restore files in .ZIP that can be restored in the future). However note that if you select “permanently delete” there is no backup created so once you delete a file, it is gone. Same thing with deleting to the recycle bin: there is no backup created before the file is sent to recycle bin so once you delete it from recycle bin, the file is gone. Since this program is a junk file cleaner, backup of files is not critical because junk files aren’t critical (unless of course you accidentally mistake a critical file for a junk file) so don’t worry about the lack of a backup.
When the wizard has finished you may want to consider checking “Do not show wizard at startup” because the wizard will appear every time you run WDCP and it gets very annoying in my opinion.
If you mess up during the settings (i.e. select the wrong settings) or want to change the settings later on, you can always re-run the wizard or manually change the settings from the main program window, so don’t fret.
As already mentioned, once you get past the wizard, you will see the main program window:
At this main program window, if you opted for the “Automatic” option earlier the scan and cleaning process will occur. If you selected the “Manual” option, you will need to run the scan manually.
The interface of WDCP is pretty clean and easy to navigate. As I mentioned above, there are more than just junk cleaning capabilities of WDCP. However, the “Disk Cleaner” is the main feature and the one that the most screen real estate is devoted to.
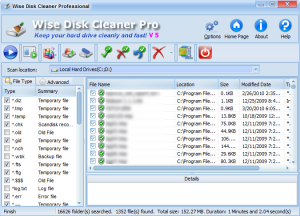
After you run a scan (the play button – first one from the left on the button bar – starts a scan) and the scan has finished (scans do not take very long at all), all the junk files that were found will be displayed for you:
Each found file will either have a green shield with a check mark by it, or an orange shield with an exclamation mark by it. These two signs are designed to caution the user about the file. The green shield means “go ahead, you can safely delete this file” while the orange shield means “verify this file can be safely deleted”. In actuality, these two signs are simplistic because they don’t depend on the individual file/file content but rather on the file type/extension. For example, all .log files will get the orange shield while all .tmp files will get the green shield; so don’t worry too much about these signs.
If you click on each file, minimal information about the file will be displayed for you under “Details” (located at the bottom of the window as you as can above). By default all the files will be checked and made ready to be removed. However you can either manually uncheck certain files that you don’t want to remove or you can uncheck them all by clicking on “Check None” button (red x with a green dot with a checkmark) located at the top. You can also check/recheck all of the files by clicking on the “Check all items” button (green checkmark with a green dot with a checkmark) located at the top. There is also an “Invert Checks” button (blue arrow with a green dot with a checkmark) reserves the current state of the checkboxes. In other words, if a checkbox is checked then the checkbox will be unchecked and vice versa.
Once you are ready to remove the selected files, hit the “Delete junk files” button (red x). Whatever you had set the “Cleaning Method” to during the wizard is what will be followed once you hit that button, i.e. if the “Cleaning Method” was “Delete To Recycle Bin”, all the selected files will be sent to recycle bin. Or, if you would like to do something to the selected files other then what you set the “Cleaning Method” to earlier, click on the little arrow next the button; this will show you a drop down menu where you can select specifically what you want to do with the selected files:
As mentioned earlier “Move To Folder” compresses files into a .ZIP (which, by the way, you cannot manually unzip – you have to use the restore function from within WDCP; you can access the restore feature via the second to last button on the button bar at the top – the one that looks like a WinZip icon) and moves them to a location you specify. When you first use the “Move To Folder” function you will be asked for a location. The location you set will be treated as the default location from then on and you must go to “Options” if you want to change it. Also take note that the method of secure delete is not specified; we don’t know what algorithm is being used nor can we change it.
You can monitor the progress of deleting or moving the files via a progress bar at the very bottom of the main program window; however you won’t do much monitoring because the whole process doesn’t take very long. When all is set and done it should say “Finish” and it should tell you what was finished.
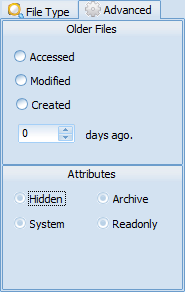
One cool feature for “Disk Cleaner” is the ability to specify special criteria when searching for junk files; in other words you can narrow down the search results by specifying special attributes that files must have in order to be displayed in the scan results:
Aside from the “Disk Cleaner”, Wise Disk Cleaner Professional has three other tools users can use:
- “Disk Defrag”
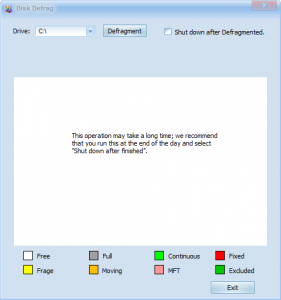
The “Disk Defrag” is a feature that allows users to defragment their hard drive. You are allowed to defrag one partition at a time. Do note, however, that the scanning, analyzing and actual defragging all occur after you hit the “Defragment” button – there is no intermediary step that allows you to view the results before deciding if you want to defrag or not.
Users can access the “Disk Recover” via the third button from the left on the button bar at the top:
- “Disk Recover”
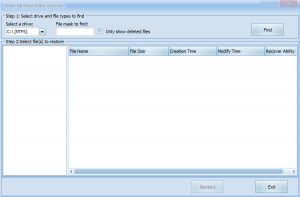
This feature allows users to recover recently deleted files (from NTFS drives only). I say recently deleted files because this is not a full-blown file recovery feature but rather a simple read-the-MFT feature.
Users can access the “Disk Recover” via the fourth button from the left on the button bar at the top:
The one potentially annoying thing to note about “Disk Recover” is that while it does have a feature to only show deleted files in the scan results, it shows all existing folders – regardless of if they have deleted files or not. So in reality you may find yourself going from folder to folder even though there is nothing to be found.
- “Disk Scrubber”
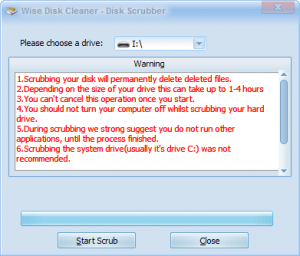
“Disk Scrubber” allows users to permanently delete already deleted files on your hard drive (individual partitions at a time).
As you can see in the above screenshot, there are 7 things written in red. You should read them (be sure to scroll down to read all of them).
As mentioned earlier, the method of secure delete is not specified; we don’t know what algorithm is being used nor can we change it.
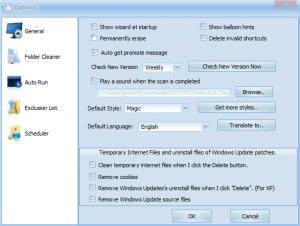
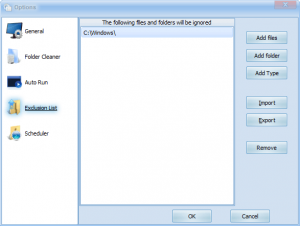
Last but not least, here are the “Options” you are allowed to tweak and mess around with:
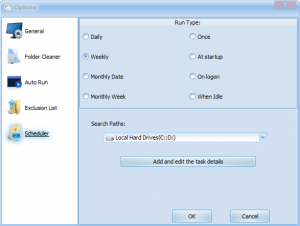
Note that the “Scheduler” just uses Windows Task Manager so after you hit the “Add and edit the task details” you can specify in more detail the time for the task to run.
This review was conducted on a laptop running Windows 7 Professional 32-bit. The specs of the laptop are as follows: 3GB of RAM, a Radeon HD 2600 512MB graphics card, and an Intel T8300 2.4GHz Core 2 Duo processor.
{rw_freea}
The following programs all include tools that will allow you to remove junk files from your computer, perma delete files and recover deleted files:
WinUtilities Professional Edition
jv16 PowerTools 2009
TuneUp Utilities 2008
Ashampoo WinOptimizer 2010 Advanced
Glary Utilities
The following programs have some sort of junk file cleaners with perma delete. However they do not have the ability to recover deleted files:
{rw_verdict2}Last year when I reviewed Wise Disk Cleaner Professional (v4) I was very disappointed because it was filled with bugs. However, over the year the developer has greatly improved his/her game; in fact I can’t find any bugs that were present in v4. I give Wise Disk Cleaner Professional a thumbs up! As for my recommendation: If you like it, sure go ahead and grab Wise Disk Cleaner Professional. However personally, while I don’t really care for junk file cleaners, I still prefer CCleaner for my computer maintenance needs.
{/rw_verdict2} –>

 Email article
