Lets pretend you are chatting away with a friend on Windows Live Messenger (or Skype, or Yahoo Messenger, or [insert messenger here]) and he or she asks you for assistance in installing Firefox. Yes, I know even a baby can install Firefox but your friend is very computer-illiterate. Because you want to be a good friend and you know your friend is a good visual learner, you offer to show instead of tell. So, at this point your options are:
- Create a screencast using any of the five tools already mentioned on dotTech or use BB FlashBack Express and show it to your friend.
- Use a VPN like Logmein and virtually take control of your friends to do the actual installation yourself.
- Stream your desktop live via the webcam feature of Windows Live Messenger (or whatever messenger you are using) and demonstrate to your friend how to install Firefox so he/she can install it on his/her own computer.
Everyone pretty much knows how to do the first option; the second option, although not as well known, is also popular. However, not very many people know how to go the third path. That is where VH Screen Capture Driver comes in.
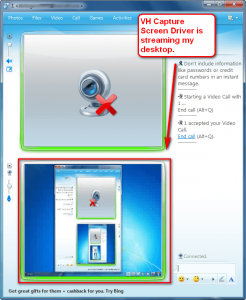
VH Screen Capture Driver is what you can call a “virtual camera”. Once installed, it acts just like a normal webcam would on your computer. However, the difference is instead of showing you, it shows your desktop:
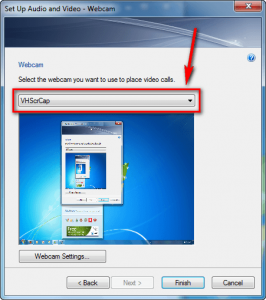
How to use VH Screen Capture Driver is simple. All you have to do is set VH Screen Capture Driver as the “webcam” to use whenever you use the webcam feature on whichever messenger or software you are working with. For example, for Windows Live Messenger I had to go to “Tools” -> “Audio and video setup…” -> “Next” and select “VHSrcCap” as the webcam:
Now whenever I use the webcam/video feature of Windows Live Messenger, VH Screen Capture Driver is used instead of my normal webcam and my desktop is streamed instead of me.
If you prefer to only stream only a specific window or a portion of your desktop instead of your whole desktop, VHScrCap allows for that also. You can do it in two ways:
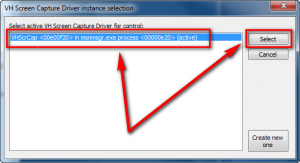
- After you start your streaming, run VHScrCapDlg.exe (will be located C:/Program Files/HmelyoffLabs/VHScrCap by default) and select the stream you have open:
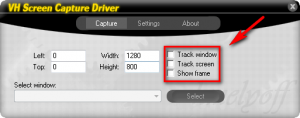
After that, simply go to “Capture” and set the window or region you want to stream:
“Track window” allows you to specify a specific window to stream. “Track screen” allows you to specify a specific region or your whole screen to stream.
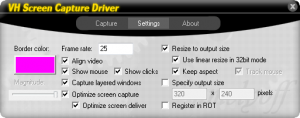
You may also edit any “Settings”:
When you are happy with what captured area and your settings, simply hit “X” and close out the window. Your desktop stream should be changed accordingly.
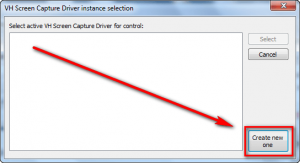
- Before you start your stream run VHScrCapDlg.exe (will be located C:/Program Files/HmelyoffLabs/VHScrCap by default) and select “Create new one”:
After that, go to “Capture” and “Settings” and make the required changes just like I mentioned above:
When you are happy with what captured area and your settings, simply hit “X” and close out the window. Now go start your webcam streaming (i.e. if you are using Windows Live Messenger start the video chat). The settings that you changed will be reflected in the new stream that you create.
My recommendation would be to use the latter method (set it up before you start the stream) because I noticed if you change any capture area after you start your stream, your stream is liable to mess up or crash.
So, pretty cool, huh? What makes VH Screen Capture Driver even better is:
- You don’t need an actual, real webcam to use it. Since VHScrCap is a “virtual camera”, as far as the computer knows you are installing and using a real webcam.
- VHScrCap will work with any software/messenger/platform that allows you to select the source for your webcam stream, including but not limited to Skype, Windows Live Messenger, Digsby, and Yahoo Messenger. Just search around, go to options, settings, etc. and find out how to change the source for the webcam stream; once you find it change it to “VHScrCap”.
Additionally, VH Screen Capture Driver actually does not come as a “standalone” download. It comes with the (free) Hmelyoff general video tools package. This package includes other tools:
- VHPlayer – VHPlayer is a video and audio player
- VHCapture – VHCapture is a video recording/screen reordering tool.
- VHMultiCam – VHMultiCam is a tool that allows users to “mix, synchronize, split, and share any media or screen content”. It also allows uses to set it so their webcam – including VHScrCap – can be used at the same time with multiple programs (usually by default you can only use your webcam with one program at a time).
The one thing to note about VHMultiCam is by default it is set so the VHMultiCam main program window open every time you run a program that supports webcams. This can get annoying really quickly, especially if you don’t want to use the multi cam feature. So to turn this off, simply go to “Tools” and check “Disable auto start (STOP OPEN annoying mixer)” from the VHMultiCam main program window.
You may download VH Screen Capture Driver, and all the other tools that come with it, from the following link:
Version reviewed: v2.2.6.3
Supported OS: Winodws 98 or later

 Email article
